CHYC-03A
Importing/Exporting Settings Data of This Machine (Remote UI)
This section describes how to use the Remote UI to save (export) data such as Address Book destinations and settings to a computer and how to import exported data to this machine using the Remote UI.
IMPORTANT
Designate an administrator to manage operations.
Data should be imported and exported by an administrator with Administrator privileges. Importing data overwrites information such as the Address Book, user settings, and network settings. Depending on the function used, importing may not be performed correctly and could cause operational faults, so caution should be exercised.
Do not turn off this machine until importing or exporting is completed.
Processing may take several minutes to complete. Turning off the machine during the process risks data loss or corruption and malfunction.
Do not import or export in different display languages.
If the display language of the export source and import destination do not match, the settings may have corrupt characters, and the machine may not operate properly.
NOTE
Importing to Canon multifunction printers other than this machine
Note that some settings cannot be imported.
If the security policy settings are password-protected
Security policy settings can only be imported if the password for the security policy settings is the same for both the export source and the import destination or if no password is set for the import destination. If no password is set for the import destination, the password set for the export source is also set for the import destination.
Batch Importing/Exporting Settings
Batch exporting of settings data to a computer lets you import the settings from an older machine to a newly installed machine, for example. If you are using multiple Canon multifunction printers*, you can use this to copy settings from one machine to another, saving you the time and trouble of configuring the same settings multiple times. For this task, log in to the Remote UI with Administrator privileges.
* Only applies to imageRUNNER ADVANCE series multifunction printers or models that support batch import/export.
IMPORTANT
You can export personal settings information and user group address lists if the following conditions are met:
Preparations have been made to export user data by synchronizing the custom settings (server), and 15 minutes have elapsed since the user data was prepared for export.
The connection destination for both server and client machines is localhost:8443.
You cannot import personal settings information and user group address lists.
Batch Exporting Settings
1
Open the Remote UI and log in as an administrator.Opening the Remote UI
2
On the portal page, click [Settings/Registration].
3
Click [Data Management]  [Export].
4
Select the [Select All] check box.
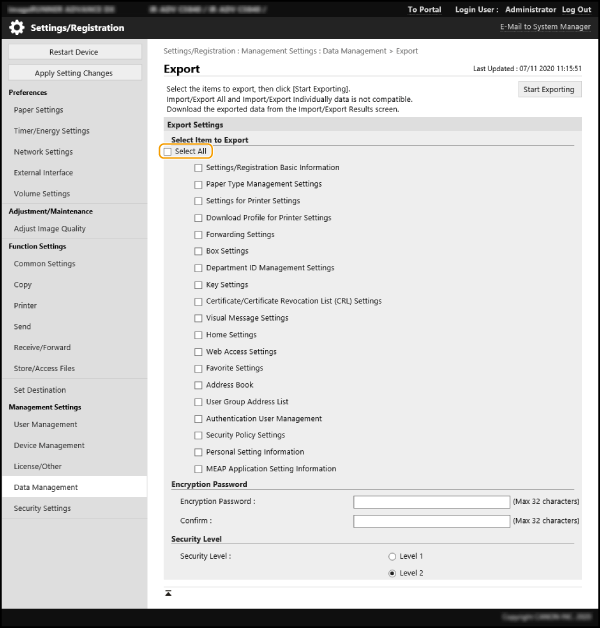
NOTE
You can also export specific settings individually.
5
Enter the [Encryption Password], select the [Security Level], and then click [Start Exporting] [OK].
An encryption password is required when you are importing exported settings data. Enter the password using single-byte alphanumeric characters.
For confirmation, enter the same password again in [Confirm].
To encrypt all the settings data, specify [Level 2] in [Security Level].
IMPORTANT
It may take some time for the screen to change. Click [Start Exporting] only once.
If you are importing the settings data to another model that does not support [Security Level], specify [Level 1].
6
Click [Check Status].
Do not use the Remote UI while the [Cannot be used when exporting.] message is displayed.
7
Click [Start Downloading].
8
Specify where to save the data by following the on-screen instructions.
Batch Importing Settings
Use this procedure to import settings data that you batch exported to a computer. This procedure overwrites the previous settings data. However, depending on the model, you may not be able to import some settings.
IMPORTANT
Check the administrator information first.
If you imported department ID management settings from one machine to a multifunction printer using Department ID Management, the administrator information is also overwritten, and you may no longer be able to log in using the previous administrator ID and PIN. Before beginning this procedure, check that the administrator information is saved on another machine.
NOTE
Applying security policy settings
Security policy settings can only be imported if the password for the security policy settings is the same for both the export source and the import destination or if no password is set for the import destination. If no password is set for the import destination, the password set for the export source is also set for the import destination.
1
Open the Remote UI and log in as an administrator.Opening the Remote UI
2
On the portal page, click [Settings/Registration].
3
Click [Data Management] [Import].
4
Click [Browse...] and select the file to be imported.
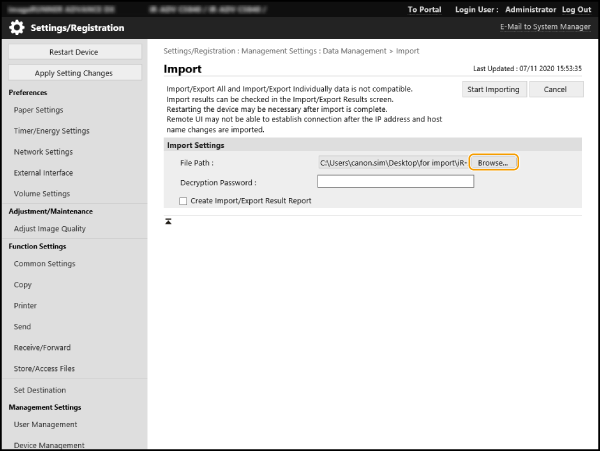
5
Enter the [Decryption Password] and click [Start Importing] [OK].
In [Decryption Password], enter the encryption password you entered when exporting the settings data.
When the [Create Import/Export Result Report] check box is selected, you can output the import results from [Settings/Registration] [Data Management] [Import/Export Results] [Create Report].
To output the import results to a CSV format file and check the file, select the [Create Import/Export Result Report] check box.
The data in the selected file is imported to this machine.
6
Click [OK] [Check Status].
Depending on the imported data, a restart may be required. Click [Perform Restart].
Importing/Exporting Individual Settings
You can also select just the required settings for import/export, such as the Address Book address lists or printer settings. For this task, log in to the Remote UI with Administrator privileges.
IMPORTANT
You can export personal settings information (all) and user group address lists (all) if the following conditions are met:
Preparations have been made to export user data by synchronizing the custom settings (server), and 15 minutes have elapsed since the user data was prepared for export.
The connection destination for both server and client machines is localhost:8443.
You cannot export user group address lists 01 to 20. (There is no export function for individual address lists.)
You cannot import personal settings information (all), user group address lists (all), and user group address lists 01 to 20 if the following condition is met:
The connection destination for both server and client machines is localhost:8443.
NOTE
You can also edit address lists to be imported as CSV files.Address Book Items
Exporting Individual Settings
1
Open the Remote UI and log in as an administrator.Opening the Remote UI
2
On the portal page, click [Settings/Registration].
3
Click [Data Management] and select the settings to be exported.
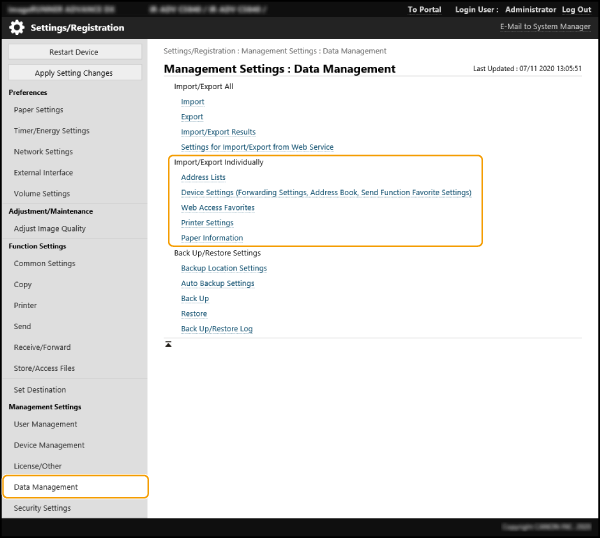
Exporting an address list
1
Click [Address List] in [Import/Export Individually].
2
Click [Export].
If a PIN entry page appears, enter the PIN and click [OK].
3
Specify the required settings.
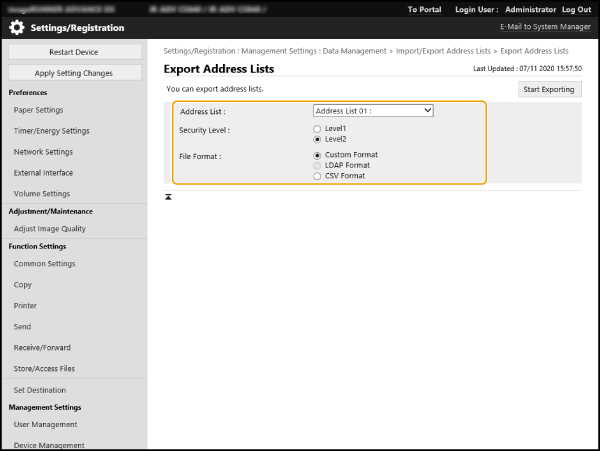
[Address List]
Select the address list to be exported. Note that the address list name reverts to the default name when it is saved.
[Security Level]
When the [File Format] is set to [Custom Format], you can set the security level. Selecting [Level 1] allows you to import the data to any Canon multifunction printer. Selecting [Level 2] encrypts the password for the address list data with a more secure method than [Level 1]. However, this means that the data can only be imported to models that support the [Level 2] setting (models where the [Security Level] item appears in this setting).
[File Format]
Select the file format for the exported data. To import all the information registered in the address list to another Canon multifunction printer, select [Custom Format]. To use the data in a computer application, select [LDAP Format] or [CSV Format]. Note that only e-mail addresses and fax numbers are saved in [LDAP Format].
NOTE
Setting a password for exported data
Set  (Settings/Registration) <Set Destination> <Include Password When Exporting Address Book> to <On>. When you select this setting, a password prompt appears on the [Export Address Lists] screen. Password-protected data cannot be imported without entering the correct password.
(Settings/Registration) Editing data exported in CSV format
Check the columns that can be edited in the Address Book. Address Book Items
Data imported to older versions of this machine may not be imported correctly.
Exporting device settings (forwarding settings, Address Book, frequently used send settings)
1
Click [Device Settings (Forwarding Settings, Address Book, Send Function Favorite Settings)] in [Import/Export Individually].
2
Click [Export].
3
Select [Security Level].
Selecting [Level 1] enables you to import the data to any Canon multifunction printer. Selecting [Level 2] encrypts the password for the exported data with a more secure method than [Level 1]. However, this limits the Canon multifunction printers that can import the data*.
* Only imageRUNNER ADVANCE series multifunction printers that support [Security Level]
Exporting Web browser favorites information
1
Click [Web Access Favorites] in [Import/Export Individually].
2
Click [Export].
Exporting printer settings
1
Click [Printer Settings] in [Import/Export Individually].
2
Click [Export].
Exporting paper information
1
Click [Paper Information] in [Import/Export Individually].
2
Click [Export].
3
Select the paper settings information in [Category].
4
Click [Start Exporting].
5
Specify where to save the data by following the on-screen instructions.
Importing Individual Settings
1
Open the Remote UI and log in as an administrator.Opening the Remote UI
2
On the portal page, click [Settings/Registration].
3
Click [Data Management] and select the settings to be imported.

Importing an address list
1
Click [Address List] in [Import/Export Individually].
2
Click [Import].
If a PIN entry page appears, enter the PIN and click [OK].
3
Specify the required settings.
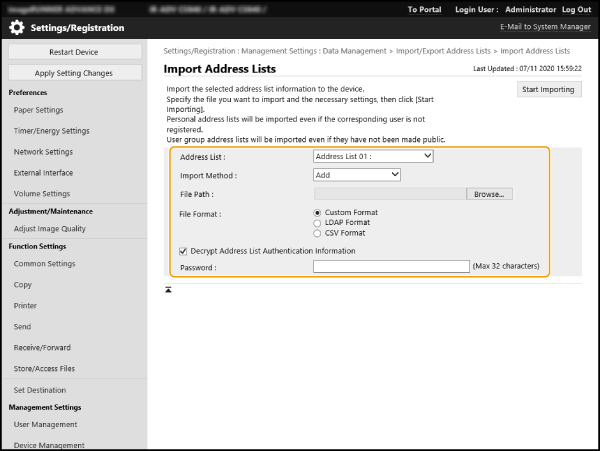
[Address List]
Select the import destination address list.
[Import Method]
Select [Add] to add the imported destinations without deleting the current address list, or select [Delete and Overwrite] to delete the current address list and replace it with the imported destinations.
[File Path]
Click [Browse...] and specify the file to be imported.
[File Format]
Select the file format for the data to be imported. Select [Custom Format] for files to be used only with Canon multifunction printers (*.abk), select [LDAP Format] for LDAP format files (*.ldif), or select [CSV Format] for CSV format files (*.csv).
[Decrypt Address List Authentication Information]
If you are importing an encrypted file, select this check box and enter the password you entered when exporting the settings data.
Importing device settings (forwarding settings, Address Book, frequently used send settings)
1
Click [Device Settings (Forwarding Settings, Address Book, Send Function Favorite Settings)] in [Import/Export Individually].
2
Click [Import].
3
Specify the required settings.
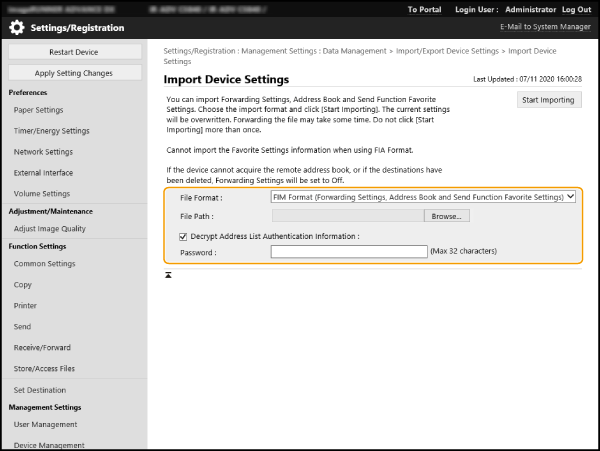
[File Format]
Select the file format for the settings data to be imported. Check the file to be imported, as the file format differs depending on the model of the exporting multifunction printer.
[File Path]
Click [Browse...] and specify the file to be imported.
[Decrypt Address List Authentication Information]
If you are importing an encrypted file, select this check box and enter the password you entered when exporting the settings data.
IMPORTANT
This will delete the current Address Book and replace it with the imported Address Book.
Once you start the import, you will not be able to use the Remote UI until this machine restarts. Note also that the settings become valid after the restart.
Importing Web browser favorites information
1
Click [Web Access Favorites] in [Import/Export Individually].
2
Click [Import].
3
Click [Browse...] and specify the settings data to be imported.
Only the first 20 items in order of registration are imported.
Importing printer settings
1
Click [Printer Settings] in [Import/Export Individually].
2
Click [Import].
3
Click [Browse...] and specify the settings data to be imported.
Importing paper information
1
Click [Paper Information] in [Import/Export Individually].
2
Click [Import].
3
Specify the required settings.
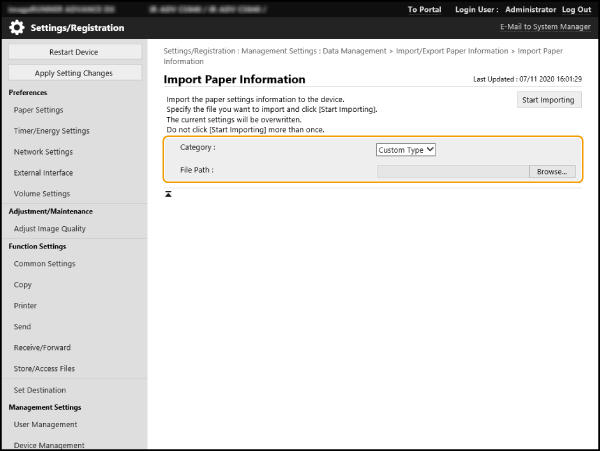
[Category]
Select the paper settings information.
[File Path]
Click [Browse...] and specify the file to be imported.
4
Click [Start Importing] [OK].
Depending on the imported items, a machine restart may be required.
Address Book Items
This section describes the columns in the Address Book. Use this as a reference when editing CSV files.
Header
Header Name | Required | Notes |
# Canon AddressBook CSV version: 0x0002 | Yes | Fixed value |
# CharSet: UTF-8 | Yes | Fixed value |
# dn: fixed | Yes (Required for One-touch button Address Book) | Indicates that the destination name is handled as a one-touch button. Entry is only required when the import destination is a one-touch button Address Book. Added when exporting from a one-touch button Address Book, so there is no need to add this item again when importing. |
# SubAddressBookName: Address Book name | Yes | Enter the Address Book name after the colon (:), with a space in between. If the Address Book is unnamed, leave the space after the colon (:) blank. |
# DB Version: 0x010a | Yes | Fixed value |
# Crypto Version: 2 | No | Leave this section blank if you are creating a new Address Book CSV file. |
# Crypto Attribute: pwd | No | Leave this section blank if you are creating a new Address Book CSV file. |
NOTE
The presence of a header relating to Crypt indicates that the password attribute is encrypted. However, when you are entering this information into a newly-created CSV file or editing the pwd attribute of an exported CSV file, the data cannot be encrypted in a form that the machine can correctly decode. In such cases, delete the corresponding portion from the header.
Main unit
Attribute Name | Description | Required | Notes |
objectclass | Object class (destination type) | Yes | Indicates the type of destination. The required attribute varies according to this value. Enter one of the following. For e-mail: email For G3 fax: g3fax For IP fax: ipfax For fax: ifax For file server (SMB, FTP, WebDAV): remotefilesystem For group: groupfids |
cn | Destination name | No | Enter in UTF-8 character code. Otherwise, the destination name will be left blank. |
cnread | Phonetic alphabet | No | Displayed as "phonetic" if the display language is set to "Japanese". |
cnshort | One-touch button name | No | Enter in UTF-8 character code. Otherwise, the one-touch button name will be left blank. |
subdbid | Address Book number | No | Specify which Address Book to import to in the Remote UI. Not required when writing to a CSV file. |
mailaddress | E-mail address | Yes (Required for certain destination types) | This attribute is required for e-mail and I-fax destinations. |
dialdata | Fax number | Yes (Required for certain destination types) | This attribute is required for fax destinations. However, it is not required if the destination is an IP fax using a URI. |
uri | The URI used with an IP fax | Yes (Required for certain destination types) | Only usable for IP fax destinations. This attribute is required if you do not specify a fax number for an IP fax. For an IP fax destination using a URI, you must also specify the "URI flag" (see below). |
url | File server destination host name | Yes (Required for certain destination types) | This attribute is required for file server destinations. You can only use letters and symbols. |
path | File path for file server destination | No | You can only use letters and symbols. |
protocol | Protocol | Yes (Required for certain destination types) | This attribute is required for file server destinations. Enter one of the following. For SMB: smb For FTP: ftp For WebDAV: addonprotocol0225 |
username | User name used when logging in to a file server destination | Yes (Required for certain destination types) | This attribute is required for FTP file server destinations. The user ID is required to log in to a file sending destination, and therefore is also required for file sending destinations using authentication, such as SMB and WebDAV. |
pwd | Password used when logging in to a file server destination | No | This attribute is required for file sending destinations using authentication. |
member | A member of a group destination | Yes (Required for certain destination types) | This attribute is required for group destinations. |
indxid | A serial number allocated to a destination | Yes | This attribute is required if the import destination is a one-touch button Address Book. This number becomes the one-touch button number. In other cases, enter a number from 201 to 1,800. |
enablepartial | Setting for dividing data when sending an e-mail | No | Enter either "on" or "off". |
sub | Subaddress of a file server destination | No | |
faxprotocol | Fax protocol | No | Enter one of the following. g3 ecm |
ecm | Indicates the use of ECM. | No | Enter either "on" or "off". |
txstartspeed | Starting transmission speed for faxing | No | Enter one of the following. 2400 4800 7200 9600 14400 33600 |
commode | Fax communication mode Setting regarding international sending | No | Enter one of the following. For PSTN domestic line: domestic For PSTN international line 1: international1 For PSTN international line 2: international2 For PSTN international line 3: international3 |
lineselect | Selected fax line | No | Enter one of the following. Otherwise, "auto" is used. For lines 1 to 4: line1, line2, line3, or line4 For automatic line specification: auto |
uricommode | IP fax communication mode | Yes (Required for certain destination types) | This is the chosen communication mode for IP faxes. This attribute is required if you use IP faxing, and are sending to a fax destination. Enter one of the following. For G3: ip_g3 For intranet: ip_lsv For a VoIP gateway: ip_gw |
uriflag | The flag for a URI used with an IP fax | Yes (Required for certain destination types) | This attribute is required if the destination is an IP fax, and you use a URI instead of a fax number. Enter either "TRUE" or "FALSE". If you use a URI, enter "TRUE". |
pwdinputflag | Setting for requesting password input per transmission | No | Enter either "on" or "off". |
ifaxmode | I-Fax mode (simple/full) | No | Enter either "simple" or "full". |
transsvcstr1 | I-fax relay service text string 1 | No | Enter total of up to 40 alphanumeric characters and symbols. |
transsvcstr2 | I-fax relay service text string 2 | No | Enter total of up to 16 alphanumeric characters and symbols. |
ifaxdirectmode | I-fax direct sending | No | Enter either "on" or "off". |
documenttype | I-fax document type | No | Enter one of the following. To send in color: cl To send in black and white: bw |
bwpapersize | Paper size allowable when sending an I-fax | No | |
bwcompressiontype | Compression format used when sending an I-fax | No | |
bwpixeltype | Color space allowable when sending an I-fax | No | |
bwbitsperpixel | Bit count allowable when sending an I-fax | No | |
bwresolution | Resolution allowable when sending an I-fax | No | |
clpapersize | Paper size allowable when sending a color I-fax | No | |
clcompressiontype | Compression format used when sending a color I-fax | No | Fixed as "jpeg". |
clpixeltype | Color space allowable when sending a color I-fax | No | Fixed as "rgb". |
clbitsperpixel | Bit count allowable when sending a color I-fax | No | Fixed as "8". |
clresolution | Resolution allowable when sending a color I-fax | No | |
accesscode | Access code | No | Enter up to seven numbers. |
uuid | A UUID for identifying a destination | No | This item is not necessary when creating a new CSV file. |
cnreadlang | Phonetic alphabet character code | No | Displayed as "phonetic" if the display language is set to "Japanese". Enter the language code to use. For Japanese (SJIS), enter "ja". |
enablesfp | Unused | No | This item is unused, and therefore does not need to be entered. |
memberobjectuuid | Used for Personal Address List/User Group Address List | No | |
loginusername | Used for Personal Address List/User Group Address List | No | |
logindomainname | Used for Personal Address List/User Group Address List | No | |
usergroupname | Used for Personal Address List/User Group Address List | No | |
personalid | Used for Personal Address List/User Group Address List | No |