Adding Printer Output Icons
When adding the printer output icon on the Output Bar in the Desktop Browser screen, you can print documents easily from Desktop.
When Desktop Browser is started up for the first time, if a Canon printer driver in which the automatic registration function is applicable is installed on your computer, it automatically registers the corresponding Canon printer as a printer output icon.
When there is no printer output icon for the printer that you want to use, you need to take the following steps to add a printer output icon.
Note that because the flow of printing operation will differ depending on the settings of printer output icon, you need to configure the settings according to the purposes and usages.
|
Note
|
|
The settings of printer output icons can be changed as necessary.
You can change the order of the printer output icons by dragging and dropping.
Preinstall the printer driver for the printer that will be used with a printer output icon.
|
In addition, refer to the following as necessary.
You can add the printer output icon on the Output Bar by using a drag and drop operation. However, when you add it through a drag and drop operation, you cannot configure the advanced settings. When you need to specify the settings, do so after adding the printer output icon.
|
Note
|
|
If adding by dragging and dropping, the following is set for the printer output icon.
[Use print settings of template when printing] is selected
The template being used is set to [Same as Original]
Depending on the type of printer (such as a network printer), you may not be able to add the printer output icon by dragging and dropping. In this case, add the printer output icon using the advanced settings. For more information on how to configure the advanced settings, see the following.
|
1.
Select the [Start] menu > [Control Panel]. (for Windows Vista/Windows 7)

[Control Panel] is displayed.
|
Note
|
|
If you select the [Start] menu > [Devices and Printers] on Windows 7, proceed to step 3.
For Windows XP, select the [Start] menu > [Printers and Faxes] and proceed to step 3.
For Windows 8/Windows 8.1, select [Settings] from the Charms on the [Desktop] screen > [Control Panel] and proceed to step 2.
|
2.
Select [Printer] (for Windows Vista) or [View devices and printers] (for Windows 7/Windows 8/Windows 8.1) in [Hardware and Sound].

|
Note
|
|
If [Classic View] is selected in the [Control Panel], select [Printer].
|
3.
Drag the icon for the printer you want to use and drop it to the Output Bar of the Desktop Browser screen.
The printer output icon is added to the Output Bar.
1.
Select the [Tools] menu > [Output Bar Settings] > [Create] > [Printer].
Or, right-click Output Bar and select [Create] > [Printer].
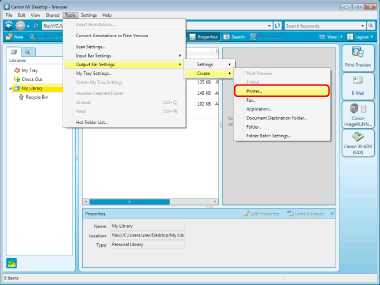
The [Printer Settings] dialog box is displayed.
2.
Configure the advanced printer settings.
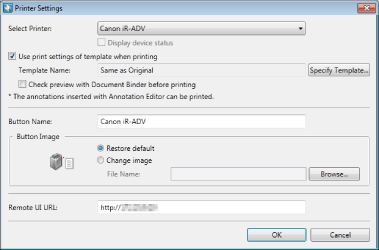
For more information on advanced printer output icon settings, see the following.
3.
Click [OK].
The printer output icon is added at the bottom of the Output Bar.