Saving Binder Documents
When creating a binder document by merging documents in Document Binder, you can save the document as a binder file (*.iwb).
|
Note
|
|
In the following cases, you can save binder documents.
In a page inside a binder document
If all the original documents have been deleted
|
In addition, refer to the following as necessary.
Saving with a Name
1.
Click  (Save As) on the Toolbar.
(Save As) on the Toolbar.Or, select the [File] menu > [Save As].
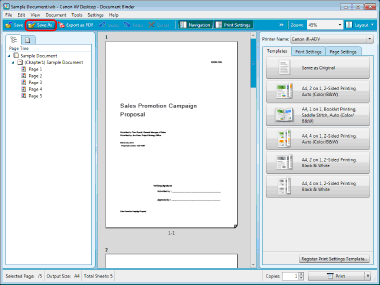
The [Select Save Destination] dialog box is displayed.
|
Note
|
|
If buttons are not displayed on the Document Binder Toolbar, set the buttons on the Toolbar. For more information, see the following.
|
2.
In the [Select Save Destination] dialog box, select the destination, and then click [OK].
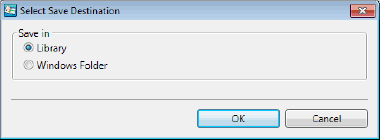
The [Save As] dialog box is displayed.
3.
Select a library or Windows Folder in which to save the document.
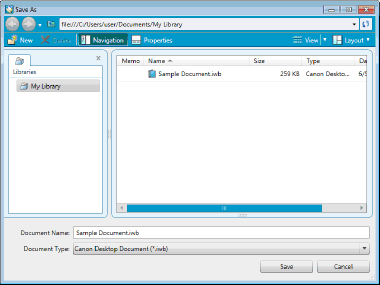
4.
Specify the document name in [Document Name] and then click [Save].
|
Note
|
|
If the following dialog box is displayed after saving, select the appropriate update process and then click [OK].
[Checked Out Document Confirmation] dialog box
[Modify Shared Document] dialog box
If you have not selected the [Check in automatically after exiting the application that is editing documents] check box, you need to manually check in and check out documents.
[Settings] > [System Settings] > [Browser] > [Shared Document Management] > [Check in automatically after exiting the application that is editing documents]
|
Saving by Overwriting
When Document Binder is in the edit mode, you can save a binder document by overwriting an existing file.
1.
Click  (Save) on the Toolbar.
(Save) on the Toolbar.Or, select the [File] menu > [Save].
|
Note
|
|
When saving to the following library, check in if necessary.
When the Document Server Library has [Require Check Out] set
SharePoint Server Library
If the following dialog box is displayed after saving, select the appropriate update process and then click [OK].
[Checked Out Document Confirmation] dialog box
[Modify Shared Document] dialog box
If you have not selected the [Check in automatically after exiting the application that is editing documents] check box, you need to manually check in and check out documents.
[Settings] > [System Settings] > [Browser] > [Shared Document Management] > [Check in automatically after exiting the application that is editing documents]
If buttons are not displayed on the Document Binder Toolbar, set the buttons on the Toolbar. For more information, see the following.
|