Connecting to Wireless LAN (MF5950dw Only)
Be Sure to Check Before Setting
|
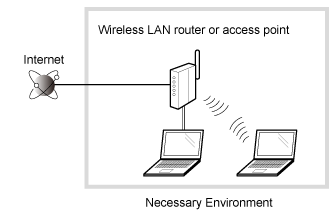
The setup of the computer and wireless LAN router or access point must be completed.
 If it is not set up, you will not be able to use the machine on the wired LAN network.
For the details, refer to the instruction manual for your network device or contact its manufacturer. |
 |
|
NOTE
|
Precautions when connecting to a wireless LANThe structure of your computer or networked device, the existence of router functions, setting methods and security settings vary depending on your environment.
You can connect the machine to wireless LANs or wired LANs, but you cannot use both at the same time. When using a wireless LAN connection, do not connect a LAN cable to the machine. This may cause malfunctions.
If using the machine in your office, consult with your network administrator.
|
Switching the Connection Method to Wireless LAN
1
Press [ ] (Menu).
 ] (Menu).
2
Select <Network Settings> with [ ] or [
 ], and then press [OK].
 ] or [
 ], and then press [OK].

The next screen is displayed for approximately 5 seconds.
Turn OFF/ON using Step 5. Turning this OFF/ON is not required.

3
Select <Select Wired/Wireless LAN> using [ ] or [
 ], and then press [OK].
 ] or [
 ], and then press [OK].
4
Select <Wireless LAN> using [ ] or [
 ], and then press [OK].
 ] or [
 ], and then press [OK].
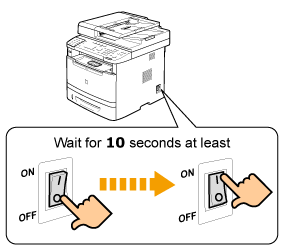
Turns the machine OFF/ON when the following screen disappears.

It is necessary to turn the machine OFF/ON to activate the settings.
Turn OFF the machine and wait for at least 10 seconds before turning it back ON.
Selecting a Method for Setting the Wireless LAN
Two methods are provided for connecting to the wireless LAN or access point, connecting using WPS (Wi-Fi Protected Setup) function or connecting manually.
Select the appropriate setting method after checking the following functions on the wireless LAN or access point you are using.
When WPS button is placed

|
NOTE
|
Checking WPS functionsCheck whether the box or body of the wireless LAN router or access points that you are using supports the WPS function.
As an example, a symbol such as shown below can be seen on the shipping box or machine.
 This supports WPS (Wi-Fi Protected Setup).
If you are not sure if WPS is supported, contact the wireless LAN router or access point manufacturer.
|
When WPS button is not placed
Setup manually.
Setting the Machine Using WPS (Push Button Mode)
1
Have you completed the procedure, "Switching the Connection Method to Wireless LAN"?
2
Press [ ] (Menu).
 ] (Menu).
3
Select <Network Settings> with [ ] or [
 ], and then press [OK].
 ] or [
 ], and then press [OK].

The next screen is displayed for approximately 5 seconds.
You do not need to turn the machine OFF/ON in this step.

4
Select <Wireless LAN Settings> using [ ] or [
 ], and then press [OK].
 ] or [
 ], and then press [OK].
5
Press [OK].

Select <WPS Push Button Mode> using [ ] or [
 ], and then press [OK].
 ] or [
 ], and then press [OK].
7
Press [ ] to select <Yes>, and press [OK].
 ] to select <Yes>, and press [OK].
8
Within 2 minutes, press and hold the WPS button on the wireless LAN router and/or access point.
 |
The amount of time you must hold down the WPS button will depend on the model you are using.
Please refer to the instruction manual for your wireless LAN routers and/or access points. |


 |
If "Cannot find Access Point" appears, press [OK] to close the screen, and follow the procedure from Step 6.
|


9
Make sure the Wi-Fi indicator blinks.
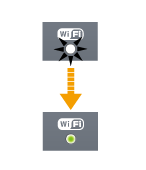
When the wireless LAN router or access point is detected, the Wi-Fi indicator blinks.
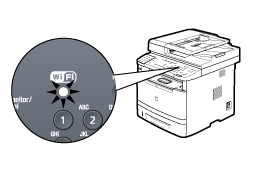

The next screen is displayed for approximately 2 seconds, and then the Wi-Fi indicator lights.

 |
If an error message appears, press [OK] to close the screen, and repeat starting from Step 6.
If you cannot detect the access point after retrying, see the following:
|
10
Wait until the machine sets the IP address automatically (approx. 2 min).
If you want to set the IP address manually, see the following.
Setting by Manually Selecting an Access Point
1
Have you completed the procedure, "Switching the Connection Method to Wireless LAN"?
2
Write down the following information required for the settings.
The information is needed in steps 9 through 11.
The information is needed in steps 9 through 11.
 |
For more information on how to check, refer to the instruction manual of the wireless LAN router or access point, or contact the manufacturer.
|
SSID
 |
It may be indicated as access point name or network name.
|
Write down all if there is multiple SSID.
It is used when selecting an access point in Step 8.
Network key
 |
It may be indicated as encryption key, WEP key, WPA/WPA2 passphrase, PSK or pre-shared key.
|
You write down here is the network key that is currently specified for the wireless LAN router or access point.
It is used when entering an network key in Step 11.
Number of network key characters (digits)
Select the entry format that matches the number of network key characters (digits) in Step 10.
|
NOTE
|
Checking for SSID and network keysThere are cases when the defaults are written on the body of the wireless LAN router or access point. If the settings for the wireless LAN router or access point have changed or are not written, or if you are not sure of the settings, see the following.
|
3
Press [ ] (Menu).
 ] (Menu).
4
Select <Network Settings> using [ ] or [
 ], and then press [OK].
 ] or [
 ], and then press [OK].

The next screen is displayed for approximately 5 seconds.
You do not need to turn the machine OFF/ON in this step.

5
Select <Wireless LAN Settings> using [ ] or [
 ], and then press [OK].
 ] or [
 ], and then press [OK].
6
Press [OK].

Select <SSID Settings> using [ ] or [
 ], and then press [OK].
 ] or [
 ], and then press [OK].
Select <Select Access Point> using [ ] or [
 ], and then press [OK].
 ] or [
 ], and then press [OK].


 |
See the following when the <Cannot find access point.> is displayed.
|
Select the matched SSID that you have written down in step 2 using [ ] or [
 ], and then press [OK].
 ] or [
 ], and then press [OK].
If the multiple matched SSID are displayed, select the one that is displayed at the top (a stronger signal).
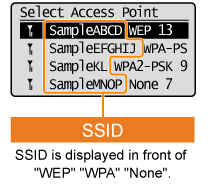

The next screen is displayed for approximately 5 seconds.

 |
See the following when you cannot find an access point you want to connect.
|
Select the entry format that matches the number of network key characters (digits) that you have written down in step 2 using [ ] or [
 ], and then press [OK].
 ] or [
 ], and then press [OK].
Either of the following screens is displayed.


Enter the network key that you have written down in step 2.
ASCII text

|
(1)
|
Press [
 ] (Tone), and then select <Entry Mode>. ] (Tone), and then select <Entry Mode>. |
|
(2)
|
Enter the network key.
 You can enter it using the numeric keys. You can enter it using the numeric keys. |
|
(3)
|
Select <Apply> using [
 ] or [ ] or [ ], and then press [OK]. ], and then press [OK]. |
Hexadecimal

|
(1)
|
Enter the network key.
 Select the character using [ Select the character using [ ] or [ ] or [ ], and then press [OK] to enter. ], and then press [OK] to enter. |
|
(2)
|
Select <Apply> using [
 ] or [ ] or [ ], and then press [OK]. ], and then press [OK]. |
12
Select <Yes> using [ ] and press [OK].
 ] and press [OK].


The Wi-Fi indicator blinks.


The next screen is displayed for approximately 2 seconds, and then the Wi-Fi indicator lights.


 |
If an error message appears, press [OK] to close the screen, check to make sure that the network key is correct, and follow the procedure in 7 again.
If you cannot connect the access point after retrying, see the following:
|
13
Wait until the machine sets the IP address automatically (approx. 2 min).
If you want to set the IP address manually, see the following.
 "
"