Screen Layout of the Remote UI (Details on Each Setting Page)
Remote UI Portal Page
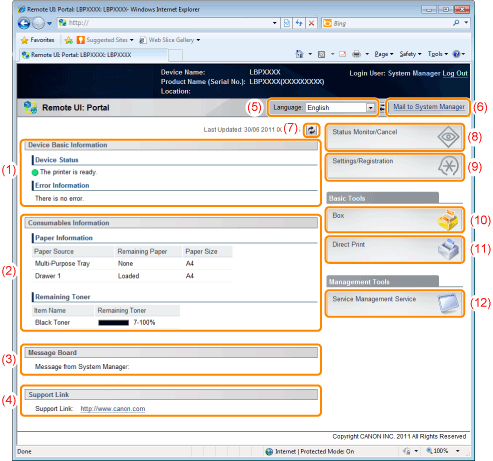
The screen shown below, which is displayed when the Web browser is launched and you have logged in to the Remote UI, is called the Portal Page.
(1) |
[Device Basic Information][Device Status]
The indicators and status messages show the current printer status. You can see the status of the printer from the indicator colors, as shown below.
|
||||||||||||||||||||||||||
|
[Error Information]
It displays error information generated by the printer.
|
|||||||||||||||||||||||||||
(2) |
[Consumables Information][Paper Information]
It displays paper level, size and type for each of the paper sources.
[Remaining Toner]
It displays the amount remaining in the toner cartridge.
|
||||||||||||||||||||||||||
|
|||||||||||||||||||||||||||
(3) |
[Message Board]It displays messages from the administrator.
|
||||||||||||||||||||||||||
(4) |
[Support Link]It displays links to information concerning printer support.
|
||||||||||||||||||||||||||
(5) |
[Language]You can change the screen display language from the drop-down list.
|
||||||||||||||||||||||||||
(6) |
[Mail to System Manager]You can send e-mail to the system manager.
|
||||||||||||||||||||||||||
(7) |
Update ButtonRefresh the portal page display to the latest status.
|
||||||||||||||||||||||||||
(8) |
[Status Monitor/Cancel]You can check and change the status of jobs the printer is processing. You can also check device status.
|
||||||||||||||||||||||||||
(9) |
[Settings/Registration]You can set/change the various printer settings. The items that can be set/changed differ depending on whether you log in as administrator or end user.
|
||||||||||||||||||||||||||
(10) |
[Box] (LBP6680x only)When the optional SD card is installed, you can print, copy and send documents that are saved in the printer's box.
|
||||||||||||||||||||||||||
(11) |
[Direct Print]Using the printer, you can print PDF files, PS/EPS files, image files and XPS files that are saved to the computer you are using as is, without opening them.
|
||||||||||||||||||||||||||
(12) |
[Service Management Service] (LBP6680x only)It displays the SMS (Service Management Service) screen.
|
[Status Monitor/Cancel] Menu
The following pages are in the [Status Monitor/Cancel] menu.
Print: [Job Status] Page
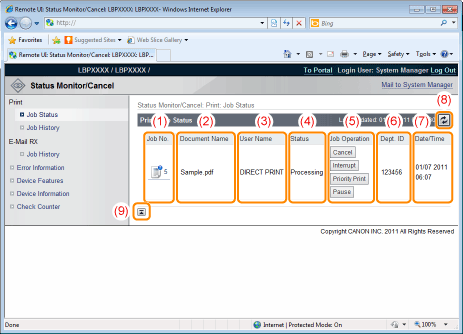
You can check the status of jobs that are currently printing and manage them using cancel/resume.
(1) |
[Job No.]The Job No. of the job is displayed. When you click the Job No., the job's details are displayed.
|
(2) |
[Document Name]The name of the job is displayed. For e-mail printing jobs, the subject of the e-mail is displayed.
|
(3) |
[User Name]The user name of the job is displayed. For e-mail printing jobs, the e-mail sender is displayed.
|
(4) |
[Status]The status of the job is displayed.
|
(5) |
[Job Operation]It runs the job operation. Click the button for the operation that you want to run.
|
|
[Cancel]
|
It cancels the printing of the job that you clicked on and deletes the job.
|
When the SD card is installed, you can run the following operations. (LBP6680x only)
|
[Interrupt]
|
It pauses the job that is currently being output, and makes the new job the printing priority. When the new job is finished printing, it resumes printing the paused job.
|
|
[Priority Print]
|
The output order of the job is moved up by one.
|
|
[Pause]/[Resume]
|
When you click [Pause], it pauses the job output. The button for the paused job changes to [Resume].
When you click [Resume], the paused job resumes. The button for the resumed job goes back to [Pause].
|
|
NOTE
|
[Job Operation]When logged on in End-User mode, it is possible to operate jobs with user names that match using [Management Settings] of [Settings/Registration] - [Management Settings] - [Security] only when job operation by end users is permitted.
|
(6) |
[Dept. ID]If department ID is set, the department ID for the job is displayed. (LBP6680x only)
|
(7) |
[Date/Time]The date and time the job was input is displayed.
|
(8) |
Update ButtonIt refreshes the [Job Status] page display to the latest status.
|
(9) |
[Back to Page Top]It moves the scroll box up to the top of the page.
|
Print: [Job History] Page
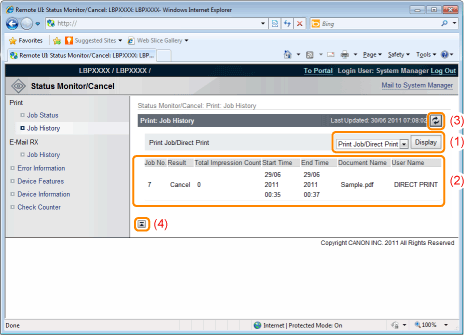
The Print Job/Direct Print, saved job, report printing and e-mail Job History are displayed.
|
NOTE
|
[Job History] Page DisplayIt is possible to display Job History only when displaying job history is permitted by [Display Job History] of [Settings/Registration] - [Management Settings] - [Security].
|
(1) |
Display TogglingSelect the job history to display. Only the selected type of job history is displayed in the list.
[Print Job/Direct Print]
[Stored Job] (LBP6680x only)
[Report]
[E-Mail Print]
|
(2) |
Display Job HistoryThe output job history list is displayed.
|
(3) |
Update ButtonIt refreshes the [Job History] page display to the latest status.
|
(4) |
[Back to Page Top]It moves the scroll box up to the top of the page.
|
E-Mail RX: [Job History] Page
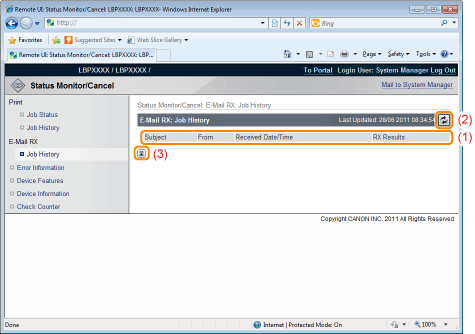
It displays the received e-mail history.
(1) |
Display Job HistoryThe received e-mail history list is displayed.
|
(2) |
Update ButtonIt refreshes the [Job History] page display to the latest status.
|
(3) |
[Back to Page Top]It moves the scroll box up to the top of the page.
|
[Error Information] Page
Information about errors occurring in the printer is displayed.
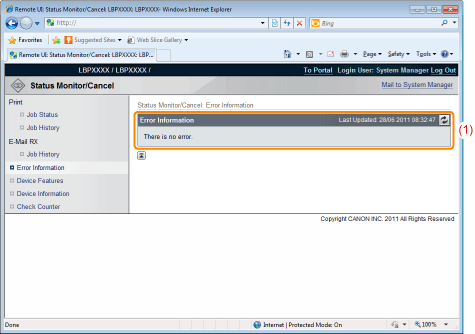
(1) |
[Error Information] (Number of Errors)It displays whether or not errors have occurred, and if there are errors, the number of errors.
|
(2) |
[Error Information] (Information)It displays status and solutions for the error information occurring in the printer.
The meanings of the displayed icons are shown below.
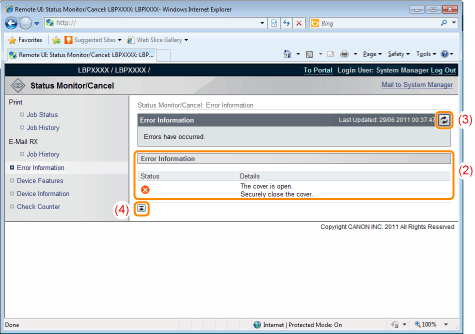 |
(3) |
Update ButtonIt refreshes the [Error Information] page display to the latest status.
|
(4) |
[Back to Page Top]It moves the scroll box up to the top of the page.
|
[Device Features] Page
The printer equipment information and the functions that can be used in the current equipment status are displayed.
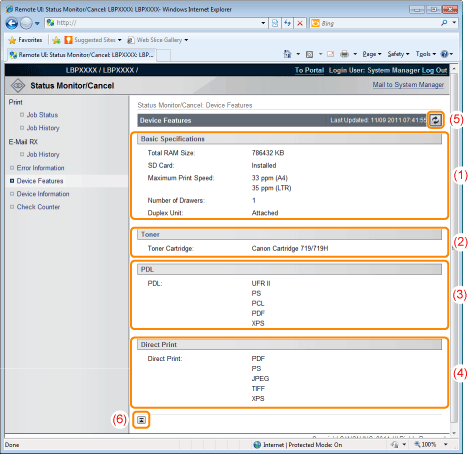
(1) |
[Basic Specifications]The amount of RAM installed in the printer console, the installed options and the basic printing performance are displayed.
|
(2) |
[Toner]Information about the toner cartridges installed in the printer is displayed.
|
(3) |
[PDL]The page description languages that can be used by the printer are displayed.
|
(4) |
[Direct Print]The file formats and document formats that can be used by Direct Print are displayed.
|
(5) |
Update ButtonIt refreshes the [Device Features] page display to the latest status.
|
(6) |
[Back to Page Top]It moves the scroll box up to the top of the page.
|
[Device Information] Page
The basic information about the printer and the system manager information are displayed.
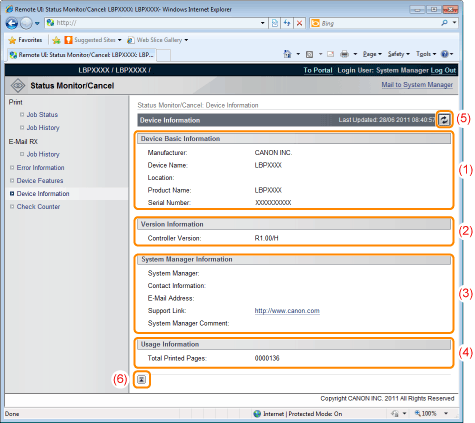
(1) |
[Device Basic Information]The basic information about the printer is displayed.
|
(2) |
[Version Information]The printer controller version is displayed.
|
(3) |
[System Manager Information]Information about the registered system manager is displayed.
|
(4) |
[Usage Information]The number of pages printed and the date of the last maintenance are displayed.
|
(5) |
Update ButtonIt refreshes the [Device Information] page display to the latest status.
|
(6) |
[Back to Page Top]It moves the scroll box up to the top of the page.
|
[Check Counter] Page
The number of pages printed is displayed.
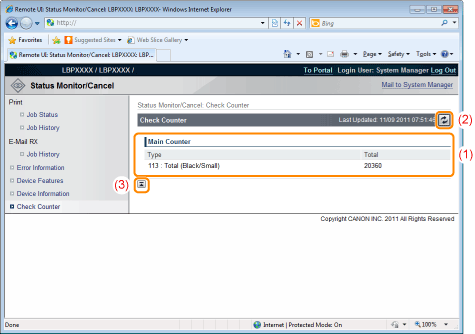
(1) |
[Main Counter]The number of pages printed for each counter is displayed.
|
(2) |
Update ButtonIt refreshes the [Check Counter] page display to the latest status.
|
(3) |
[Back to Page Top]It moves the scroll box up to the top of the page.
|
[Settings/Registration] Menu
The following pages show the settings that can be checked using the [Settings/Registration] menu.
[Preferences]
[Output/Control]
[Management Settings]
[Control Menu] Page
It displays the operation settings for energy-saving mode (Sleep Mode) and when errors occur.
For details on the settings, see "[Setup] Menu ([Control Menu] Options)."
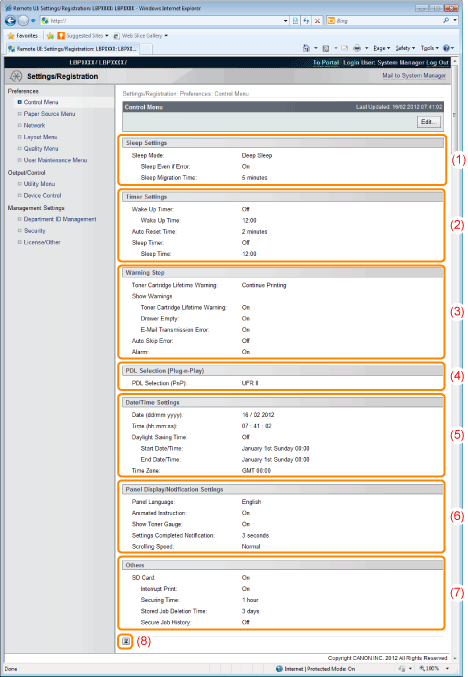
(1) |
[Sleep Settings]The settings related to sleep mode operation are displayed.
|
(2) |
[Timer Settings]The settings related to timer operation are displayed.
|
(3) |
[Warning Step]The settings related to warning display are displayed.
|
(4) |
[PDL Selection (Plug-n-Play)]The currently selected page description language is displayed.
|
(5) |
[Date/Time Settings]The settings related to date and time are displayed.
|
(6) |
[Panel Display/Notification Settings]The settings related to control panel display are displayed.
|
(7) |
[Others]Other operation settings not included in the above categories are displayed.
|
(8) |
[Back to Page Top]It moves the scroll box up to the top of the page.
|
|
NOTE
|
Changing SettingsYou can only change settings when you are logged on in system manager mode.
|
[Paper Source Menu] Page
It displays the settings for paper size, etc. when printing from the multi-purpose tray or paper drawer.
For details on the settings, see "[Setup] Menu ([Paper Source] Options)" or "[Select Feeder] Menu."
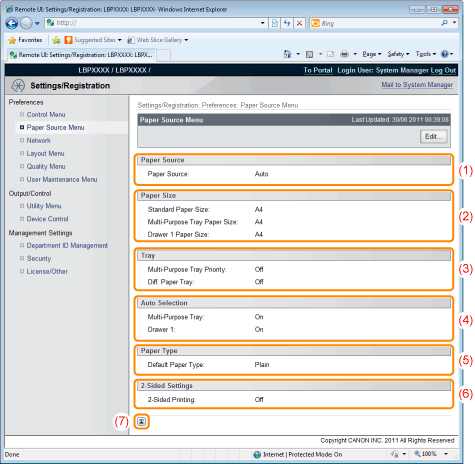
(1) |
[Paper Source]The currently selected paper source is displayed.
|
(2) |
[Paper Size]The paper size selected for each paper source is displayed.
|
(3) |
[Tray]The operation settings related to the multi-purpose tray are displayed.
|
(4) |
[Auto Selection]It displays whether to recognize the paper source for auto selection when [Auto] is set for [Paper Source] for each paper source.
|
(5) |
[Paper Type]The paper type selected for each paper source is displayed.
|
(6) |
[2-Sided Settings]The settings related to 2-sided printing are displayed.
|
(7) |
[Back to Page Top]It moves the scroll box up to the top of the page.
|
|
NOTE
|
Changing SettingsYou can only change settings when you are logged on in system manager mode.
|
[Network] Page
It displays the printer's network settings, etc.
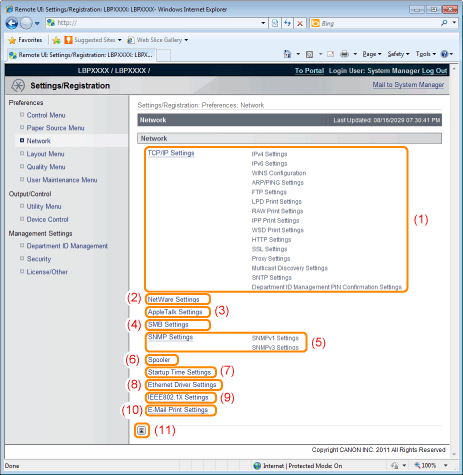
(1) |
[TCP/IP Settings]It displays the TCP/IP settings.
|
||
(2) |
[NetWare Settings] (LBP6680x only)It displays the NetWare settings.
|
||
(3) |
[AppleTalk Settings]It displays the AppleTalk settings.
|
||
(4) |
[SMB Settings] (LBP6680x only)It displays the SMB settings.
|
||
(5) |
[SNMP Settings]It displays the SNMP settings.
|
||
(6) |
[Spooler] (LBP6680x only)It displays the spool function settings when the SD card is installed.
|
||
(7) |
[Startup Time Settings]It displays the startup time settings.
|
||
(8) |
[Ethernet Driver Settings]It displays the network interface settings.
|
||
(9) |
[IEEE802.1X Settings]It displays IEEE802.1X security settings.
|
||
(10) |
[E-Mail Print Settings]It displays the e-mail print settings.
|
||
(11) |
[Back to Page Top]It moves the scroll box up to the top of the page.
|
|
NOTE
|
Changing SettingsYou can only change settings when you are logged on in system manager mode.
|
[Layout Menu] Page
It displays the settings relating to print appearance, such as adjustment of print position and setting gutter margins.
For details on the settings, see "[Setup] Menu ([Layout] Options)."
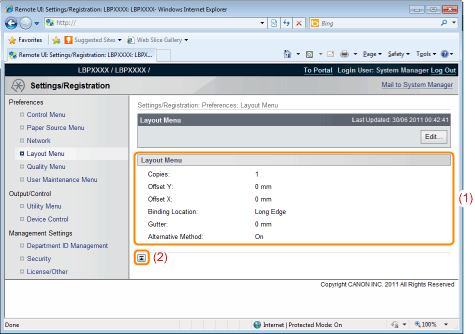
(1) |
[Layout Menu]The settings for number of pages and print appearance are displayed.
|
(2) |
[Back to Page Top]It moves the scroll box up to the top of the page.
|
|
NOTE
|
Changing SettingsYou can only change settings when you are logged on in system manager mode.
|
[Quality Menu] Page
It displays the settings related to print quality, such as toner density adjustment.
For details on the settings, see "[Setup] Menu ([Quality] Options)."
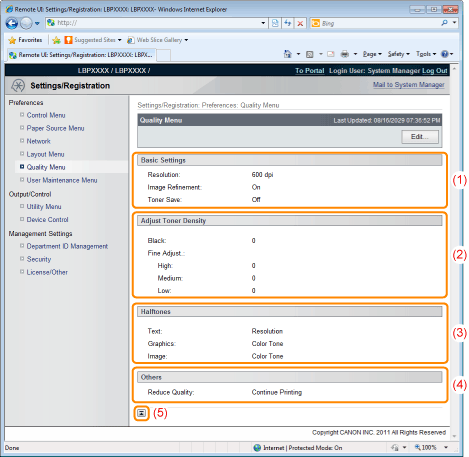
(1) |
[Basic Settings]It displays the settings related to printing resolution and toner.
|
(2) |
[Adjust Toner Density]Display the fine-tuned toner density.
|
(3) |
[Halftones]It displays the settings related to halftone representation method when printing.
|
(4) |
[Others]The settings related to other print quality are displayed.
|
(5) |
[Back to Page Top]It moves the scroll box up to the top of the page.
|
[User Maintenance Menu] Page
It displays the settings for printer adjustment from a specified paper source if a problem occurs, such as adjustment of print position and recovery printing.
For details on the settings, see "[Setup] Menu ([User Maintenance] Options)."
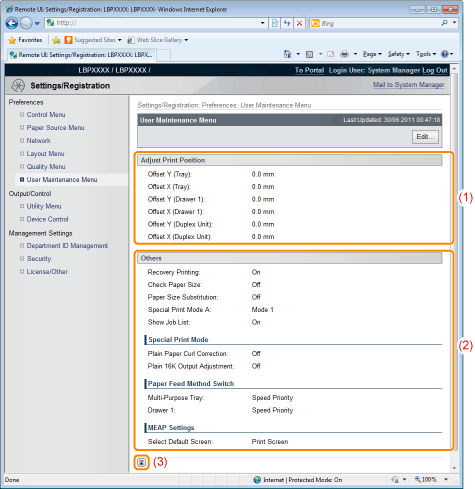
(1) |
[Adjust Print Position]It displays the print position adjustment settings for each paper source.
|
(2) |
[Others]It displays the settings for operation and maintenance if a problem occurs.
|
(3) |
[Back to Page Top]It moves the scroll box up to the top of the page.
|
|
NOTE
|
Changing SettingsYou can only change settings when you are logged on in system manager mode.
|
[Utility Menu] Page
You can print each type of management report. Select the item to output, and then click [Execute].
For details on the settings, see "[Utility Menu] Menu."
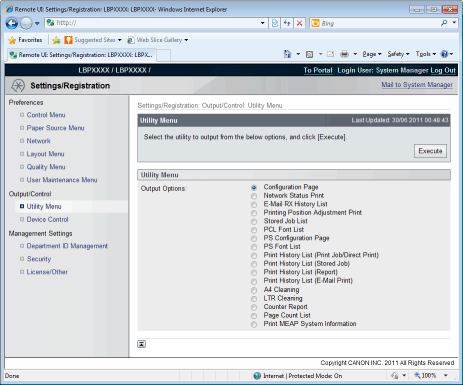
The following management reports can be output.
Configuration Page
Network Status Print
E-Mail RX History List
Printing Position Adjustment Print
Stored Job List (LBP6680x only)*
PCL Font List
PS Configuration Page (LBP6680x only)
PS Font List (LBP6680x only)
Print History List (Print Job/Direct Print)
Print History List (Stored Job) (LBP6680x only)*
Print History List (Report)
Print History List (E-Mail Print)
A4 Cleaning
LTR Cleaning
Counter Report
Page Count List (LBP6680x only)
Print MEAP System Information (LBP6680x only)
* Only when the optional SD card is installed
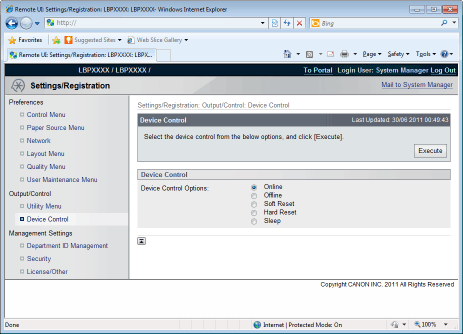
[Device Control] Page
It controls the printer. Select the item to run, and then click [Execute].
For details on the settings, see "[Reset] Menu" or "Basic Printer Operations."
[Department ID Management] Page (LBP6680x Only)
If department ID management is set, it displays the number of pages printed by each registered department.
For details on the settings, see "Specifying an ID for Each Department (LBP6680x Only)."
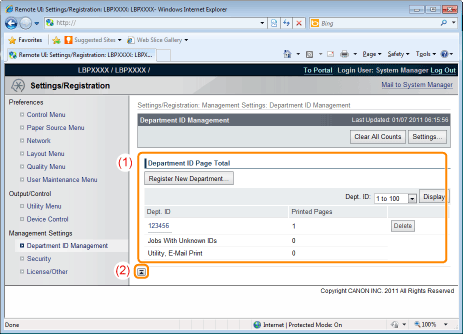
(1) |
[Department ID Page Total]It displays the number of pages printed by each department.
|
(2) |
[Back to Page Top]It moves the scroll box up to the top of the page.
|
[Security] Page
It displays printer information and security settings.
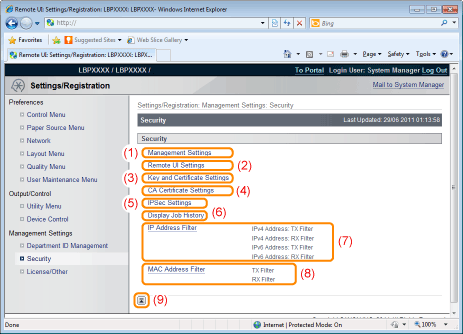
(1) |
[Management Settings]It displays general information about the printer.
|
||
(2) |
[Remote UI Settings]It displays whether the Remote UI is set to use the SSL encrypted communication function.
|
||
(3) |
[Key and Certificate Settings]It displays information on registered keys and certificates.
|
||
(4) |
[CA Certificate Settings]It displays information on registered keys and certificates.
|
||
(5) |
[IPSec Settings] (LBP6680x only)It displays the IPSec security policy list.
|
||
(6) |
[Display Job History]It displays whether it is set to allow job history to be displayed.
|
||
(7) |
[IP Address Filter]It displays information restricting users who can print and change settings.
|
||
(8) |
[MAC Address Filter]It displays information restricting users who have access.
|
||
(9) |
[Back to Page Top]It moves the scroll box up to the top of the page.
|
|
NOTE
|
Changing the settingsYou can only change settings when you are logged on in system manager mode.
|
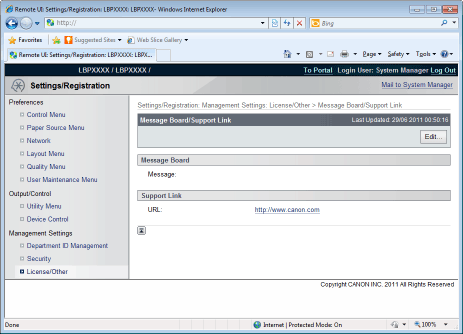
[License/Other] Page/[Message Board/Support Link] Page
For LBP6680x
It displays the pages that the settings for message boards or support links, or registering or updating software are performed.
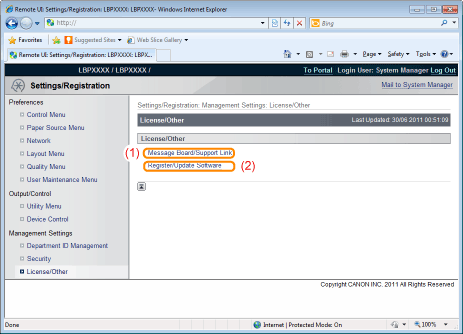
(1) |
[Message Board/Support Link]It displays messages from the administrator and links to support pages.
|
||
(2) |
[Register/Update Software]It displays the pages that registering or updating software is performed.
|
For LBP6670dn
It displays messages from the administrator and links to support pages.
See "Display/Change Message Board Messages and Support Links" for setting procedures.
|
NOTE
|
Changing the settingsYou can only change settings when you are logged on in system manager mode.
|
 (Gray):
 (Green):
 (Yellow):
 (Red):
 ] (
] ( : Online) on the printer control panel and printing will continue.
 "
"
