Screen Layout of the Remote UI (Details on Each Setting Page)
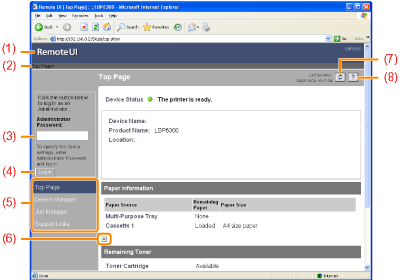
(1)
|
Displays the Remote UI top page.
|
(2)
|
Displays the hierarchy of the currently displayed page.
Clicking a displayed page name displays the page of which you clicked the name.
|
(3)
|
When you log in as Administrator, enter the administrator password.
|
(4)
|
You can log in as Administrator by entering the administrator password, then clicking this button.
If you are using the Remote UI as Administrator, you can log out by clicking this button.
|
(5)
|
Displays each setting page.
|
(6)
|
If the page is scrolled down, moves the scroll box up to the top of the page.
|
(7)
|
Updates the information in the currently displayed page to the latest one.
|
(8)
|
Displays Help for the currently displayed page in a new window.
|
[Status] Page
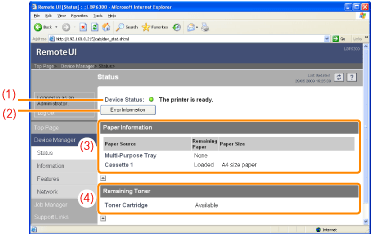
Displays the statuses of the paper sources and toner cartridge or other information.
(1)
|
[Device Status]
Displays messages about the printer status.
Also, according to the printer status, the indicator color changes as follows.
 (green) (green) |
The printer is in the normal state.
(The printer is ready to print.)
|
 (yellow) (yellow) |
Some attention is required although this state does not affect the job.
(A Warning message is being displayed.)
|
 (red) (red) |
The printer cannot print for some reason.
(An Error message is being displayed.)
|
 (blinking red) (blinking red) |
A problem is occurring in the printer, and the printer does not operate properly.
(A service call is being displayed.)
|
|
(2)
|
[Error Information]
When clicked, displays information (situation explanation, solutions, and so on) about the error occurring in the printer.
|
(3)
|
[Paper Information]
Displays information about the paper sources.
(A): The names of each paper source
(B): The amount of paper remaining in each paper source
(C): The sizes of paper in each paper source
|
(4)
|
[Remaining Toner]
Displays the status of the toner cartridge. The contents and solutions of the messages are as follows.
|
Message
|
Contents and Solutions
|
|
Available
|
Continue using as normal.
|
|
Replacement Needed Soon
|
You can continue to print.
Have ready a new toner cartridge.
We recommend that you replace the toner cartridge before printing a large amount of data.
|
|
Check Cartridge
|
You can continue to print.
A toner cartridge with print quality that cannot be guaranteed or a used toner cartridge that reached their lifetime may be inserted.
Continuing to use the cartridge may cause a malfunction, so replacing the cartridge with a new cartridge is recommended.
|
|
Insert Cartridge
|
The printer stops printing.
Install the toner cartridge.
|
|
[Information] Page
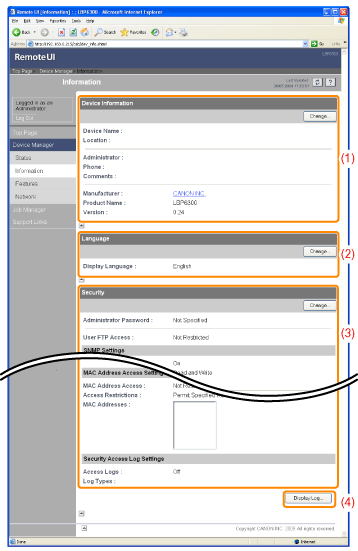
Displays the printer information, security settings, and so on.
(1)
|
[Device Information]
Displays the general information about the printer.
|
|
How to change the settings
|
|
(2)
|
[Language]
Displays the display language currently being used in the Remote UI.
|
|
How to change the settings
|
|
(3)
|
[Security]
Displays information about the security settings, such as the administrator password and the access restrictions.
|
|
How to change the settings
|
|
(4)
|
[Display Log]
Clicking this button displays the [Security Access Log] page that allows you to display or save the obtained security access logs.
You can also display the date and time that the print server obtained from the SNTP server, or update the date and time by obtaining them from the SNTP server.
|
|
How to change the settings
|
|
|
NOTE
|
Changing the settings
You can change the settings only if you logged in as Administrator.
|
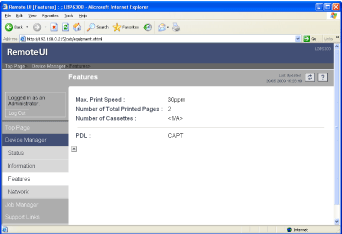
[Features] Page
Displays the maximum print speed of the printer, the total number of printed pages, and so on.
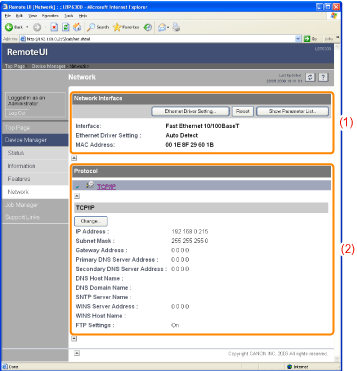
[Network] Page
Displays the network settings for the printer and so on.
(1)
|
[Network Interface]
Displays information about the network interface and so on.
|
|
How to change the settings
|
|
(2)
|
[Protocol]
Displays the network protocol settings.
|
|
How to change the settings
|
|
|
NOTE
|
Changing the settings
You can change the settings only if you logged in as Administrator.
After changing the network settings, click [Reset]. After completing the reset, the settings are effective.
|

 (green)
 (yellow)
 (red)
(red) (blinking red)
