Sending a Fax from a Computer
This explains the basic procedure for fax transmission from a computer of documents created in an application.
 NOTE
NOTEWhen using a device connected via a WSD port, enable [Use WSD] at the device.
Prerequisites
If you cannot retrieve the device information, you need to manually set the options installed in the device.
Procedures
1.
Open a document in the application → display the print screen.
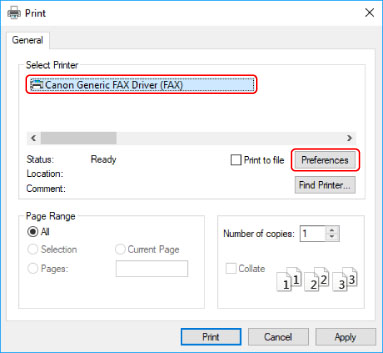
2.
Select the device you are using → click [Preferences].
Depending on the application, [Preferences] may be called "Printer properties" or "Properties."
If you do not need detailed fax transmission settings, click [Print] or [OK] and proceed to step 5.
3.
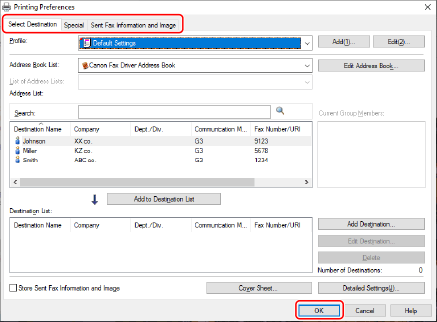
Set the necessary items in the print settings screen of the driver → click [OK].
If necessary, switch sheets and configure other settings.
[Select Destination] sheet > [Store Sent Fax Information and Image], [Cover Sheet] and [Detailed Settings] can also be set when sending a fax in step 5.
For details about the setting methods for the main functions, click the subsequent "Open details" below.
To arrange multiple pages on a single sheet of paper
Specify the number of pages to be arranged in [Special] sheet > [Page Layout].
To enter confirmation of the destination
Click [Special] sheet > [Security Settings] → enable [Confirm Fax Number/URI when Configuring Destinations (Prevent Sending to Wrong Destination)] in the [Security Settings] dialog box.
To specify the send time *
Click [Select Destination] sheet > [Detailed Settings] → enable [Set the Time to Send] to specify time in the [Detailed Settings] dialog box → click [OK].
To send notification of the transmission result by email *
Click [Select Destination] sheet > [Detailed Settings] → enable [Job Done Notice] and set the notification conditions and email address in the [Detailed Settings] dialog box → click [OK].
* To set these functions, the functions must be enabled beforehand in the [Device Settings] sheet. Set them by referring to the procedures for setting device information.
4.
Click [Print] or [OK] in the print screen of the application.
Specify a destination from the displayed [Fax Sending Settings] screen.
When specifying a destination from the address book
(1) Display the [Select Destination] sheet.
(2) Select the address book from [Address Book List].
When the sub address books are displayed in [List of Address Lists], select the target sub address book.
(3) Select a destination → click [Add to Destination List].
When entering a destination directly
(1) Display the [Enter Destination] sheet.
(2) Select the communication mode to use from [Communication Mode].
(3) Select [Fax Number/URI] → specify [Fax Number] or [URI].
If necessary, set other items.
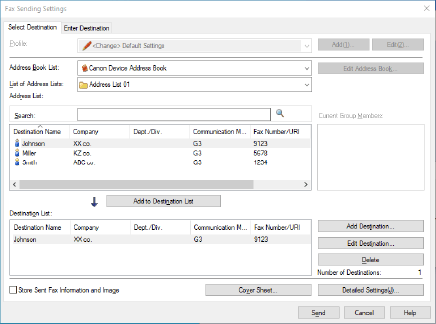
If destinations are added to [Destination List] before changing the destination details in the address book, the changes made in the address book are not reflected. If you registered destinations from the address book with the default settings, check whether the destinations are correct.
6.
In the [Fax Sending Settings] screen, click [Send].
When the confirmation dialog box is displayed, confirm the destination name and destination fax number, and click [OK].
NOTETo cancel sending, click [Cancel] on the [Fax Sending Settings] screen.
With some applications, an error message may be displayed even if sending is canceled successfully. In this case, click [OK].