Clearing Paper Jams/Staple Jams
If a paper jam or staple jam occurs, a screen indicating the location of the jam and how to clear the jam appears on the touch panel display. Follow the instructions on the screen to clear the jam. The screen is displayed repeatedly until the procedure is complete. If you press [Close], you can continue operations, such as setting modes or scanning originals, even if the jammed paper/staple is not cleared immediately.
For information on the parts of the machine in which paper jams/staple jams occur and instructions on clearing jams, see the following.
 WARNING WARNING |
|
Some areas inside the machine are subject to high-voltages. When removing jammed paper or when inspecting the inside of the machine, do not allow necklaces, bracelets, or other metal objects to touch the inside of the machine, as this may result in burns or electrical shock.
|
 CAUTION CAUTION |
|
When removing jammed originals or paper, take care not to cut your hands on the edges of the originals or paper. If you cannot remove the paper, contact your local authorized Canon dealer.
When removing paper which has become jammed inside the machine, take care not to allow the toner on the jammed paper to come into contact with your hands or clothing, as this will dirty your hands or clothing. If they become dirty, wash them immediately with cold water. Washing them with warm water will set the toner, and make it impossible to remove the toner stains.
When removing paper which has become jammed inside the machine, remove the jammed paper gently to prevent the toner on the paper from scattering and getting into your eyes or mouth. If the toner gets into your eyes or mouth, wash them immediately with cold water and immediately consult a physician.
The fixing assembly and its surroundings inside the machine may become hot during use. When removing jammed paper or when inspecting the inside of the machine, do not touch the fixing assembly and its surroundings, as doing so may result in burns or electrical shock.
After clearing all paper jams, remove your hands from the machine immediately. Even if the machine is not in operation, your hands, hair, or clothing may get caught in the feed rollers, which could result in personal injury or damage if the machine suddenly starts printing.
|
|
IMPORTANT
|
|
If a paper jam occurs in the feeder, you cannot continue operating the machine. Follow the directions on the touch panel display to clear the paper jam. (See "Feeder.")
Some areas that are shown to have paper jams may not actually have paper jams. However, always check all locations indicated on the touch panel display in the order that is given.
If a paper jam occurs and printing is stopped when you are printing in the Staple mode, do not remove the paper from the areas except those which are shown to have paper jams on the touch panel display. For example, if paper is jammed in the main unit, do not remove the output sheets on the finisher which does not have paper jams. (Printing and stapling resume after you clear the paper jam in the main unit.)
|
|
NOTE
|
|
If paper is jammed in several locations, remove the jammed paper in the order indicated on the touch panel display.
When all the paper jams are cleared, the machine automatically recalculates the number of copies or prints to make. You do not need to re-enter the number of copies or prints, even if you are printing multiple sets.
|
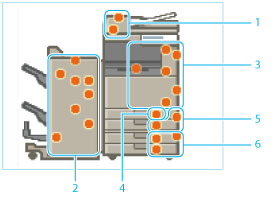
Paper Jam/Staple Jam Locations
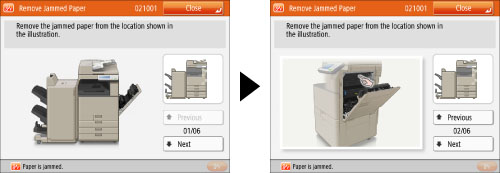
An example of the images displayed on the right side of the touch panel display when a paper jam/staple jam occurs is indicated below. Follow the procedure below to clear the jam.
|
NOTE
|
|
When paper jams/staple jams occur in multiple locations, clear the jams in the order of the numbers displayed on the screen.
|
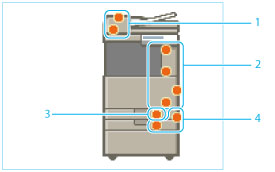
When No Option Is Attached
|
1.
|
|
|
2.
|
|
|
3.
|
|
|
4.
|
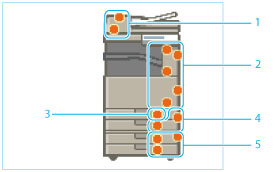
When the Inner 2way Tray-J1, Copy Tray-J2, and Cassette Feeding Unit-AL1 Are Attached
|
1.
|
|
|
2.
|
|
|
3.
|
|
|
4.
|
|
|
5.
|
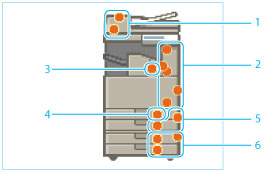
When the Inner Finisher-G1 and Cassette Feeding Unit-AL1 Are Attached
|
1.
|
|
|
2.
|
|
|
3.
|
|
|
4.
|
|
|
5.
|
|
|
6.
|
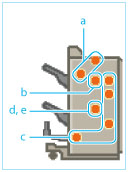
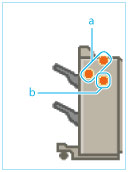
When the Booklet Finisher-U1/Staple Finisher-U1 and Cassette Feeding Unit-AL1 Are Attached
 |
|
 |
 |
|
Booklet Finisher-U1
|
Staple Finisher-U1
|
|
1.
|
||
|
2.
|
||
|
a.
|
||
|
b.
|
||
|
c.
|
||
|
d.
|
||
|
e.
|
||
|
3.
|
||
|
4.
|
||
|
5.
|
||
|
6.
|
||