Adding a Bates Number and Converting to a PDF Document
In Desktop Editor, you can add a bates number to a document and convert the document to a PDF document.
Adding a Bates Number
This section describes how to add a Bates Number to the document header or footer and convert to a PDF document.
|
IMPORTANT
|
|
The Reader Extensions function is deleted when you convert a PDF document with Reader Extensions.
PDF documents in the PDF/A format will no longer conform to the PDF/A format when they are converted.
|
|
NOTE
|
|
The bates number added to the document is fixed.
You can convert multiple documents to a PDF document.
When multiple documents are converted to PDF documents, a PDF document is created for each document. The bates number that is added is for all the converted documents.
The bates number added to the PDF document that is being edited cannot be deleted with the [Undo] tool button. For information on how to delete a bates number, see the following.
|
1.
Start Desktop Editor.
For information on how to start Desktop Editor, see the following.
2.
Click the icon for the ribbon command.
Or, follow one of the steps described below.
Select [Add/Delete] on the ribbon > [Add Bates Number].
Click [Add] on the ribbon.
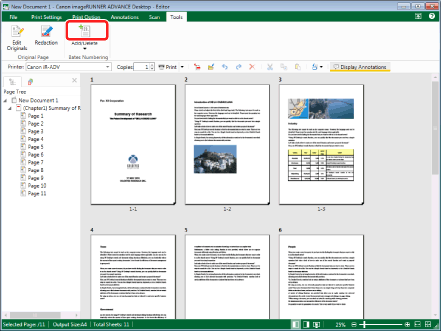
[Select Documents for Bates Numbering] is displayed.
|
NOTE
|
|
If commands are not displayed on the ribbon of Desktop Editor, see the following to display them.
The same operation can also be performed with the tool buttons. If tool buttons are not displayed on the toolbar of Desktop Editor, see the following to display them.
|
3.
Click [Add], and select [Add from Library] or [Add from Windows Folder].
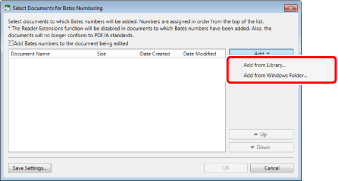
[Open] is displayed.
|
NOTE
|
|
To convert a document saved in a Desktop Browser library, select [Add from Library].
To convert a document in a Windows Folder, select [Add from Windows Folder].
If [Connect to Library] or the dialog box for authentication is displayed, enter the user name in [User Name] and password in [Password] and then click [OK].
|
4.
Select the document, and click [Open].
The selected document is added to the list.
|
NOTE
|
|
You can select multiple documents.
|
5.
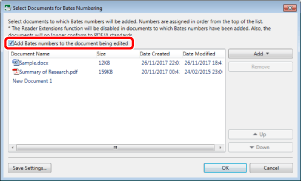
To include the document open in Desktop Editor in the target documents for conversion, select the [Add Bates numbers to the document being edited] check box.
|
NOTE
|
|
New documents are added to the list as "New Document".
The following documents cannot be included in the documents for conversion.
PDF documents certified with a signature
Documents opened in the read-only mode
If you only display the password protected document without entering a password, it cannot be included in the documents for conversion.
The documents opened in the view mode can be included in the documents for conversion if they are reopened in a mode that enables editing.
|
6.
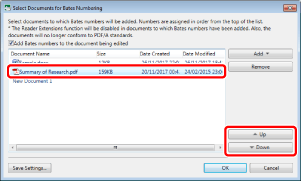
To change the order of the documents, select a document in the list, and click [Up]/[Down].
|
NOTE
|
|
When converting multiple documents to a PDF document, a bates number is added to the documents from the document displayed on the top of the list.
|
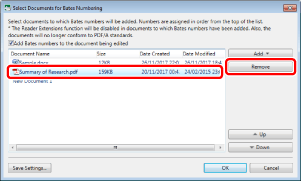
7.
To delete a document from the list, select a document in the list, click [Remove].
8.
To specify the document name and destination to save the PDF document, click [Save Settings].
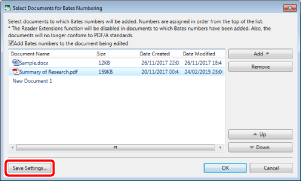
[Save Settings] is displayed.
9.
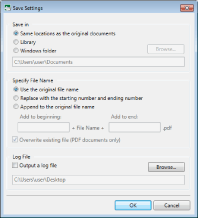
Specify the document name and destination to save the PDF document.
|
[Save in]
|
Enables you to specify the destination to save the PDF documents.
|
|
[Same locations as the original documents]
|
Select this to save the PDF document in the same location as the original document.
|
|
[Library]
|
Select this to save the PDF document to a Desktop Browser library.
|
|
[Windows folder]
|
Select this to save the PDF document to a Windows Folder.
|
|
[Browse]
|
If you selected [Library] or [Windows folder] for [Save in], specify the destination library or folder in the dialog box displayed when this is clicked.
|
|
[Specify File Name]
|
Enables you to specify the document name for the PDF document.
|
|
[Use the original file name]
|
Select this to use the same document name as the original document.
|
|
[Replace with the starting number and ending number]
|
Select this to use a start number and end number for the document name. The document name becomes the start number and end number connected with a hyphen (-).
|
|
[Append to the original file name]
|
Select this to use the document name with a string appended before or after the original document name.
|
|
[Add to beginning]
|
Enter the string to add before the original document name.
|
|
[Add to end]
|
Enter the string to add after the original document name.
|
|
[Overwrite existing file (PDF documents only)]
|
Select this check box to overwrite any PDF documents with the same name in the destination folder.
|
|
[Log File]
|
Enables you to configure the log file settings.
|
|
[Output a log file]
|
Select this check box to create a log file.
|
|
[Browse]
|
Specify the output destination of the log file in the dialog box displayed when this is clicked.
|
|
NOTE
|
|
When a new document is converted to a PDF document, the following occurs.
If [Same locations as the original documents] is selected in [Save in], the PDF document is saved to [My Documents]/[Document] on the computer.
If [Use the original file name] is selected in [Specify File Name], the document name displayed in the [Select Documents for Bates Numbering] list is used as the name of the PDF document.
If [Replace with the starting number and ending number] is selected in [Specify File Name], the following order is used for the numbers in the document name when a bates number is added to multiple locations of the header/footer.
[Left] > [Center] > [Right] for the header > [Left] > [Center] > [Right] for the footer
When multiple bates numbers are added to a single location, the first number is used in the document name.
If [Append to the original file name] is selected in [Specify File Name], some characters cannot be used for [Add to beginning]/[Add to end] depending on the destination specified in [Save in].
[Same locations as the original documents]: The prohibited characters for Desktop Browser libraries and \ / : * ? " < > | ,
[Library]: The prohibited characters for Desktop Browser libraries
[Windows folder]: \ / : * ? " < > | ,
For information on the prohibited characters for Desktop Browser libraries, see the following.
Differences in Library Formats (Administrator Guide)
Even when converting to a PDF document with the [Overwrite existing file (PDF documents only)] check box selected in [Specify File Name], an error occurs if an existing document with the same name cannot be overwritten (due to the file being set to read-only or being edited, etc.)
When converting to a PDF document with the [Overwrite existing file (PDF documents only)] check box deselected in [Specify File Name], an error occurs if a document with the same name exists in the destination.
The file name of the output log file is "Bates.log". If there is a file with the same name in the specified destination, it is overwritten.
|
10.
Click [OK].
[Select Documents for Bates Numbering] is displayed again.
11.
Click [OK].
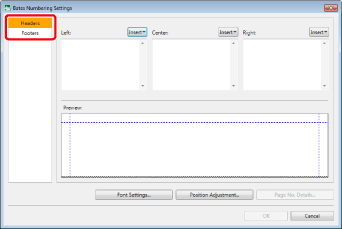
[Bates Numbering Settings] is displayed.
12.
Select the header or footer.
13.
Click [Insert] for the position to add the bates number, and select [Bates Number].
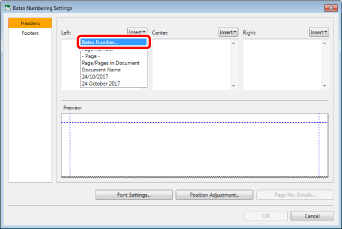
[Bates Number Format Settings] is displayed.
|
NOTE
|
|
The items displayed in the pull-down list displayed when [Insert] is clicked and a custom string can be set for the header/footer. To set a custom string, enter the string in the text box at the position where it will be inserted.
|
14.
Configure the format of the bates number.

|
[Number of Digits]
|
Specify the number of digits for the bates number. You can specify 3 to 15 digits.
|
|
[Starting Number]
|
Enter the start number for the bates number.
|
|
[Prefix]
|
Enter the prefix for the bates number.
|
|
[Suffix]
|
Enter the suffix for the bates number.
|
|
NOTE
|
|
A number that exceeds the number of digits specified in [Number of Digits] cannot be set in [Starting Number]. However, a number exceeding the specified number of digits is set if the number of digits is exceeded during the process for appending the bates number.
|
15.
Click [OK].
[Bates Numbering Settings] is displayed again.
A simple preview of the bates number is displayed in [Preview].
16.
To change the font of the bates number, click [Font Settings].
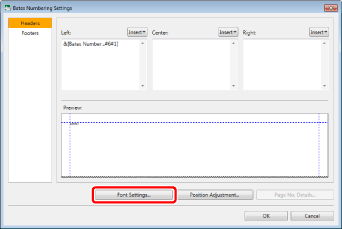
[Font Settings] is displayed.
17.
Set the font for the bates number.

|
[Font]
|
Select a font to use. The list displays the fonts installed in the computer you are using.
|
|
[Size]
|
Select a font size to use. If it is entered directly, the figures below the second decimal place are omitted.
|
|
[Style]
|
To make the text bold, select [Bold].
To make the text italic, select [Italic].
|
|
[Font Color]
|
Select a font color to use. When you want to use a color that is not available in the list, click [More Colors].
|
|
[More Colors]
|
If you click this, [Color] is displayed. On [Color], you can set a color that is not listed in [Font Color].
|
18.
Click [OK].
[Bates Numbering Settings] is displayed again.
19.
To adjust the display position of the bates number, click [Position Adjustment].
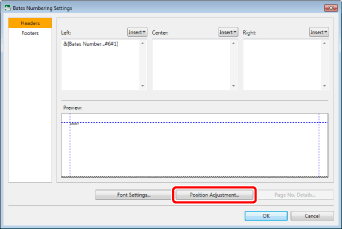
[Position Adjustment] is displayed.
20.
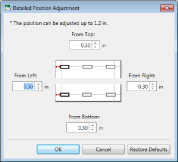
Enter the position to display the bates number.
|
NOTE
|
|
To return the display position for the bates number to the standard position, click [Restore Defaults].
|
21.
Click [OK].
[Bates Numbering Settings] is displayed again.
22.
To configure detailed page number settings, click [Page No. Details].
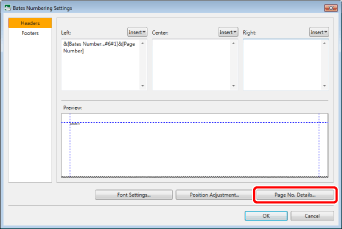
[Detailed Settings for Page Number] is displayed.
|
NOTE
|
|
When converting multiple documents to PDF documents, page numbers are added to each document.
|
23.
Specify the detailed page number settings.

|
[Format]
|
Select the desired format from the pull-down list.
|
|
[Specify Starting Page]
|
Select this check box to specify the starting page.
|
|
[Start Page]
|
Enter the starting page.
The starting page can be entered when [Specify Starting Page] is selected.
|
|
[Specify start page number]
|
Select this check box to specify the starting page number.
|
|
[Start Page Number]
|
Enter the starting page number.
The starting page number can be entered when [Specify start page number] is selected.
|
24.
Click [OK].
[Bates Numbering Settings] is displayed again.
25.
Click [OK].
The configured bates number is added and the PDF document is saved to the specified location.
A confirmation message is displayed.
26.
Click [OK].
Deleting a Bates Number
This section describes how to delete a bates number that has been added to a PDF document.
|
IMPORTANT
|
|
The items other than the bates number set from the pull-down list displayed by clicking [Insert] in [Bates Numbering Settings] and the custom string are deleted.
Deletion of bates numbers that have been added with Desktop and edited with an application other than Desktop is not guaranteed.
Bates numbers added with an application other than Desktop are also deleted. However, the bates number may not be detected and deleted, depending on the specifications of the bates number.
|
1.
Open the PDF document with a bates number in Desktop Editor.
For information on how to open a document with Desktop Editor, see the following.
2.
Select [Add/Delete] on the ribbon > [Delete Bates Number].
Or, click [Delete] on the ribbon.
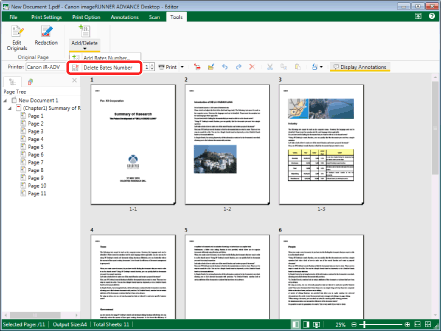
All the bates numbers are deleted.
A confirmation message is displayed.
|
NOTE
|
|
If commands are not displayed on the ribbon of Desktop Editor, see the following to display them.
The same operation can also be performed with the tool buttons. If tool buttons are not displayed on the toolbar of Desktop Editor, see the following to display them.
|
3.
Click [OK].
4.
Save the PDF document.
For information on how to save a PDF document, see the following.