Creating Office Documents with Desktop Editor
You can export documents in the Word format (*.docx) or Excel format (*.xlsx) with the range of pages specified in Desktop Editor.
|
NOTE
|
|
The print settings specified for the document are not reflected in the exported Word/Excel document.
Annotations added to a PDF document are not converted.
|
Exporting as a Word Document
This section describes how to export a document as a Word document.
1.
Open a document with Desktop Editor.
For information on how to open a document with Desktop Editor, see the following.
2.
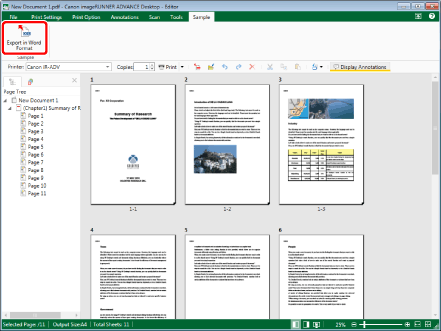
Click [Export in Word Format] on the ribbon.
Or, select the [File] menu > [Export] > [Export in Word Format], and select one of the following.
[Export to Library]
[Export to Windows Folder]
[Export to Therefore]
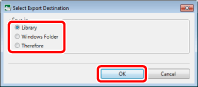
If [Select Export Destination] is displayed, proceed to step 3.
If [Export in Word Format] is displayed, proceed to step 4.
|
NOTE
|
|
If commands are not displayed on the ribbon of Desktop Editor, see the following to display them.
The same operation can also be performed with the tool buttons. If tool buttons are not displayed on the toolbar of Desktop Editor, see the following to display them.
[Select Export Destination] is displayed if two or more of the following check boxes are selected in [Destination Displayed in Save Destination Dialog when Saving/Exporting] in [System Settings].
[Library]
[Windows Folder]
[Therefore]
[Export in Word Format] is displayed if only one check box is selected.
[File] menu > [Option] > [System Settings] > [Editor] > [Options] > [Destination Displayed in Save Destination Dialog when Saving/Exporting]
For more information on the operations when you select the [File] menu > [Export] > [Export in Word Format] > [Export to Therefore], see the following.
Exporting a Document Edited with Desktop Editor to Therefore (Administrator Guide)
|
3.
Select the export destination, and click [OK].
[Export in Word Format] is displayed.
|
NOTE
|
|
For more information on the operations when [Therefore] is selected, see the following.
Exporting a Document Edited with Desktop Editor to Therefore (Administrator Guide)
|
4.
Select the library or Windows Folder to export the document to.
5.
Specify [Document Name] or [File name].
6.
To specify the pages to export, select [Original Pages] in [Export Range] and specify the page number in the displayed [Specify Range].
You can use the following formats to specify a range of page numbers.
When exporting from page "a" to the last page: a-
("a" indicates the page number to start exporting)
When exporting from the first page to page "b": -b
("b" indicates the page number to end exporting)
When exporting continuous pages: a-b
("a" and "b" indicate the page numbers to start and end exporting respectively)
When exporting discontinuous pages: c,d
("c" and "d" indicate the individual page numbers to export, separated by commas)
|
NOTE
|
|
The entry order of [Specify Range] is not the order of pages of the document to be exported. Even when you enter "1,2" or "2,1", pages are exported in the order "1,2".
|
7.
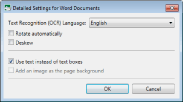
If you want to export with advanced settings specified, click [Detailed Settings].
[Detailed Settings for Word Documents] is displayed.
8.
Specify the advanced settings for the Word document.
|
[Text Recognition (OCR) Language]
|
Select the language to use for the OCR function from the pull-down list.
|
|
[Rotate automatically]
|
If this check box is selected, the vertical orientation of the document is corrected. Select this check box when the document includes both vertically and horizontally-oriented pages.
|
|
[Deskew]
|
Select this check box to correct the skew of the document. Select this check box when the document is skewed.
|
|
[Use text instead of text boxes]
|
If this check box is deselected, the layout uses text boxes. If this check box is selected, the layout uses paragraphs.
|
|
[Add an image as the page background]
|
Select this check box to place an image behind the text.
|
|
IMPORTANT
|
|
Even if [Text Recognition (OCR) Language] is correctly selected in [Detailed Settings for Word Documents], different characters may be used, depending on the character and the format of document.
When a document is converted to a Word document, the layout may differ from the original document.
|
|
NOTE
|
|
Even if the [Use text instead of text boxes] check box is selected, the layout may use text boxes.
If the [Add an image as the page background] check box is selected, the file size of the exported Word file will become larger.
|
9.
Click [OK].
[Export in Word Format] is displayed again.
10.
Click [Save].
The document is exported as a Word document when a library other than a Therefore Library or Windows Folder is specified as the export destination.
[Specify Index Data] is displayed when a Therefore Library is specified as the export destination. Proceed to step 11.
|
NOTE
|
|
If a message confirming whether to proceed with the export process is displayed, click [Yes].
If the following dialog box is displayed after saving, select the appropriate update process and then click [OK].
[Checked Out Document Confirmation]
[Modify Shared Document]
If the [Check in automatically after exiting the application that is editing documents] check box in [System Settings] is deselected, you need to perform check in/check out manually.
[File] menu > [Option] > [System Settings] > [Browser] > [Shared Document Management] > [Check in automatically after exiting the application that is editing documents]
|
11.
Specify the value of the index data, and click [OK].
The document is exported as a Word document.
Exporting as an Excel Document
This section describes how to export a document as an Excel document.
|
NOTE
|
|
Each page of the original document is converted to a sheet of an Excel document.
|
1.
Open a document with Desktop Editor.
For information on how to open a document with Desktop Editor, see the following.
2.
Click [Export in Excel Format] on the ribbon.
Or, select the [File] menu > [Export] > [Export in Excel Format], and select one of the following.
[Export to Library]
[Export to Windows Folder]
[Export to Therefore]

If [Select Export Destination] is displayed, proceed to step 3.
If [Export in Excel Format] is displayed, proceed to step 4.
|
NOTE
|
|
If commands are not displayed on the ribbon of Desktop Editor, see the following to display them.
The same operation can also be performed with the tool buttons. If tool buttons are not displayed on the toolbar of Desktop Editor, see the following to display them.
[Select Export Destination] is displayed if two or more of the following check boxes are selected in [Destination Displayed in Save Destination Dialog when Saving/Exporting] in [System Settings].
[Library]
[Windows Folder]
[Therefore]
[Export in Excel Format] is displayed if only one check box is selected.
[File] menu > [Option] > [System Settings] > [Editor] > [Options] > [Destination Displayed in Save Destination Dialog when Saving/Exporting]
For more information on the operations when you select the [File] menu > [Export] > [Export in Excel Format] > [Export to Therefore], see the following.
Exporting a Document Edited with Desktop Editor to Therefore (Administrator Guide)
|
3.
Select the export destination, and click [OK].
[Export in Excel Format] is displayed.
|
NOTE
|
|
For more information on the operations when [Therefore] is selected, see the following.
Exporting a Document Edited with Desktop Editor to Therefore (Administrator Guide)
|
4.
Select the library or Windows Folder to export the document to.
5.
Specify [Document Name] or [File name].
6.
To specify the pages to export, select [Original Pages] in [Export Range] and specify the page number in the displayed [Specify Range].
You can use the following formats to specify a range of page numbers.
When exporting from page "a" to the last page: a-
("a" indicates the page number to start exporting)
When exporting from the first page to page "b": -b
("b" indicates the page number to end exporting)
When exporting continuous pages: a-b
("a" and "b" indicate the page numbers to start and end exporting respectively)
When exporting discontinuous pages: c,d
("c" and "d" indicate the individual page numbers to export, separated by commas)
|
NOTE
|
|
The entry order of [Specify Range] is not the order of pages exported. Even when you enter "1,2" or "2,1", pages are exported in the order "1,2".
|
7.
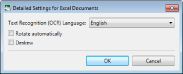
If you want to export with advanced settings specified, click [Detailed Settings].
[Detailed Settings for Excel Documents] is displayed.
8.
Specify the advanced settings for the Excel document.
|
[Text Recognition (OCR) Language]
|
Select the language to use for the OCR function from the pull-down list.
|
|
[Rotate automatically]
|
If this check box is selected, the vertical orientation of the document is corrected. Select this check box when the document includes both vertically and horizontally-oriented pages.
|
|
[Deskew]
|
Select this check box to correct the skew of the document. Select this check box when the document is skewed.
|
|
IMPORTANT
|
|
Even if [Text Recognition (OCR) Language] is correctly selected in [Detailed Settings for Excel Documents], different characters may be used, depending on the character and the format of document.
When a document is converted to an Excel document, the layout may differ from the original document.
|
9.
Click [OK].
[Export in Excel Format] is displayed again.
10.
Click [Save].
The document is exported as an Excel document when a library other than a Therefore Library or Windows Folder is specified as the export destination.
[Specify Index Data] is displayed when a Therefore Library is specified as the export destination. Proceed to step 11.
|
NOTE
|
|
If a message confirming whether to proceed with the export process is displayed, click [Yes].
If the following dialog box is displayed after saving, select the appropriate update process and then click [OK].
[Checked Out Document Confirmation]
[Modify Shared Document]
If the [Check in automatically after exiting the application that is editing documents] check box in [System Settings] is deselected, you need to perform check in/check out manually.
[File] menu > [Option] > [System Settings] > [Browser] > [Shared Document Management] > [Check in automatically after exiting the application that is editing documents]
|
11.
Specify the value of the index data, and click [OK].
The document is exported as an Excel document.