Exporting a Document Edited with Desktop Editor to Therefore
Documents edited with Desktop Editor can be exported to Therefore in the PDF format (*.pdf), Word format (*.docx), or Excel format (*.xlsx).
You can also export (save) the original documents stored in an IWB document to Therefore.
|
NOTE
|
|
For information on exporting documents edited with Desktop Editor to a library or Windows Folder, see the following.
Exporting Documents in the PDF Format (User's Guide)
Creating TIFF Documents/JPEG Documents with Desktop Editor (User's Guide)
Exporting Original Documents (User's Guide)
|
Exporting to Therefore in the PDF Format
|
NOTE
|
|
In the following cases, you cannot export documents in the PDF format with the chapter number or page range specified.
When [Booklet Printing] is selected in [Print Style]
When [Sheet for Insertion] is set
When you use Desktop to convert a document into a PDF document, the file size may become larger.
When you insert a sheet and then export a document as a PDF, all pages including the inserted sheet will be exported. For details on how to set the inserted sheet, see the following.
Configuring the Front Cover/Back Cover/Tab Paper/Sheets (User's Guide)
When a document is converted to a PDF document, the layout settings and the blank side of a 2-sided printing/booklet printing configured for the IWB document (such as [Output Size], [Output Paper Orientation], [Page Layout], and [Enlarge/Reduce Original Page]) will be applied to the PDF document. If the following are set to be printed, they too will be converted into PDF documents.
Annotations
Headers/Footers
The tab section of the tab paper
Watermarks
The page layout boundaries
The print settings specified for the IWB document are not reflected in the print settings of the exported PDF document.
|
1.
Select [Export as PDF] on the ribbon > [Therefore], and click [OK].
Or, select the [File] menu > [Export] > [Export as PDF] > [Export to Therefore].
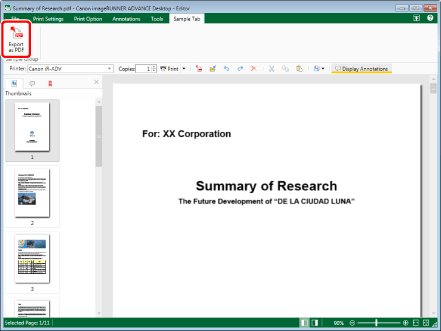
The [Export as PDF] is displayed.
|
NOTE
|
|
If commands are not displayed on the ribbon of Desktop Editor, see the following to display them.
Adding Commands to Ribbons (User's Guide)
This operation can also be performed with the tool buttons on the toolbar. If tool buttons are not displayed on the toolbar of Desktop Editor, see the following to display them.
Setting Tool Buttons on the Toolbar (User's Guide)
Lists of Ribbon Commands/Tool Buttons (User's Guide)
If [Therefore] is not displayed in the storage destination, check [Destination Displayed in Save Destination Dialog when Saving/Exporting] in [System Settings].
|
2.
Specify [Document Name].
3.
Specify the range to export.
You can specify chapters and page numbers. For more information, see the following.
Exporting Documents in the PDF Format (User's Guide)
4.
If you want to export with advanced settings specified, click [Detailed Settings].
The [Detailed Settings for PDF Document] is displayed.
5.
Configure the advanced settings of the PDF document, then click [OK].
For more information on the [Detailed Settings for PDF Document], see the following.
Exporting Documents in the PDF Format (User's Guide)
The [Export as PDF] is displayed again.
When a password to open the document is set, the [Confirm Document Open Password] is displayed. In this case, enter the same password you have entered in [Document Open Password], and click [OK].
When printing or editing the document is restricted, the [Confirm Permissions Password] is displayed. In this case, enter the same password you have entered in [Permissions Password to Bypass Restrictions], and click [OK].
When you click [OK] after entering all the passwords again, the [Export as PDF] is displayed again.
6.
Click [Save].
7.
Enter the user name and password.
For more information, see the instruction manual for Therefore.
The document is saved to Therefore as a PDF document.
Exporting to Therefore in TIFF Format or JPEG Format
|
IMPORTANT
|
|
If a document is converted into a TIFF/JPEG document, annotations containing unrenderable characters are deleted.
|
|
NOTE
|
|
The print settings specified for the document are not reflected in the exported TIFF/JPEG document.
A document with multiple pages is exported as a single TIFF document.
A document with multiple pages is exported as a separate JPEG document for each page.
|
1.
Select [Export as Image] on the ribbon > [Therefore], and click [OK].
Or, select [File] menu > [Export] > [Export as Image] > [Export to Therefore].
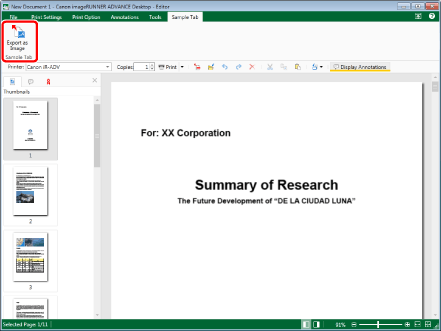
The [Export as Image] is displayed.
|
NOTE
|
|
If commands are not displayed on the ribbon of Desktop Editor, see the following to display them.
Adding Commands to Ribbons (User's Guide)
This operation can also be performed with the tool buttons on the toolbar. If tool buttons are not displayed on the toolbar of Desktop Editor, see the following to display them.
Setting Tool Buttons on the Toolbar (User's Guide)
Lists of Ribbon Commands/Tool Buttons (User's Guide)
If [Therefore] is not displayed in the storage destination, check [Destination Displayed in Save Destination Dialog when Saving/Exporting] in [System Settings].
|
2.
Specify [Document Name].
3.
Select [TIFF File (*.tiff;*.tif)] or [JPEG File (*.jpg;*.jpeg)] in [Document Type].
4.
Specify the range to export.
You can specify the page to export by a page number. For more information, see the following.
Creating TIFF Documents/JPEG Documents with Desktop Editor (User's Guide)
5.
If you want to export with advanced settings specified, click [Detailed Settings].
When exporting a document in the TIFF format, the [Convert to TIFF Document] is displayed.
When exporting a document in the JPEG format, the [Convert to JPEG Document] is displayed.
6.
Configure the advanced settings of the TIFF document or the JPEG document, then click [OK].
For more information on the [Convert to TIFF Document] and [Convert to JPEG Document], see the following.
Creating TIFF Documents/JPEG Documents with Desktop Editor (User's Guide)
The [Export as Image] is displayed again.
7.
Click [Save].
8.
Enter the user name and password.
For more information, see the instruction manual for Therefore.
The document is saved in Therefore in the TIFF or JPEG format.
Exporting Original Documents to Therefore
|
NOTE
|
|
If you select the [Save the original document in Canon Desktop Document] check box in [System Settings], the original document is stored in the IWB document.
[File] menu > [Option] > [System Settings] > [Editor] > [Options] > [Save the original document in Canon Desktop Document]
When the [Also import files attached to Outlook message files (.msg)] check box is selected in [System Settings], files attached to e-mail are also converted to an IWB document.
[File] menu > [Option] > [System Settings] > [Common Settings] > [Import] > [Also import files attached to Outlook message files (.msg)]
|
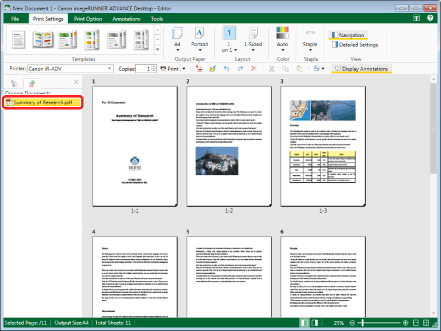
1.
Select the original documents to export from the [Original Documents] tab on the Navigation Window.
|
NOTE
|
|
If the [Original Documents] tab is not displayed on the Navigation Window, see the following to display it.
Displaying/Hiding the Navigation Window (User's Guide)
|
2.
Click [Export Original Documents] on the ribbon.
Or, right-click and select [Export Original Documents].
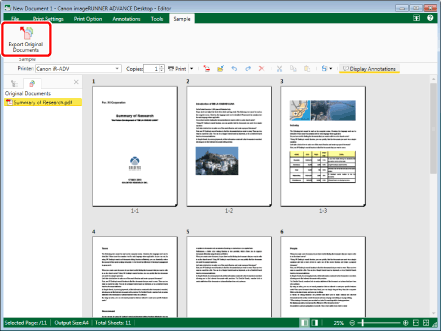
The [Select Export Destination] is displayed.
|
NOTE
|
|
If commands are not displayed on the ribbon of Desktop Editor, see the following to display them.
Adding Commands to Ribbons (User's Guide)
This operation can also be performed with the tool buttons on the toolbar. If tool buttons are not displayed on the toolbar of Desktop Editor, see the following to display them.
Setting Tool Buttons on the Toolbar (User's Guide)
Lists of Ribbon Commands/Tool Buttons (User's Guide)
If [Therefore] is not displayed in the storage destination, check [Destination Displayed in Save Destination Dialog when Saving/Exporting] in [System Settings].
|
3.
Select [Therefore], and click [OK].
4.
Enter the user name and password.
For more information, see the instruction manual for Therefore.
Exporting starts.
Exporting Office Documents to Therefore
|
NOTE
|
|
The print settings specified for the document are not reflected in the exported Word/Excel document.
Annotations added to a PDF document are not converted.
|
1.
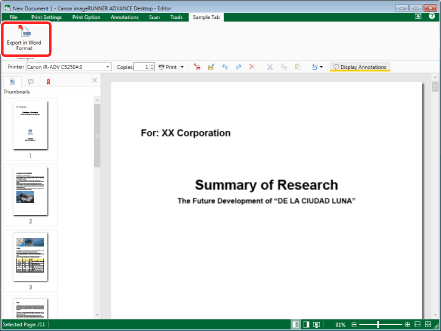
Select [Export in Word Format]/[Export in Excel Format] on the ribbon > [Therefore], and click [OK].
Or, select the [File] menu > [Export] > [Export in Word Format]/[Export in Excel Format] > [Export to Therefore].
The [Export in Word Format]/[Export in Excel Format] is displayed.
|
NOTE
|
|
If commands are not displayed on the ribbon of Desktop Editor, see the following to display them.
Adding Commands to Ribbons (User's Guide)
This operation can also be performed with the tool buttons on the toolbar. If tool buttons are not displayed on the toolbar of Desktop Editor, see the following to display them.
Setting Tool Buttons on the Toolbar (User's Guide)
Lists of Ribbon Commands/Tool Buttons (User's Guide)
If [Therefore] is not displayed in the storage destination, check [Destination Displayed in Save Destination Dialog when Saving/Exporting] in [System Settings].
|
2.
Specify [Document Name].
3.
Specify the range to export.
You can specify the page to export by a page number. For more information, see the following.
Creating Office Documents with Desktop Editor (User's Guide)
4.
If you want to export with advanced settings specified, click [Detailed Settings].
The [Detailed Settings for Word Documents]/[Detailed Settings for Excel Documents] is displayed.
5.
Configure the advanced settings of the Word document, then click [OK].
For more information on the [Detailed Settings for Word Documents]/[Detailed Settings for Excel Documents], see the following.
Creating Office Documents with Desktop Editor (User's Guide)
The [Export in Word Format]/[Export in Excel Format] is displayed again.
6.
Click [Save].
7.
Enter the user name and password.
For more information, see the instruction manual for Therefore.
The document is saved in Therefore in the Word/Excel document.