Registering [Document Destination Folder] Output Button
By registering a Document Destination Folder as a button in the output bar, you can copy/move documents simply by selecting a document and clicking the button.
This feature is useful when sorting and managing received faxes etc. in multiple folders.
|
NOTE
|
|
You can also use one of the following methods to copy/move documents.
Drag and drop the document to the output bar
Press a shortcut key on the keyboard
The [Document Destination Folder Settings] output button is shared with Desktop Editor. [Document Destination Folder] output button created in Desktop Browser are also reflected in Desktop Editor.
To reflect changes to [Document Destination Folder] output button settings in Desktop Editor, it is necessary to restart Desktop Editor.
The settings and display settings of [Document Destination Folder] output button can be changed as necessary.
You can register multiple [Document Destination Folder] output button.
|
1.
Select the [File] menu > [Tools] > [Create Output Bar Button] > [Document Destination Folder].
Or, right-click the output bar, and select [Create] > [Document Destination Folder].
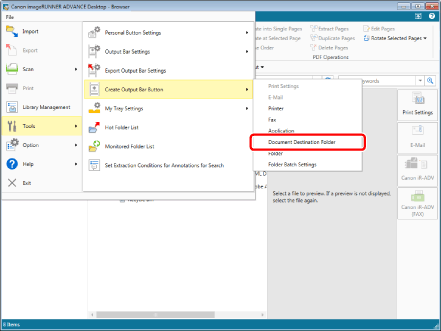
The [Document Destination Folder Settings] is displayed.
|
NOTE
|
|
[Document Destination Folder] output button can also be created from Desktop Editor. To create [Document Destination Folder] output button from Desktop Editor, select the [File] menu > [Settings/Management] > [Create Document Destination Folder].
|
2.
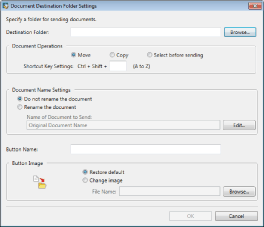
Configure the advanced settings [Document Destination Folder] output button.
|
[Destination Folder]
|
Click [Browse], and select the folder to specify as the copy/move destination.
|
|
[Document Operations]
|
Select a document, and set the operation that is performed when [Document Destination Folder] output button is clicked.
|
|
[Move]
|
When [Document Destination Folder] output button is clicked, the document is moved to the specified folder.
|
|
[Copy]
|
When [Document Destination Folder] output button is clicked, the document is copied to the specified folder.
|
|
[Select before sending]
|
Select either [Move] or [Copy] when [Document Destination Folder] output button is clicked.
|
|
[Shortcut Key Settings]
|
Set a keyboard shortcut key to use instead of clicking [Document Destination Folder] output button. Keys A to Z can be assigned.
|
|
[Document Name Settings]
|
Set the document name to use after copying/moving documents.
|
|
[Do not rename the document]
|
Select this to not rename documents.
|
|
[Rename the document]
|
Select this to rename documents when copying/moving them. Set the document name on the dialog box displayed by clicking [Edit]. For more information, see the following.
|
|
[Button Name]
|
Enter a name for output button using up to 40 characters.
|
|
[Button Image]
|
Specify the image to display in the button.
|
|
[Use default image]
|
Select to use the default image.
|
|
[Change image]
|
Select to specify an image to use. Click [Browse] and select the desired image in the displayed dialog box.
|
|
NOTE
|
|
[Document Destination Folder] output button settings can be configured for each button.
|
3.
Click [OK].
A confirmation message is displayed.
4.
Click [OK].
[Document Destination Folder] output button is added at the bottom of the output bar.
|
NOTE
|
|
The key assigned in [Shortcut Key Settings] can be checked by pressing the [Ctrl] key and [Shift] key on the keyboard at the same time to display the key on the output bar.
[Document Destination Folder] output button can also be displayed on the ribbon or toolbar. For information on displaying them, see the following.
|