Changing the Settings of [Document Destination Folder] Output Button
You can change the settings for [Document Destination Folder] output button that you have registered on the Desktop Browser screen.
Changing a [Document Destination Folder] output button
1.
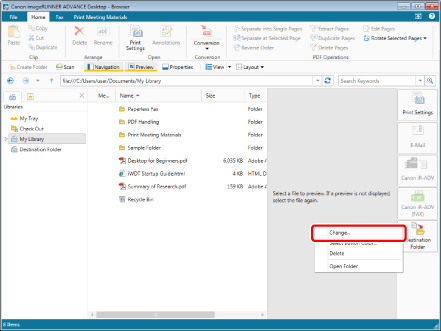
Right-click the [Document Destination Folder] output button > [Change].
Or, select the [File] menu > [Tools] > [Output Bar Settings] > (Document Destination Folder name) > [Change].

The [Document Destination Folder Settings] is displayed.
|
NOTE
|
|
You can also perform the same operation by clicking ▼ for [Document Destination Folder] output button displayed on the ribbon or toolbar and selecting [Change]. If an output button is not displayed on the ribbon or toolbar, see the following to display one.
A Document Destination Folder can also be set from Desktop Editor. To set a Document Destination Folder from Desktop Editor, follow one of the steps below.
[File] menu > [Settings/Management] > [Document Destination Folder Settings] > (Document Destination Folder name) > [Change]
Click ▼ for [Document Destination Folder] output button displayed on the ribbon or toolbar, and select [Change]
|
2.
Change the advanced [Document Destination Folder] output button settings.
For information on the detailed [Document Destination Folder] output button settings, see the following.
3.
Click [OK].
A confirmation message is displayed.
4.
Click [OK].
[Document Destination Folder] output button settings are changed.
|
NOTE
|
|
Even if you rename, copy or move a [Document Destination Folder] output button in Desktop Browser, the [Document Destination Folder] output button settings are retained. When a [Document Destination Folder] output button is copied, a confirmation message for selecting whether to retain the settings is displayed. If you click [Yes], the settings are changed to the destination folder. However, the settings are not retained if you change them with Windows Folder, etc.
If you rename a button in the [Document Destination Folder Settings], the [Document Destination Folder] output button name displayed on the ribbon or toolbar is also changed automatically.
|
Setting the Document Name to Use When Copying/Moving Documents
You can automatically rename documents that are copied/moved.
1.
Right-click the [Document Destination Folder] output button, and select [Change].
Or, follow one of the steps described below.
Select the [File] menu > [Tools] > [Output Bar Settings] > (Document Destination Folder name) > [Change]

The [Document Destination Folder Settings] is displayed.
|
NOTE
|
|
You can also perform the same operation by clicking ▼ for [Document Destination Folder] output button displayed on the ribbon or toolbar and selecting [Change]. If an output button is not displayed on the ribbon or toolbar, see the following to display one.
A Document Destination Folder can also be set from Desktop Editor. To set a Document Destination Folder from Desktop Editor, follow one of the steps below.
[File] menu > [Settings/Management] > [Document Destination Folder Settings] > (Document Destination Folder name) > [Change]
Click ▼ for the [Document Destination Folder] output button displayed on the ribbon or toolbar, and select [Change]
|
2.
Select [Rename the document] in [Document Name Settings] and click [Edit].
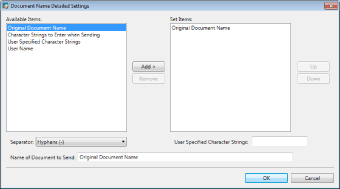
The [Document Name Detailed Settings] is displayed.
3.
Set the method for renaming documents.

|
[Add]
|
Adds the items you selected in [Available Items] to [Set Items].
|
|
[Remove]
|
Deletes the items you selected in [Set Items].
|
|
[Up]
|
The selected item is moved to the top of [Set Items].
|
|
[Down]
|
The selected item is moved to the bottom of [Set Items].
|
|
[Separator]
|
Select a separator character to insert between items.
|
|
[User Specified Character Strings]
|
If you added [User Specified Character Strings] in [Available Items], enter the custom string you want to insert in the document name.
|
|
[Name of Document to Send]
|
Displays the renamed document name templates in the order of [Set Items].
|
|
NOTE
|
|
You can set a combination of the following four items as the method for renaming documents.
[Original Document Name]: Inserts the original document name.
[Character Strings to Enter when Sending]: Enables you to enter a custom string to insert when copying/moving documents.
[User Specified Character Strings]: Inserts a fixed custom string.
[User Name]: Inserts the user name as the document name.
Selecting [Original Document Name] only is the same as selecting [Do not rename the document].
You can also double-click an item in [Available Items] to add it. You can also double-click an item in [Set Items] to delete it.
You can change the order of, add, or delete buttons by dragging and dropping.
|
4.
Click [OK].
The [Document Destination Folder Settings] is displayed again.
5.
Click [OK].