Registering [Folder] Output Buttons
Specify the folder that acts as the destination folder for the circulated documents to a [Folder]output button.
To specify the destination folder, follow one of the procedures below to register a [Folder] output button to the output bar on the Desktop Browser screen.
|
NOTE
|
|
The settings and display settings of the [Folder] output button can be changed as necessary.
You can register multiple [Folder] output buttons.
|
Registering [Folder] Output Buttons Using the Drag and Drop Operation
You can register a [Folder] output button to the output bar by dragging and dropping it. However, when you register it by dragging and dropping, you cannot configure the advanced settings during registration. If advanced settings are necessary, see the following.
|
NOTE
|
|
If you register a [Folder] output button by dragging and dropping, [Document Operations] is set to [Move] in the [Folder Settings].
|
1.
Drag one of the following icons and drop it to the output bar of the Desktop Browser screen.
The icon for the destination folder that is created in the shared folder
The icon of a link file (*.lnk) associated with the destination folder that is created in the shared folder
The [Folder] output button is registered to the output bar.
|
NOTE
|
|
The destination folders for the My Tray on the same Desktop cannot be registered to a [Folder] output button.
You can register the shared folder that other users do not specify as the destination folder for My Tray, but cannot circulate documents. After registering the folder, when you specify it as the destination folder for My Tray, you will be able to circulate documents.
[Folder] output buttons can also be displayed on the ribbon or toolbar. For information on displaying them, see the following.
|
Registering a [Folder] Output Button by Configuring the Advanced Settings
1.
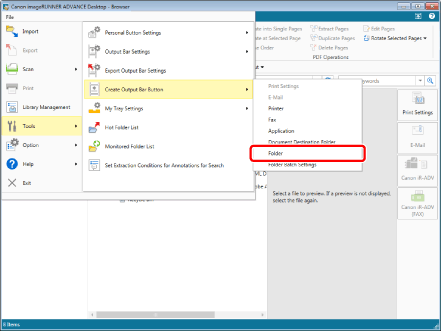
Select the [File] menu > [Tools] > [Create Output Bar Button] > [Folder].
Or, right-click the output bar and select [Create] > [Folder].

The [Folder Settings] is displayed.
2.
In the [Folder Settings], specify the destination folder to register to the output bar.
For more information on advanced [Folder] output button settings, see the following.
3.
Click [OK].
The [Folder] output button is registered to the output bar.
|
NOTE
|
|
[Folder] output buttons registered on the output bar can also be displayed on the ribbon or toolbar. For information on displaying them, see the following.
|
Registering Multiple [Folder] Output Buttons at a Time
|
NOTE
|
|
If you registered a [Folder] output button to the output bar by selecting [Folder Batch Settings], you cannot configure the detailed settings. If configuration of the advanced settings is necessary, see the following.
|
1.
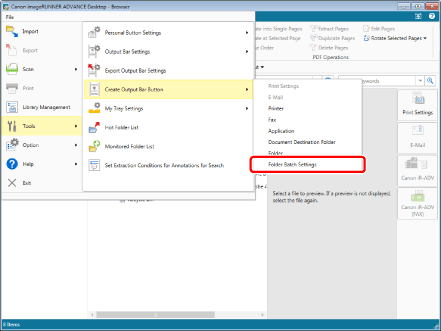
Select the [File] menu > [Tools] > [Create Output Bar Button] > [Folder Batch Settings].
Or, right-click the output bar and select [Create] > [Folder Batch Settings].

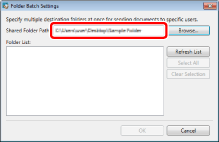
The [Folder Batch Settings] is displayed.
2.
Enter the path of the folder in which you will store the destination folder in [Shared Folder Path].

|
NOTE
|
|
You can also specify the folder where the destination folder is stored by clicking [Browse].
|
3.
Click [Refresh List].
The destination folder specified in the shared folder is displayed.
|
NOTE
|
|
The destination folder already registered to the output bar is not displayed.
|
4.
Check the destination folder to be registered to the [Folder] output button.
|
NOTE
|
|
When clicking [Select All], all displayed folders are checked.
When clicking [Clear Selection], all check marks for folders are cleared.
|
5.
Click [OK].
The selected [Folder] output buttons are added at the bottom of the output bar in order.
|
NOTE
|
|
[Folder] output buttons registered on the output bar can also be displayed on the ribbon or toolbar.
|