Managing the Print Settings for Index Tabs
You can adjust the position to print the chapter name on the tabs of tab paper. The adjusted print settings for index tabs can be registered, duplicated, edited, deleted, and exported as custom tabs.
You can manage custom tabs from [Manage Custom Tabs].
|
NOTE
|
|
You can register up to 10 custom tabs.
For information on how to print chapter names on index tabs, see the following.
|
Displaying [Manage Custom Tabs]
This section describes how to display [Manage Custom Tabs].
1.
Click [Detailed Settings for Insert Sheets] in [Sheet for Insertion] on the [Print Settings] tab on the Details Window.
Or, select [For Insertion] on the ribbon > [Detailed Settings for Insert Sheets].
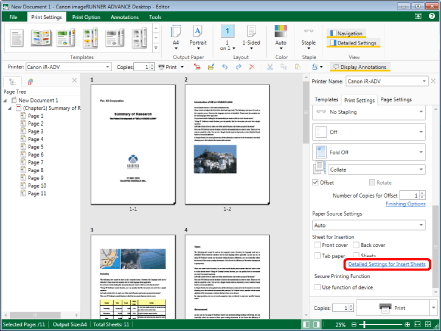
[Sheets for Insertion Settings] is displayed.
|
NOTE
|
|
If the Details Window is not displayed, see the following.
If commands are not displayed on the ribbon of Desktop Editor, see the following to display them.
This operation can also be performed with the tool buttons. If tool buttons are not displayed on the toolbar of Desktop Editor, see the following to display them.
|
2.
Click [Manage Custom Tabs].
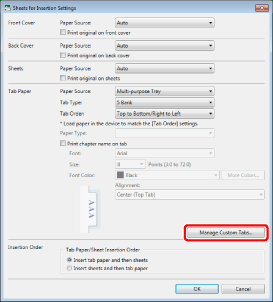
[Manage Custom Tabs] is displayed.
|
NOTE
|
|
You can also display [Manage Custom Tabs] by selecting the [File] menu > [Settings/Management] > [Manage Custom Tabs].
|
Registering a New Custom Tab
This section describes how to register a new custom tab.
1.
Display [Manage Custom Tabs].
|
NOTE
|
|
For information on displaying [Manage Custom Tabs], see the following.
|
2.
Click [Add].
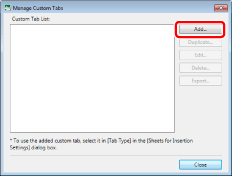
[Add New Tab] is displayed.
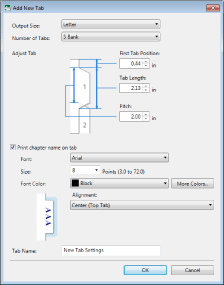
3.
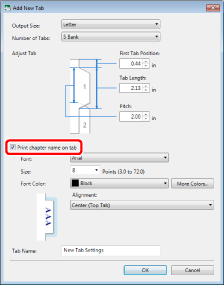
Select the [Print chapter name on tab] check box.
4.
Configure the print settings for the index tabs.
|
[Output Size]
|
Select the paper size to output.
|
|
[Number of Tabs]
|
Selects the number of the tab area on the tab paper.
|
|
[Adjust Tab]
|
Specify the dimensions of the tabs on the actual tab paper to print on.
|
|
[First Tab Position]
|
Specify a value that is 0 or more for the distance from the edge of the paper to the edge of the first tab.
|
|
[Tab Length]
|
Specify the length of the tab.
|
|
[Pitch]
|
Specify the distance from the start position of the previous tab to the start position of the next tab.
|
|
[Print chapter name on tab]
|
Select this check box when printing chapter names on the index tab.
|
|
[Font]
|
Select a font to use to print on the index tabs. The list displays the fonts installed in the computer you are using.
|
|
[Size]
|
Select a font size to use to print on the index tabs. If it is entered directly, the figures below the second decimal place are omitted.
|
|
[Font Color]
|
Select a font color to use to print on the index tabs. When you want to use a color that is not available in the list, click [More Colors].
|
|
[More Colors]
|
If you click this, [Color] is displayed. On [Color], you can set a color that is not listed in [Font Color].
|
|
[Alignment]
|
Select how the text is aligned when printing on the index tabs.
|
|
[Tab Name]
|
Enter the name of the custom tab to register using up to 31 characters. You cannot specify the same name as the name of a custom tab that is already registered.
|
When the Tab Shape of the Tab Paper Being Used Differs from the Displayed Shape
If it is difficult to measure the shape of the tabs on the tab paper because the shape differs from that displayed in the dialog box, use the following method to measure the shape of the tabs.
[First Tab Position] and [Tab Length]
Measure [Tab Length] by making a mark on the tab of the tab paper to measure.
For [First Tab Position], measure the length from the paper edge to the mark made for [Tab Length].
[Pitch]
Stack up the tabs of the tab paper to measure, and measure the length of the protruding area.

|
NOTE
|
|
For the [Adjust Tab] value, place the tab paper so that the tab is on the right side and measure the dimensions of the tab from the top right of the tab.
When specifying [Pitch], round measured numbers down when adjusting for fractions.
When measuring [Pitch], the accuracy can be improved by measuring the distance of multiple tabs and taking the average.
|
5.
Click [OK].
[Manage Custom Tabs] is displayed again.
6.
Click [Close].
[Sheets for Insertion Settings] is displayed again.
7.
Click [OK].
8.
Output the configured custom tab on tab paper to confirm that it is printed correctly.
If the print position is out of alignment with the position of the tabs on the tab paper, adjust the print position in [Edit Tab].
|
[First Tab Position]
|
Adjust this when the overall print position is out of alignment.
If the overall print position is shifted up when the tab paper is placed with the tab on the right side, increase the value. If it is shifted down, decrease the value.
|
|
[Tab Length]
|
Adjust this when the print width does not match the width of the tabs on the tab paper.
Reduce the value if the print width does not fit on the tab and printed information is missing.
|
|
[Pitch]
|
Adjust this when the tab interval of the tab paper does not match the print position interval.
If the print position on the tab is shifted up towards the bottom tab when the tab paper is placed with the tab on the right side, increase the value. If it is shifted down, decrease the value.
|
|
NOTE
|
|
Adjust [Pitch] in small increments, as it has a large effect on the overall printing position.
Confirm that the paper size is not exceeded based on the values specified in [First Tab Position], [Tab Length], and [Pitch]. If an error message is displayed when you click [OK] after specifying the values, adjust the following values so that the total is less than the height of the paper size set in [Output Size].
[First Tab Position] + [Pitch] x (number of tabs - 1) + [Tab Length]
 For information on how to edit custom tabs, see the following.
|
Duplicating Custom Tabs
This section describes how to duplicate registered custom tabs.
1.
Display [Manage Custom Tabs].
|
NOTE
|
|
For information on displaying [Manage Custom Tabs], see the following.
|
2.
Select the custom tab to duplicate, and click [Duplicate].
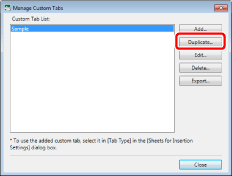
The custom tab is duplicated.
|
NOTE
|
|
The name of the duplicated setting is the original name with "(1)" appended.
The setting cannot be duplicated if the name of the duplicated setting with "(1)" appended exceeds 31 characters.
|
3.
Click [Close].
[Sheets for Insertion Settings] is displayed again.
4.
Click [OK].
Editing Custom Tabs
This section describes how to edit the settings of a registered custom tab.
1.
Display [Manage Custom Tabs].
|
NOTE
|
|
For information on displaying [Manage Custom Tabs], see the following.
|
2.
Select the custom tab to edit, and click [Edit].
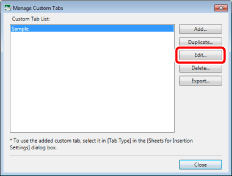
[Edit Tab] is displayed.
3.
Change the index tab settings.
|
NOTE
|
|
For information on how to configure custom tabs, see the following.
|
Deleting Custom Tabs
This section describes how to delete registered custom tabs.
1.
Display [Manage Custom Tabs].
|
NOTE
|
|
For information on displaying [Manage Custom Tabs], see the following.
|
2.
Select the custom tab to delete, and click [Delete].
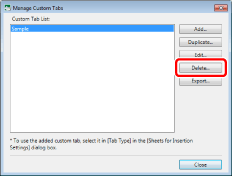
A confirmation message is displayed.
3.
Click [Yes].
The custom tab is deleted.
4.
Click [Close].
[Sheets for Insertion Settings] is displayed again.
5.
Click [OK].
Exporting Custom Tabs
This section describes how to export the custom tabs to another Desktop. For information on the export procedure, see the following.
Exporting Separate User Settings (Administrator Guide)