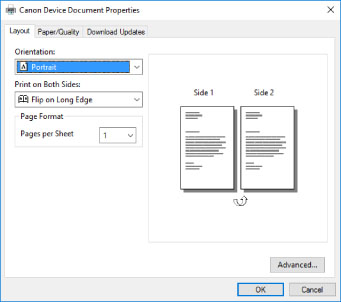
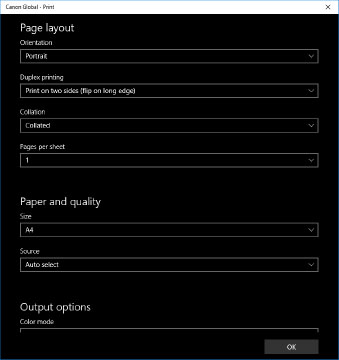
The Windows standard print settings screen is displayed
Even after you install the driver, the print settings screen of the driver may not be displayed and the Windows standard print settings screen displayed instead. If this happens, a number of causes are possible.
Display the print settings screen of the driver by referring to the "Cause" and "Remedy" that explains each Windows standard print settings screen displayed.
If displayed from the icon of the device in [Devices and Printers] or a desktop app
The following screen is displayed from the icon of the device in [Devices and Printers] or when printing with a desktop app.

Cause 1.
The driver has not been correctly installed in the client in a shared printer environment.
Remedy
Refer to the procedure for setting a computer as a shared printer client and install the driver.
Cause 2.
The driver was installed by the add printer function of Windows (by specifying an inf file).
Remedy
Install the driver using the installer.
If the environment does not enable installation using the installer, you will be able to use the Windows standard print settings screen.
Cause 3.
There is the possibility of some sort of problem occurring while installing the printer driver.
Remedy
Uninstall the printer driver, then re-install it by following the correct procedure.
If displayed from a store app
The following screen is displayed when printing from a store app.

Cause 1.
You cannot connect to the Internet from the computer you are using.
Remedy
The functions required for printing with a store app are installed from the Windows store via the Internet. Check that you can access the Windows store from the computer you are using, then reinstall the driver.
Cause 2.
The account you used to log onto Windows is not associated with a Microsoft account.
Remedy
Use a Microsoft account to install from the Windows store.
If the account you are using when logging onto Windows is an account other than a Microsoft account (a local account or domain account), you need to associate it with a Microsoft account following the procedure below, then install.
(1) Display the [Accounts] screen.
In Windows 10
Select [Settings] > [Accounts].
In Windows 8.1
Display the charm bar in the [Desktop] screen → select [ Settings] > [Change PC settings] > [Accounts].
 Settings] > [Change PC settings] > [Accounts].
(2) Set association with a Microsoft account.
In Windows 10
Select [Your info] > [Sign in with a Microsoft account instead].
In Windows 8.1
Select [Your account] > [Connect to a Microsoft account].
When you have finished configuring the settings according to the instructions on the screen, check that the associated Microsoft account is displayed in the account information.
Cause 3.
The app is set so that the Windows standard print settings screen is displayed.
Remedy
If you are printing from a store app, set the app so that the print settings screen of the driver is displayed.
(1) Start the Canon Office Printer Utility.
In Windows 10
Select the Start menu > [Canon Office Printer Utility] from the list of apps.
In Windows 8.1/Server 2012 R2
Click [ ] at the bottom of the [Start] screen > [Canon Office Printer Utility] in the [Apps] screen.
 ] at the bottom of the [Start] screen > [Canon Office Printer Utility] in the [Apps] screen.
(2) Display the [Options] screen of the Canon Office Printer Utility.
In Windows 10
Select the menu [ ] at the top of the app screen > [Settings] > [Options].
 ] at the top of the app screen > [Settings] > [Options].
In Windows 8.1/Server 2012 R2
Display the charm bar in the [Desktop] screen → select [ Settings] > [Options].
 Settings] > [Options].
(3) Disable [Settings for print settings screen] > [Always display in compatibility mode].