Problems with Printing Results
The printed image is displaced or skewed.
 Are the paper guides misaligned?
Match the paper guides with the paper loaded in the paper source.
Images are uneven or faint.
Is the paper damp?
Replace the paper with paper that is not damp.
Are the gradation and density set appropriately?
Perform gradation adjustment.
If the density does not improve by performing density adjustment, it may be able to be improved by correcting the standard density.
Has condensation occurred?
If the temperature in the environment where the machine is installed changes rapidly, the images and texts may become light or blurred due to water droplets forming inside the machine (condensation). Set <Control Recognized Condensation> to <On>.
Black streaks appear.
Is the document feed scanning area dirty?
Clean the document feed scanning area.
Bleedthrough occurs.
Is the density of backgrounds set appropriately?
If bleed-through is observed with the print result, adjusting the density of background can improve the problem, giving a fine print.
Images are not printed on the intended side of the paper.
Is the orientation of the loaded paper correct?
Check the orientation and side of the paper that is facing up. Load the paper again if it is incorrectly orientated.
Images are not printed in the intended size.
Do the original size and size of the paper that is loaded match?
Replace the paper that is loaded with paper of the size you want to print on.
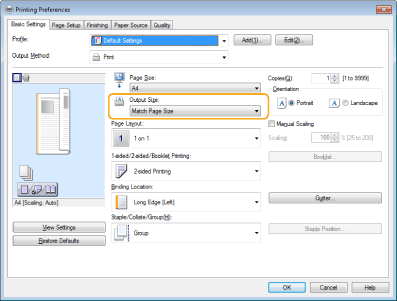
Match [Output Size] in the printer driver with the size of paper to print on.
The orientation does not match on both sides of the paper when using two-sided printing.
Are the settings for two-sided printing correct?
Follow the procedure below to check the print settings.
1 | Select the orientation of the original on the print settings screen of the application. |
2 | On the [Basic Settings] screen of the driver, set [Orientation] to the same orientation you set in step 1. 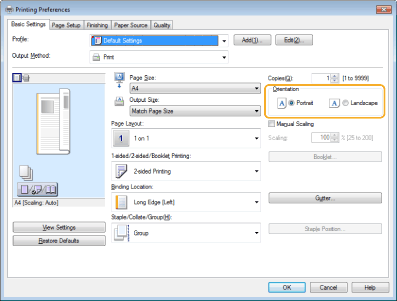 |
3 | While checking the print preview, set [Page Layout] 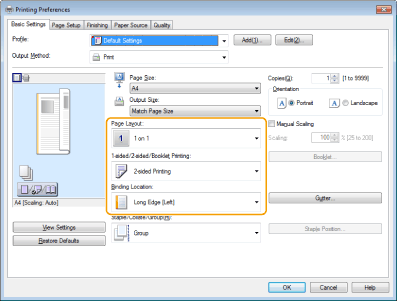 |
 |
[Page Order] is displayed when [Page Layout] is set to [2 on 1] or higher. |
Texts and images become blurred.
Are you printing in a low humidity environment?
In a low humidity environment, set <Humid Environment Mode> to <Low Humidity>.
Paper jams during two-sided printing.
Are you printing on both sides of the thin paper?
Set <Adjust Paper Separation>.
Some parts of images/texts are left white (white patch).
Are the shaded parts of images/texts not printed and left white?
Set <Correct Fill Area Void> to <On>.
Toner splatters/white patches/streaks appear.
Are you printing in a low temperature environment?
Set <Waterdrop Pattern Prevention Mode> to <On>.
Toner is lightly applied to an unprinted area (white area).
Are you printing in a low humidity environment?
Set <Fogging Prevention Mode>.
The left and right edges of the paper are dirty.
Unnecessary toner on the drum is attached to the paper.
This symptom may be able to be improved by setting <Humid Environment Mode> to <High Humidity> in the paper settings.
Afterimages appear on areas that are not printed.
The toner fixing is inappropriate.
When image problems occur because the temperature for fixing toner to the paper is too high, setting <Adjust Fixing Temperature> to <Low 1> or <Low 2> may improve the output.
When the image is faint because insufficient toner is fixed to the paper, changing the paper type or using <Correct Fixing for Jobs with MP Tray (Heavy 4)> and <Adjust Fixing Level for Envelopes> may improve the output.
The remedy for each paper type is indicated below.
Paper Type | Paper Weight | Remedy |
Thin | 16 lb bond (60 g/m2) | Select the paper type in <Paper Type>, starting from lighter and continuing to heavier (for example, from Plain 1 to Plain 2). If changing to <Plain 3> does not improve the fixing, set <Correct Fixing for Jobs with MP Tray (Heavy 4)>.*1 |
Plain 1 | 16 to 19 lb bond (61 to 74 g/m2) | |
Plain 2 | 20 to 23 lb bond (75 to 89 g/m2) | |
Plain 3 | 24 to 28 lb bond (90 to 105 g/m2) | Set <Correct Fixing for Jobs with MP Tray (Heavy 4)>.*1 |
Heavy 1 | 29 to 32 lb bond (106 to 120 g/m2) | |
Heavy 2 | 33 to 36 lb bond (121 to 135 g/m2) | |
Heavy 3 | 37 lb bond to 60 lb cover (136 to 163 g/m2) | Set <Correct Fixing for Jobs with MP Tray (Heavy 4)>. |
Heavy 4 | 61 to 73 lb cover (164 to 199 g/m2) | |
Color | 20 to 23 lb bond (75 to 89 g/m2) | Select <Plain 3> for <Paper Type>. If changing to <Plain 3> does not improve the fixing, set <Correct Fixing for Jobs with MP Tray (Heavy 4)>.*1 |
Recycled | 20 to 23 lb bond (75 to 89 g/m2) | |
Pre-Punched | 20 to 21 lb bond (75 to 80 g/m2) | |
Transparency | 27 lb bond to 66 lb cover (100 to 179 g/m2) | Select <Heavy 4> for <Paper Type>. If changing to <Heavy 4> does not improve the fixing, set <Correct Fixing for Jobs with MP Tray (Heavy 4)>. |
Labels | 35 lb bond (130 g/m2) | Select <Bond> for <Paper Type>.*2 |
Bond | 20 to 24 lb bond (75 to 90 g/m2) | Set <Correct Fixing for Jobs with MP Tray (Heavy 4)>.*1 |
Envelope | 21 to 27 lb bond (80 to 100 g/m2) | Set <Adjust Fixing Level for Envelopes>. |
*1 | When using <Correct Fixing for Jobs with MP Tray (Heavy 4)>, load the paper in the multi-purpose tray. |
*2 | <Correct Fixing for Jobs with MP Tray (Heavy 4)> cannot be used for labels, as it cannot be loaded in the multi-purpose tray. |
Envelope flaps are glued or toner fixation is poor.
Is the fixing level for envelopes appropriate?
Adjust the fixing level for envelopes.