
Registering Personal Buttons/Shared Buttons
You can register Personal buttons for your own use, or Shared buttons that can be shared with all users.
 |
To register a Personal button, you need to log in with personal authentication management. Configuring the Personal Authentication Management Settings To register a Shared button, you need to log in with administrator rights. For information on the maximum number of Personal buttons and Shared buttons that can be registered, see Management Functions. Personal buttons cannot be changed to Shared buttons, and vice-versa. To do so, recall the settings and register another button from <Menu>. Press and hold a button to change its name/comment or move/delete it. The same operations (changing the name/comment of a button or moving/deleting a button) can be performed from <Menu> on the <Home> screen. Customizing the <Home> Screen Personal buttons can be shared between multiple devices by synchronizing personalized data. List of Items That Can Be Personalized Settings that can be registered in Personal buttons/Shared buttonsFunctions and settings that can be registered in Personal buttons/Shared buttons are indicated below. Save locations for the <Access Stored Files> functions Using Storage Space Access to a server and the login password can be registered to Personal buttons/Shared buttons. This is convenient for skipping password entry when recalling the registered button. If you want to set password in the settings stored in the registered button, as you often import settings in a Personal button or Shared button to another machine and you want to prevent users from pretending to be other users, exclude a password when registering. Importing/exporting the registered buttonsYou can import and export the registered Personal/Shared buttons from the Remote UI. Importing/Exporting All Settings Depending on the model from which the buttons are being imported, you may not be able to import all the settings for Shared/Personal buttons. For more information, contact your dealer or service representative. |
Example: Registering print function
1
Press <Access Stored Files>, select a mail box, select a file to print, press <Print> and specify the print settings. <Home> Screen
2
Press 
 <Register to Home> when the setting is complete.

 <Register to Home> when the setting is complete.
3
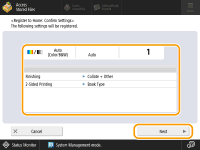
Confirm the settings and press <Next>.
4
Specify the action that is performed when the registered button is pressed, and press <Next>.
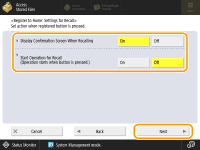
The setting described below results in a different operation immediately after pressing the registered button. For more information, see Executing Personal Buttons/Shared Buttons.
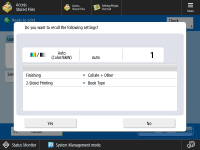
If you select <On> for <Display Confirmation Screen When Recalling>, the confirmation screen below is displayed when you press the registered button. Select <Off> if you do not want to display the confirmation screen.
If you select <On> for <Start Operation for Recall (Operation starts when button is pressed.)>, printing starts when you press the registered button without pressing <Start Printing>. Select <Off> if you want to start printing manually by pressing <Start Printing>.

If you select <On> for both <Display Confirmation Screen When Recalling> and <Start Operation for Recall (Operation starts when button is pressed.)>, printing starts after you select <Yes> on the confirmation screen.
5
Enter the button name and a comment, select <Personal> or <Shared>, and press <OK>.
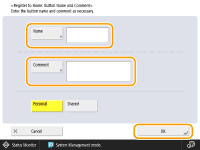
Press <Name> or <Comment> to enter. It is convenient if you enter a setting name in <Name> and a memo in <Comment>.

To register a button for yourself only, press <Personal>. To register a button to share with other users, press <Shared>.
If <4 medium-small buttons per page>, <12 medium-small buttons per page>, or <15 small buttons per page> is selected in <Home Screen Layout Settings>, <Comment> is not displayed for Shared/Personal buttons. Customizing the <Home> Screen
Executing Personal Buttons/Shared Buttons
This section describes how to execute Personal buttons/Shared buttons. The procedure for executing the function differs according to the settings specified when registering the Personal button/Shared button and the registered function.
1
Press the button you want to use.
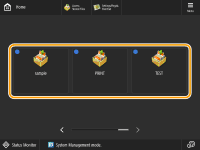
Each icon indicates the function type as shown below.
 <Access Stored Files>
You can also execute the content of the button with the following procedure: press and hold the Personal button/Shared button  press <Recall>.
 press <Recall>.
2
Perform the following operation according to the content registered in the button.
 When <Display Confirmation Screen When Recalling> is set to <On>
A confirmation screen asking whether to recall the settings is displayed.
If <Start Operation for Recall (Operation starts when button is pressed.)> is set to <On>, operations registered in the button start when you press <Yes>.
If <Start Operation for Recall (Operation starts when button is pressed.)> is set to <Off>, the setting screen is displayed when you press <Yes>. This enables you to change the settings before pressing <Start Printing> to start.
 When <Display Confirmation Screen When Recalling> is set to <Off>
If <Start Operation for Recall (Operation starts when button is pressed.)> is set to <On>, operations registered in the button start immediately.
If <Start Operation for Recall (Operation starts when button is pressed.)> is set to <Off>, the setting screen is displayed. This enables you to change the settings before pressing <Start Printing> to start.
 When you select <Access Stored Files> function button
The specified save folder is displayed. Select a file in the folder for printing.