Adding Buttons to the [Home] Screen (Personal and Shared Buttons)
Add buttons to the [Home] screen buttons for frequently used scan, copy, and other settings and destinations.
You can press an added button to recall settings or immediately execute a function for faster and more efficient operations.
Customize two types of buttons: Personal buttons, which are individually customized and can only be used by a specific logged-in user, and Shared buttons, which are available to all users.
Functions and Settings That Can Be Registered as Buttons
Scan and Send
Destination and scan settings
Scan and Store
Store location and scan settings
Shortcut to a store location
Fax
Destination and original scan settings
Copy
Copy settings
Access Stored Files
Shortcut to a store location
Fax/I-Fax Inbox
Shortcut to a store location
Adding Personal and Shared Buttons
The number of Personal and Shared buttons that can be added are as follows.
Personal buttons: Up to 60 buttons per user (maximum 12,000 buttons for all users)
Shared buttons: Up to 60 buttons
Use the control panel to add Personal and Shared buttons. You cannot add buttons using Remote UI from a computer.
This section describes the copy procedure as an example.
This section describes the copy procedure as an example.
* You may not be able to add Personal and Shared buttons depending on the machine settings and privileges of the login user. Configuring the Operations and Screen Displays Allowed for Users
1
Log in to the machine. Logging In to the Machine
When adding of Shared buttons is permitted by users other than administrators, Shared buttons can be added without the user having to log in.
2
On the control panel, press [Copy] in the [Home] screen. [Home] Screen
The copy screen is displayed.
3
Configure the content to be registered to the button. Copy Operations
4
Press [ Menu]
Menu]  [Register to Home].
 Menu]
Menu]  [Register to Home].
When a Confirmation Message Asking Whether to Register Using a Password Appears
Select [Yes] or [No] for whether to prompt the user for a password when the added button is pressed and the settings are recalled.
To skip password entry, select [Yes].
To prompt the user to enter a password each time, select [No]. Only users who know the password can use the recalled settings.
5
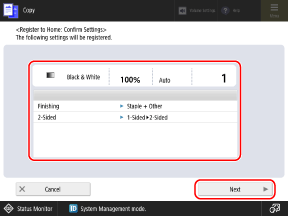
Check the settings, and click [Next].

To register a shortcut to a store location, you can skip this step and the next step. Proceed to Step 7.
6
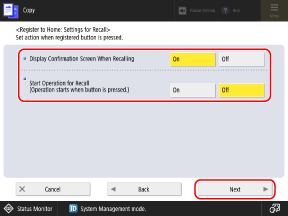
Specify the action to take when the added button is pressed, and press [Next].

When Recalling the Settings
To Recall the Settings after Displaying the Confirmation Screen of the Settings
Set [Display Confirmation Screen When Recalling] to [On], and set [Start Operation for Recall] to [Off].
Set [Display Confirmation Screen When Recalling] to [On], and set [Start Operation for Recall] to [Off].
To Recall the Settings without Displaying the Confirmation Screen of the Settings
Set [Display Confirmation Screen When Recalling] and [Start Operation for Recall] to [Off].
Set [Display Confirmation Screen When Recalling] and [Start Operation for Recall] to [Off].
When Executing a Function Immediately
To Execute a Function after Displaying the Confirmation Screen of the Settings
Set [Display Confirmation Screen When Recalling] and [Start Operation for Recall] to [On].
Set [Display Confirmation Screen When Recalling] and [Start Operation for Recall] to [On].
To Execute a Function without Displaying the Confirmation Screen of the Settings
Set [Display Confirmation Screen When Recalling] to [Off], and set [Start Operation for Recall] to [On].
Set [Display Confirmation Screen When Recalling] to [Off], and set [Start Operation for Recall] to [On].
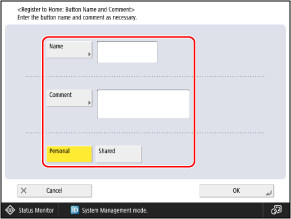
Enter the button name and a comment, and select [Personal] or [Shared].

Press [Name] or [Comment], and enter the information.
The name is always displayed on the button.
Comments are only displayed when the button size is set to large or medium. These are not displayed when the size is set to medium-small or small. Customizing the [Home] Screen
To add an individually customized button that can only be used by a login user, select [Personal]. To add a button that can be used by all users, select [Shared].
8
Press [OK].
The button is added to the [Home] screen.
NOTE
When Registering a File Server Destination to a Personal or Shared Button
If the authentication method for file server access is set to use authentication information of the login user, the password setting used for file server authentication is not included in the registered information of the Personal and Shared buttons. [Information Used for File TX/Browsing Authentication]
When Registering a Destination in the Remote Address Book to a Personal or Shared Button
Even when the destination information is updated on the server machine, the destination information registered in a Personal button or Shared button on the client machine is not updated.
If you cannot send data using an added button, check whether the destination information has been updated on the server machine.
If you cannot send data using an added button, check whether the destination information has been updated on the server machine.
Changing Added Personal and Shared Buttons
You cannot change a Personal button to a Shared button, or change a Shared button to a Personal button. You must add a new button to replace it.
Press and hold an added button to change the name and comment and to move or delete it.
* You can perform the same operations using [ Menu] in the [Home] screen. Customizing the [Home] Screen
 Menu] in the [Home] screen. Customizing the [Home] Screen