Paper Settings

You can configure the paper settings when copying.
You can also configure the settings to insert sheets or tab paper into the copy, and copy onto the tab part of the tab paper.
You can also configure the settings to insert sheets or tab paper into the copy, and copy onto the tab part of the tab paper.
Selecting the Paper to Use for Copying
By default, the machine automatically selects the paper to use for copying according to the size of the placed original and the enlarge or reduce setting.
* The machine automatically recognizes the original size when copying.
Manually select the paper to be used for copying when you want to copy onto paper loaded in the multi-purpose tray or when the paper you want to use is not automatically selected.
1
On the copy screen, press [Select Paper]. Copy Screen
The [Select Paper] screen is displayed.
2
Select the paper to be used, and press [OK].
The copy screen is displayed again.
You can press [ ] to check the details of the selected paper.
] to check the details of the selected paper.When the use of a paper source is restricted, you cannot select the paper loaded in that paper source. [Restrict Paper Source] (C7100 Series Only)
IMPORTANT
Be sure to configure the paper type settings correctly. Specifying the Paper Size and Type
* The image may become corrupted if the settings are not configured properly. In addition, the fixing assembly may become dirty or a paper jam may occur, and repair by your service representative may be required.
Inserting Sheets and Chapter Pages
You can insert pages, called "sheets," into the copies. For example, when you copy an original consisting of multiple chapters, you can insert colored paper between chapters to help you check where each chapter ends.
You can also copy the content of the original onto the sheets and insert them as chapter pages. In the normal original, include the sheet original to be copied onto the inserted sheets.
You can also copy the content of the original onto the sheets and insert them as chapter pages. In the normal original, include the sheet original to be copied onto the inserted sheets.
* When making multiple copies, you can also insert a job separator between a specified number of copies or between each set of grouped pages. For example, when you make a large number of copies, you can insert a colored job separator between a specified number of copies or between each set of grouped pages to help you check the number of copies or the end of each page group.
1
On the copy screen, press [Options]  [Insert Sheets]. Copy Screen
The [Insert Sheets] screen is displayed.
Select [Sheets] or [Chapter Pages].
To copy the original only onto the front side of each inserted page, select [Chapter Pages].
In all other cases, select [Sheets]. For each sheet of paper to be inserted, you can set whether to copy the original and whether to perform 1-sided or 2-sided copying.
3
Press [Add].
The [Add] screen is displayed.
4
Configure the settings for the sheets and chapter pages.
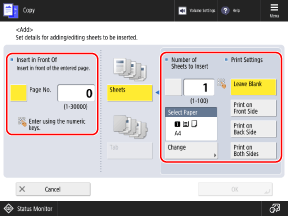
[Insert in Front Of] or [Insert To]
Specify the page number where the sheet is to be inserted.
Press the [Page No.] button to select it, and specify the page number where the paper is to be inserted, using the numeric keys.
Press the [Page No.] button to select it, and specify the page number where the paper is to be inserted, using the numeric keys.
* When you copy onto the inserted paper, the specified page number of the original is copied.
Example: When you enter "5" for the page number
If you configure the settings not to copy onto the inserted paper, the paper is inserted between pages 4 and 5.
If you configure the settings to copy onto the inserted paper, the paper is inserted as page 5, and page 5 of the original is copied onto the inserted paper.
[Number of Sheets to Insert]
To insert two or more sheets at the same page, press the button to select it, and specify the number of sheets to be inserted, using the numeric keys.
[Print Settings]
Set whether to copy onto the sheets.
[Select Paper]
Select the paper to be inserted.
Press [Change], select the paper to be inserted, and press [OK].
Press [Change], select the paper to be inserted, and press [OK].
On the screen for selecting the paper, you can press [] to check the details of the selected paper.
] to check the details of the selected paper.When the use of a paper source is restricted, you cannot select the paper loaded in that paper source. [Restrict Paper Source] (C7100 Series Only)
Press [OK].
The [Insert Sheets] screen is displayed again, and the settings for the sheets and chapter pages are added to the list.
To insert a sheet or chapter page at another location, repeat Step 2 to Step 5.
To insert a sheet or chapter page at another location, repeat Step 2 to Step 5.
6
Press [OK] [Close].
The copy screen is displayed again.
IMPORTANT
Be sure to configure the paper type settings correctly. Specifying the Paper Size and Type
* The image may become corrupted if the settings are not configured properly. In addition, the fixing assembly may become dirty or a paper jam may occur, and repair by your service representative may be required.
NOTE
Counting Inserted Pages As Copied Pages
If you do not copy onto inserted pages, they are not counted in the number of pages copied.
If you copy onto inserted pages, they are counted in the number of pages copied.
Inserting Tab Paper (For C7100 Series and C5100 Series)
You can insert tab paper into copies.
You can also copy the original onto the tab part of the inserted tab paper. Include the tab original in the normal original when you want to copy onto the tab part.
You can also copy the original onto the tab part of the inserted tab paper. Include the tab original in the normal original when you want to copy onto the tab part.
* You can also insert paper other than tab paper, such as heavy paper or color paper. Inserting Sheets and Chapter Pages
* You can also make copies in which only the tab part of the tab paper is copied. Copying onto the Tab Part of Tab Paper (For C7100 Series and C5100 Series)
* You can also make copies in which only the tab part of the tab paper is copied. Copying onto the Tab Part of Tab Paper (For C7100 Series and C5100 Series)
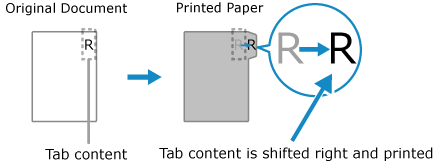
Tab original
To copy onto the tab part, place the original as shown below. Make sure that no unnecessary text or images are included in the content of the original to be copied onto the tab part.
1
On the copy screen, press [Options] [Insert Sheets]. Copy Screen
The [Insert Sheets] screen is displayed.
2
Press [Tab].
3
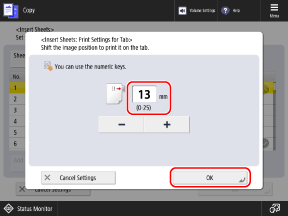
Set the tab print position, and press [OK].
The [Insert Sheets] screen is displayed again.
When copying onto the tab part, set the print position of the tab part by entering the adjustment width to apply to the tab original.
The print position setting is not required if you do not copy onto the tab part. Press [OK] without configuring this setting, and proceed to Step 4.
Press [Add].
The [Add] screen is displayed.
5
Configure the tab paper settings.
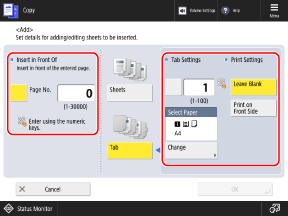
[Insert in Front Of] or [Insert To]
Specify the page number where the tab paper is to be inserted.
Press the [Page No.] button to select it, and specify the page number where the tab paper is to be inserted, using the numeric keys.
Press the [Page No.] button to select it, and specify the page number where the tab paper is to be inserted, using the numeric keys.
* When you configure the settings to copy onto the tab part, the specified page number of the original is copied.
Example: When you enter "5" for the page number
If you configure the settings not to copy onto the tab part, the tab paper is inserted between pages 4 and 5.
If you configure the settings to copy onto the tab part, the tab paper is inserted as page 5, and page 5 of the original is copied onto the tab part.
[Tab Settings]
To insert two or more sheets of tab paper at the same page, press the button to select it, and specify the number of sheets to be inserted, using the numeric keys.
[Print Settings]
Set whether to copy onto the tab part.
[Select Paper]
Select the tab paper to be inserted.
Press [Change], select the tab paper to be inserted, and press [OK].
Press [Change], select the tab paper to be inserted, and press [OK].
On the screen for selecting the paper, you can press [] to check the details of the selected paper.
] to check the details of the selected paper.When the use of a paper source is restricted, you cannot select the paper loaded in that paper source. [Restrict Paper Source] (C7100 Series Only)
Press [OK].
The [Insert Sheets] screen is displayed again, and the tab paper settings are added to the list.
To insert tab paper at another location, repeat Step 4 to Step 6.
To insert tab paper at another location, repeat Step 4 to Step 6.
7
Press [OK] [Close].
The copy screen is displayed again.
NOTE
You can insert sheets and tab paper at the same page number. In this case, the machine inserts the sheet before the tab paper. Inserting Sheets and Chapter Pages
* When a sheet and tab paper are inserted at the same page number, the original can be copied onto only one of them.
Copying onto the Tab Part of Tab Paper (For C7100 Series and C5100 Series)
You can make copies in which only the tab part of the tab paper is copied.
* You can also place a normal original and tab original together, and copy onto the tab part of the tab paper to be inserted into the copies of the normal original. Inserting Tab Paper (For C7100 Series and C5100 Series)
Tab original
To copy onto the tab part, place the original as shown below. Make sure that no unnecessary text or images are included in the content of the original to be copied onto the tab part.
1
On the copy screen, press [Options] [Print on Tab]. Copy Screen
The [Print on Tab] screen is displayed.
2
Set the tab print position.
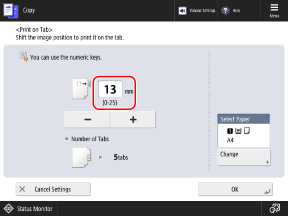
Set the print position of the tab part by entering the adjustment width to apply to the tab original.
3
Select the tab paper on which to copy the tab.
Press [Change] under [Select Paper], select the tab paper on which to copy the tab, and press [OK].
On the screen for selecting the paper, you can press [] to check the details of the selected paper.
] to check the details of the selected paper.When the use of a paper source is restricted, you cannot select the paper loaded in that paper source. [Restrict Paper Source] (C7100 Series Only)
4
Press [OK] [Close].
The copy screen is displayed again.
Inserting Paper Between Transparencies
When you copy onto transparencies, you can insert sheets of paper between the transparencies to prevent them from sticking together.
You can also copy the original onto the inserted paper.
You can also copy the original onto the inserted paper.
1
On the copy screen, press [Options] [Transparency Cover Sheets]. Copy Screen
The [Transparency Cover Sheets] screen is displayed.
2
Set whether to copy onto the paper to be inserted.
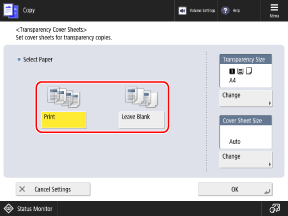
When this is set to [Print], the same image as the preceding transparency is copied onto the inserted paper.
3
Select the transparency and paper to be inserted.
Press [Change] under [Transparency Size], select the transparency on which to copy, and press [OK].
Press [Change] under [Cover Sheet Size], select the paper to be inserted, and press [OK].
* On the screen for selecting the paper, you can press [] to check the details of the selected paper.
] to check the details of the selected paper.* When the use of a paper source is restricted, you cannot select the paper loaded in that paper source. [Restrict Paper Source] (C7100 Series Only)
4
Press [OK] [Close].
The copy screen is displayed again.