Setting IPP Printing on a Computer
Make the following preparations for each computer used to print data.
Step 1: Installing the Driver on Which an IPP Port Is Set
Required Preparations
Check the operating environment via the Canon website for your country or region, and download and install the latest printer driver.
* If the machine is supplied with a CD-ROM or DVD-ROM, you can also use the CD-ROM or DVD-ROM to install the driver.
When Using Windows
Administrator privileges are required on each computer.
1
Log on to the computer using an administrator account.
2
Click [ ] (Start)
  [
[ ] (Settings) [Bluetooth & devices] [Printers & scanners].
The [Printers & scanners] screen is displayed.
3
Click [Add device] for [Add a printer or scanner].
4
Click [Add manually] for [The printer that I want isn’t listed].
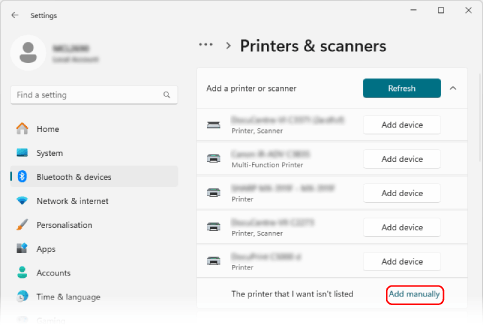
The [Add a printer] screen is displayed.
5
Select [Select a shared printer by name] and enter the connection destination, and click [Next].

The Add Printer Wizard screen is displayed.
Enter the connection destination as follows:
When using IPP printing
http://<IP address of the machine>/ipp |
When using IPPS printing
https://<IP address of the machine>/ipp |
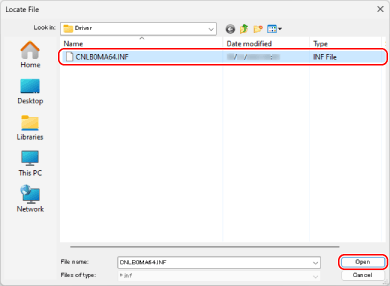
6
Click [Have Disk] [Browse].
7
Open the printer driver folder, select the INF file in the [Driver] folder, and click [Open].
8
Click [OK] and install the driver following the instructions on the screen.
When installation is completed, proceed to Step 2. Step 2: Installing the Certificate When Using IPPS Printing (Windows Only)
* If you are not using IPPS printing, proceed to Step 3. Step 3: Setting the User Management Information and Machine Information Using the Driver
* If you are not using IPPS printing, proceed to Step 3. Step 3: Setting the User Management Information and Machine Information Using the Driver
When Using macOS
Install the printer driver on the computer that will be used to perform IPP printing, and register the machine.
For details about how to install the printer driver and register the machine, see the manual of the driver at the online manual site.
For details about how to install the printer driver and register the machine, see the manual of the driver at the online manual site.
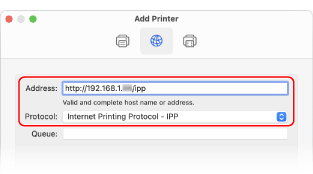
[Protocol] and [Address] Settings When Registering the Machine
When using IPP printing, set [Protocol] and [Address] when registering the machine on the computer as follows:
For [Protocol], select [Internet Printing Protocol - IPP].
Enter the following into [Address]:
When using IPP printing
http://<IP address of the machine>/ipp |
When using IPPS printing
https://<IP address of the machine>/ipp |
When installation and machine registration are completed, proceed to Step 3. Step 3: Setting the User Management Information and Machine Information Using the Driver
Step 2: Installing the Certificate When Using IPPS Printing (Windows Only)
When using IPPS printing in Windows, save the certificate file and install the certificate on the computer used for the printing.
This section describes how to install the certificate using the Microsoft Edge.
This section describes how to install the certificate using the Microsoft Edge.
Administrator privileges are required on each computer.
1
Log on to the computer using an administrator account.
2
From the web browser on the computer, access the following URL:
https://<IP address of the machine>/ |

3
In the URL input field, click [Not secure] [Your connection to this site isn't secure] [ ] (Certificate).
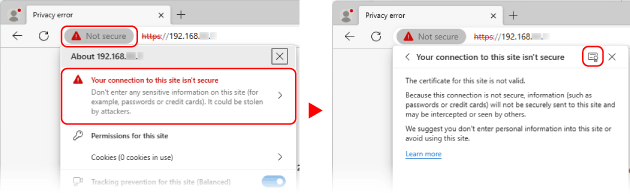
The [Certificate Viewer] screen is displayed.
4
On the [Details] tab, click [Export].
5
Select the necessary file type and save the certificate file to the computer.
Select Base64 or DER for the file type (certificate format).
6
Close the [Certificate Viewer] screen and the web browser.
7
Double click the certificate file saved in Step 5.
The [Certificates] screen is displayed.
8
On the [General] tab, click [Install Certificate...].
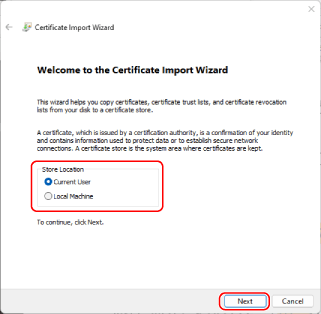
The [Certificate Import Wizard] screen is displayed.
9
Select the store location and click [Next].
10
Select [Place all certificates in the following store], and click [Browse].
The [Select Certificate Store] screen is displayed.
11
Select [Trusted Root Certification Authorities], and click [OK].
The [Certificate Import Wizard] screen is displayed again.
12
Click [Next] [Finish].
The certificate is installed.
Step 3: Setting the User Management Information and Machine Information Using the Driver
Set the following information using the printer driver, according to the usage environment of the machine:
User Management Information
Set the user management information in the following cases. Configuring User Management Information on a Computer
When user authentication is applied to printing from a computer
When Department ID Management is enabled on the machine
* If you do not know whether these cases apply to the machine you are using, contact the administrator.
Option Settings
When optional equipment is installed to the machine, configure the option settings. Step 3: Configuring the Option Settings of the Machine Using the Driver
Security Printing Function
Enable the security printing function in the following cases. Step 4: Enabling the Security Printing Function on the Printer Driver
When using the Secure Watermark function
When using the Secure Print function in macOS