Configuring User Management Information on a Computer
In the following cases, you need to configure the user management information on each computer that uses the machine:
When using user authentication for printing, scanning, or sending faxes from a computer Using User Authentication When Printing, Scanning, and Sending Faxes from a Computer
When Department ID Management is enabled on the machine, and either of the following applies:
When operations from users with an unknown Department ID are restricted Enabling Department ID Management
When you want to include operations from a computer in the usage status for each Department ID
Configuring the Printer or Fax Driver
Configure the user management information on the printer or fax driver of the computer to be used with the machine.
When Using Windows
Administrator privileges are required on each computer.
1
Log on to the computer using an administrator account.
2
Click [ ] (Start)
  [
[ ] (Settings) [Bluetooth & devices] [Printers & scanners].
The [Printers & scanners] screen is displayed.
3
Click the driver of the machine [Printer properties].
The driver properties screen is displayed.
4
On the [Device Settings] tab, set the user management information.
When Using User Authentication
1
In [User Management], select [User Authentication], and click [Settings] at the bottom right.
The [User Authentication Settings] screen is displayed.
2
Select the [Allow Password Settings] checkbox, and enter the user name and password.
When Using Department ID Management
1
In [User Management], select [Department ID Management], and click [Settings] at the bottom right.
The [Department ID/PIN Settings] screen is displayed.
2
Select the [Allow PIN Setting] checkbox, and enter the Department ID and PIN.
5
To check that the entered user management information is correct, click [Verify].
This is not available when the machine is connected to the computer via the USB or Web Services on Devices (WSD) port.
6
Set the authentication process and applicable range, as needed.
Confirming the User Management Information When Printing or Sending Faxes
Select the [Confirm Authentication Information When Printing] and/or [Confirm Authentication Information When Sending Faxes] checkboxes.
Performing Black & White Printing Without Setting a Department ID
Select the [Do Not Use Department ID Management When B&W Printing] checkbox.
* If this checkbox is selected when the machine settings are configured to restrict printing from a computer with an unknown Department ID and to prohibit black and white printing with an unknown Department ID, black and white printing cannot be performed during Department ID Management.
When the Machine Is Connected to the Computer via the USB or WSD Port
Select the [Perform Authentication at Device] checkbox.
7
Click [OK] [OK].
The settings are applied.
When Using macOS
1
Click [ ] [System Settings] [Printers & Scanners].
The [Printers & Scanners] screen is displayed.
2
Select the machine, and then click [Options & Supplies].
3
On the [Options] tab, select the [Prioritize User Authentication] or [Department ID Management] checkbox, and click [OK].
4
Click [Done].
5
Configure the user management information on the driver settings screen.
You need to configure the user management information each time you print or send a fax.
When Using the Printer Driver
1
Display the printing dialog box, and select the printer driver of the machine. Printing
2
Click [Printer Options] [Special Features].
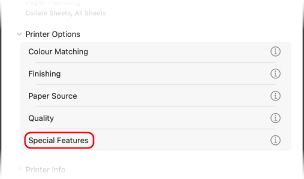
3
Configure the user management information.
When Using User Authentication
Select [User Authentication] in [User Management], click [Settings], and enter the user name and password.
When Using Department ID Management
Select [Department ID Management] in [User Management], click [Settings], and enter the Department ID and PIN.
4
Set the authentication process and applicable range, as needed.
Confirming the User Management Information When Printing
Select the [Confirm Authentication Information When Printing] checkbox.
Performing Black & White Printing Without Setting a Department ID
Select the [Do Not Use Department ID Management When B&W Printing] checkbox.
* If this setting is selected while printing from a computer with an unknown Department ID is restricted by the settings on the machine, black and white printing cannot be performed during Department ID Management.
5
Click [OK] [OK].
When Using the Fax Driver
1
Display the printing dialog box, and select the fax driver of the machine. Sending Faxes from a Computer (PC Faxing)
2
Click [Printer Options] [Special Features].
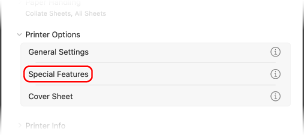
3
Configure the user management information.
When Using User Authentication
Select [User Authentication] in [User Management], click [Settings], and enter the user name and password.
When Using Department ID Management
Select [Department ID Management] in [User Management], click [Settings], and enter the Department ID and PIN.
4
Click [OK] [OK].
Configuring the Scanner Driver (Windows)
Configure the user management information on the scanner driver of the computer to be used with the machine.
1
Click [] (Start) [All apps] [Color Network ScanGear 2] [Color Network ScanGear 2 Tool].
The [Color Network ScanGear 2 Tool] screen is displayed.
2
Check that the machine is displayed in [Scanner Information].
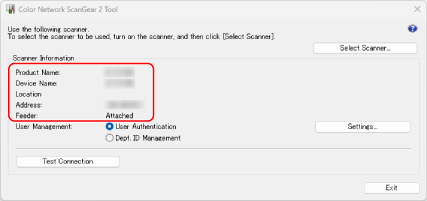
If the machine is not displayed in [Scanner Information], click [Select Scanner] and select the machine.
3
Configure the user management information.
When Using User Authentication
1
In [User Management], select [User Authentication] and click [Settings].
The [User Authentication Settings] screen is displayed.
2
Select the [Save Password] checkbox, and enter the user name and password.
When Using Department ID Management
1
In [User Management], select [Department ID Management] and click [Settings].
The [Department ID/PIN Settings] screen is displayed.
2
Select the [Save PIN] checkbox, and enter the Department ID and PIN.
4
Set the authentication process, as needed.
Select the [Confirm Authentication Information When Scanning] checkbox to confirm the user management information when scanning.
5
Click [OK] [Exit].