[Advanced Space], [Network], and [Memory Media] Print Settings Screen
On the file selection screen in a storage space, select a file and press [Print] to display the print settings screen.
Use this screen to set the number of prints and other print settings. You can also set 2-sided printing, adjust the image quality, and configure other settings to suit your document and purpose.
After checking or changing the print settings, press [Start Printing] to perform printing.
Use this screen to set the number of prints and other print settings. You can also set 2-sided printing, adjust the image quality, and configure other settings to suit your document and purpose.
After checking or changing the print settings, press [Start Printing] to perform printing.
* Depending on the setting, the reference for the description here is the description when copying. Replace "copy" with "print" when referring to it. The description may also include settings that cannot be configured for printing.
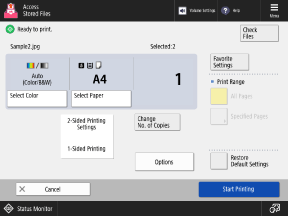
Checking and Changing the Print Settings
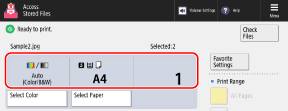
The currently set printing color, paper to be used, and number of prints are displayed in the center of the screen. Check these settings to ensure correct printing.
To change the number of prints, enter the value directly using the numeric keys.
When multiple files are selected, press [Change No. of Copies] and enter the number of prints.
When multiple files are selected, press [Change No. of Copies] and enter the number of prints.
* The number of selected files is displayed above the number of prints.
To change the printing color, press [Select Color].
To change the paper to be used, press [Select Paper].
Configuring the Various Print Settings
The following settings are available:
* When files with different formats are selected at the same time, such as a PDF file and JPEG file, you can only set [2-Sided Printing].
[Finishing] (PDF and XPS files only)
You can set sorting, stapling, and other finishing functions. Configuring the Finishing Functions
[2-Sided Printing]
When printing on both sides of the paper, select [Long Edge Binding] or [Short Edge Binding].
[Long Edge Binding]: Performs 2-sided printing with the bound side on the long edge of the paper.
[Short Edge Binding]: Performs 2-sided printing with the bound side on the short edge of the paper.
* When printing on both sides of the paper for a PDF file with different sizes for the front and back pages, you must manually set the paper to be used.
When the paper to be used is set to [Auto], data is printed on paper that matches the size of each page without performing 2-sided printing.
When the paper to be used is set to [Auto], data is printed on paper that matches the size of each page without performing 2-sided printing.
[Print Range]
When printing a document with multiple pages, select whether to print all pages or specify a range of pages to print.
When specifying a range of pages, press [Specified Pages], and enter the first and last pages.
When specifying a range of pages, press [Specified Pages], and enter the first and last pages.
[Options]
Configure booklet printing, adjust the image quality, and configure the other print settings.
Clearing the Print Settings
To clear changed print settings, press [Restore Default Settings] at the bottom right of the screen.
Printing a File
Press [Start Printing] at the bottom right of the screen to perform printing.
NOTE
Registering Frequently Used Settings from [ Menu]
Menu]
Menu]You can register the current settings as "Favorite Settings" to easily call up these settings from the print settings screen, as needed. Registering and Recalling Favorite Settings
By registering the current settings as buttons on the [Home] screen, you can call up these settings from the [Home] screen with a single click of a button. Adding Buttons to the [Home] Screen (Personal and Shared Buttons)
* When using a USB memory device, you cannot add a button to the [Home] screen.
You can also register the current settings as default settings. Changing the Default Settings
Checking the File Information and Details
Press [Check Files] at the top right of the screen to display the information of the selected file.
On the [Check Files] screen, select a file and press [Details] to check the file store location, update date and time, and other details.
On the [Check Files] screen, select a file and press [Display Image] to display a preview screen and check the file details.
When the Number of Pages That Can Be Printed during Department ID Management Is Restricted
The number of pages that can be printed by the logged-in Department ID is displayed at the top of the screen.

[Options] Screen (PDF and XPS Files)
On the print settings screen, press [Options] to display the [Options] screen.
Press the buttons on this screen to configure the detailed print settings. After configuring the print settings, press [Close] to return to the print settings screen.
Press the buttons on this screen to configure the detailed print settings. After configuring the print settings, press [Close] to return to the print settings screen.

[Resolution]
Specify the resolution to be used for print data processing.
To print at a higher resolution, set to [Superfine (1200 dpi)].
To print at a higher resolution, set to [Superfine (1200 dpi)].
[Halftones]
Set the printing method when reproducing halftones (the intermediate range between the lighter and darker areas of an image). For details about the settings, see the following:
[Halftones] (PDF files)
[Halftones] (XPS files)
[Match Paper Size]
Enlarges or reduces the document according to the paper to be used for printing.
* The document is enlarged or reduced while maintaining the aspect ratio of the document.
[Enlarge Print Area]
Enlarges the print area to the edge of the paper without providing margins around the paper.
* Depending on the document, part of the edge of the printed image may not be printed, or the paper may be partly smudged.
[N on 1]
You can reduce the size of a multiple-page document and arrange the pages on one sheet of paper when printing. Combining Multiple Originals onto One Page (N on 1)
[Booklet]
Prints by assigning pages to form a booklet. Making Booklets (Booklet Copying)
[Print Comments]
Specify whether to print comments in a PDF file.
When this is set to [Auto], comments specified for printing in the PDF file are printed.
When this is set to [Auto], comments specified for printing in the PDF file are printed.
[Password to Open Doc.]
When a PDF file has security settings, enter the password according to the setting of the PDF file.
When a Password for Opening the Document or an Authorization Password Is Set
Enter the password to open the document or the authorization password in [Encryption Password].
* Enter an authorization password in the following cases:
When printing a PDF file that is prohibited from being printed
When printing a PDF file that only allows low-resolution printing at high resolution
When Linking a Policy Server
Enter the user name and password of the policy server in [Policy Password].
* When printing multiple PDF files with configured security settings, you can only print files with the same password.
[Skip Blank Pages]
Does not output pages that have been determined to be blank when printing.
* Depending on the document, a page may not be determined to be blank even if there is nothing on it.
[Options] Screen (JPEG and TIFF Files)
On the print settings screen, press [Options] to display the [Options] screen.
Press the buttons on this screen to configure the detailed print settings. After configuring the print settings, press [Close] to return to the print settings screen.
Press the buttons on this screen to configure the detailed print settings. After configuring the print settings, press [Close] to return to the print settings screen.
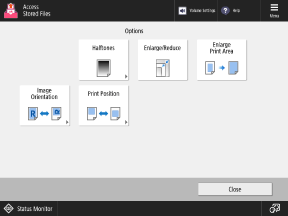
[Halftones]
Set the printing method when reproducing halftones (the intermediate range between the lighter and darker areas of an image). For details about the settings, see the following:
[Enlarge/Reduce]
Enlarges or reduces the image according to the paper to be used for printing.
The image is enlarged or reduced while maintaining the aspect ratio of the image.
When the image is larger than the printable area, the image is reduced to fit in the printable area regardless of the [Enlarge/Reduce] setting.
When this is set to [Enlarge/Reduce], even if the print position in a tag of a TIFF file is specified, it will be disabled.
[Enlarge Print Area]
Enlarges the print area to the edge of the paper without providing margins around the paper.
* Depending on the image, part of the edge of the printed image may not be printed, or the paper may be partly smudged.
[Image Orientation]
Specify the orientation of the image when printing.
When this is set to [Auto], the aspect ratio of the image is determined automatically, and the image is printed in portrait orientation if the vertical dimension is greater or it is printed in landscape orientation if the horizontal dimension is greater.
When this is set to [Auto], the aspect ratio of the image is determined automatically, and the image is printed in portrait orientation if the vertical dimension is greater or it is printed in landscape orientation if the horizontal dimension is greater.
[Print Position]
Set the image print position.
When this is set to [Auto], the image is printed according to the print position specified in the tag of the TIFF file. If the print position is not specified, or when printing a JPEG file, the image is printed in the center of the paper.
When this is set to [Auto], the image is printed according to the print position specified in the tag of the TIFF file. If the print position is not specified, or when printing a JPEG file, the image is printed in the center of the paper.