Registering Shared Folder Information to an Address Book
By registering destinations (shared folder information) to the Address Book in advance when repeatedly saving scanned data to a specified shared folder, you can save the trouble of entering the information of destinations each time you send data.
This section describes how to register destinations to a common address list (Address Lists 1 to 10) using the control panel.
You can also register the settings using Remote UI from a computer. Registering Destinations to the Address Book (Remote UI)
* To register destinations to a user-specific address list (personal address list or user group address list), you first need to log in.
Prepare a shared folder.
Prepare a shared folder that serves as the sending destination for the scanned data.
You can also create a new shared folder. Creating a Shared Folder
You can also create a new shared folder. Creating a Shared Folder
Check the information of the prepared shared folder.
Check the following information of the shared folder prepared in Step 1:
Name or IP address of the computer with the shared folder
Path to the shared folder
User name and password to access the shared folder
* When you are using the login user name of the computer with the shared folder, you can confirm the user name on that computer. Checking the Login User Name for the Computer
3
On the control panel, press [Dest./Fwd. Settings] in the [Home] screen. [Home] Screen
4
Press [Register Destinations].
If the PIN input screen appears, enter the PIN set for the Address Book, and press [OK].
5
Press [Register New Destination]  [File].
6
Enter the name of the destination.
You can register a destination without entering a name. However, if you enter a name, you can search for the destination by its initial or name when you specify destinations.
1
Press [Name].
2
Enter the name, and press [OK].
7
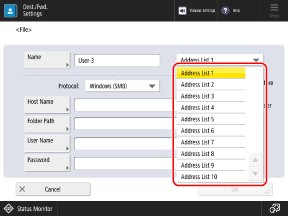
Select the address list in which to register the destination. Address List Types
8
In [Protocol], select [Windows (SMB)].
Configure the information of the shared folder.
Configure the information of the shared folder checked in Step 2.
[Host Name]
Enter the name or IP address of the computer with the shared folder, prefixed with "\\."
Examples:
\\192.168.100.50
\\[fe80:2e9e:fcff:fe4e:dbce]
\\192.168.100.50
\\[fe80:2e9e:fcff:fe4e:dbce]
[Folder Path]
Enter the path to the folder where you want to save the file. Use "\" as a separator.
[User Name] and [Password]
Enter the user name and password to access the shared folder.
10
Press [OK].
The destination is registered to the Address Book.
If destinations are managed with access numbers, press [Next], enter the access number to display the destination to be registered, and press [OK].
NOTE
If a Shared Folder Registered as a Destination Is Changed or Deleted
Change the registered details of the destination, or delete the destination and register it again as a new destination. Editing and Deleting Destinations in the Address Book (Control Panel)