You can register destinations to the Address Book or one-touch buttons using Remote UI from a computer.
You can use the following methods to register e-mail addresses, file store locations, and fax numbers:
Registering Destinations to the Address Book (Remote UI)
Registering destinations by directly entering the destination information
Registering destinations by searching for user information managed with an LDAP server
NOTE
If a Store Location Registered as a Destination Is Changed or Deleted
Change the registered details of the destination, or delete the destination and register it again as a new destination. Editing and Deleting Destinations in the Address Book (Remote UI)
Registering Destinations to the Address Book
Required Preparations
If you are using an LDAP server, register the LDAP server information in the machine. Registering LDAP Servers
1
Log in to Remote UI. Starting Remote UI
The address lists to which destinations can be registered vary depending on the logged in user. Address List Types
2
On the Portal page of Remote UI, click [Address Book]. Remote UI Portal Page
The [Address Lists] screen appears.
3
Click the address list in which to register the destination. Address List Types
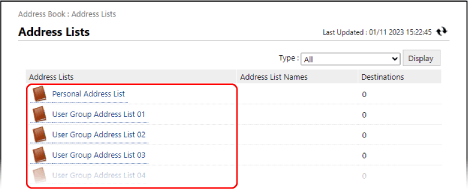
The address list screen appears.
If the PIN input screen appears, enter the PIN set for the Address Book, and press [OK].
4
Click [Register New Destination].
The [Register New Destination: E-Mail] screen appears.
5
Select the destination type, and click [Set].
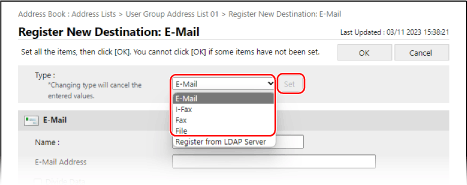
The screen for registering the selected type of new destination appears.
If you register an e-mail destination, this step is not required. Proceed to Step 6.
When you register file store locations (shared folder, file server, or Advanced Space), select [File].
Registering Destinations by Using User Information from an LDAP Server 

1
In [Type], select [Register from LDAP Server], and click [Set].
The [Register New Destination: Register from LDAP Server] screen appears.
2
Select the LDAP server to be searched for the destination, and enter the authentication information.
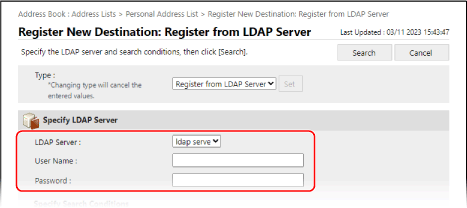
To perform authentication using login information, enter the user name and password of the machine that are registered in the LDAP server.
To perform authentication anonymously without using login information, leave the user name and password blank.
3
In [Specify Search Conditions], select the search target attributes and enter the search string.
4
Click [Search].
The users who meet the search conditions are displayed.
If the search cannot find users
If the search cannot find any users even though the information (user name and password) for authenticating the LDAP server is correct, check the time set for the LDAP server and the machine. The search cannot be performed if the time setting of the LDAP server differs from the time setting of the machine by five minutes or more.
You cannot search from the control panel and Remote UI at the same time.
5
Select the user to be registered in the Address Book, and click [OK].
The destination is registered to the Address Book.
If you register the destination by using the user information from an LDAP server, you can skip the remaining steps.
Only the name, e-mail address, and fax number information can be retrieved from the LDAP server. Configure the other information by editing the destination registered in the Address Book. Editing and Deleting Destinations in the Address Book (Remote UI)
In [Name], enter the name of the destination.
You can register a destination without entering a name. However, if you enter a name, you can search for the destination by its initial or name when you specify destinations.
7
Set the destination information according to the type of destination.
When Managing Destinations with Access Numbers
In [Access Number], enter the access number to display the destination to be registered.
* If no access number is set for the destination to be registered, leave [Access Number] blank.
8
Click [OK].
The destination is registered to the Address Book.
9
Log out from Remote UI.
Registering Destinations to One-Touch Buttons
Required Preparations
If you are using an LDAP server, register the LDAP server information in the machine. Registering LDAP Servers
1
Log in to Remote UI. Starting Remote UI
2
On the Portal page of Remote UI, click [Address Book]. Remote UI Portal Page
The [Address Lists] screen appears.
3
Click [Address List One-Touch].
The address list screen appears.
If the PIN input screen appears, enter the PIN set for the Address Book, and press [OK].
4
Click a name (or number) displayed as [Not Registered].
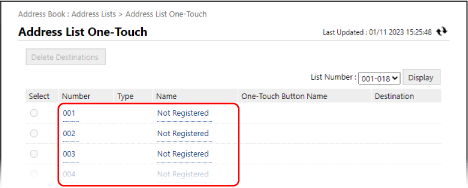
The [Register New Destination: E-Mail] screen appears.
Three-digit numbers (001 to 200) are assigned to one-touch buttons. At the top right of the screen, select the range of numbers in [List Number], and click [Display] to change the numbers displayed in the list.
5
Select the destination type, and click [Set].
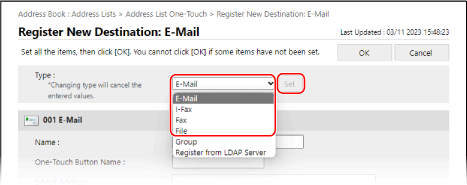
The screen for registering the selected type of new destination appears.
If you register an e-mail destination, this step is not required. Proceed to Step 6.
When you register file store locations (shared folder, file server, or Advanced Space), select [File].
When you register group destinations, see the following:
Registering Destinations by Using User Information from an LDAP Server 

1
In [Type], select [Register from LDAP Server], and click [Set].
The [Register New Destination: Register from LDAP Server] screen appears.
2
Select the LDAP server to be searched for the destination, and enter the authentication information.
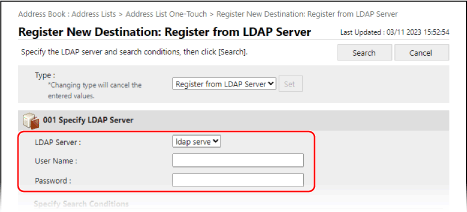
To perform authentication using login information, enter the user name and password of the machine that are registered in the LDAP server.
To perform authentication anonymously without using login information, leave the user name and password blank.
3
In [Specify Search Conditions], select the search target attributes and enter the search string.
4
Click [Search].
The users who meet the search conditions are displayed.
If the search cannot find users
If the search cannot find any users even though the information (user name and password) for authenticating the LDAP server is correct, check the time set for the LDAP server and the machine. The search cannot be performed if the time setting of the LDAP server differs from the time setting of the machine by five minutes or more.
You cannot search from the control panel and Remote UI at the same time.
5
Select the user to be registered to the one-touch button, and click [OK].
The destination is registered to the one-touch button.
If you register the destination by using the user information from an LDAP server, you can skip the remaining steps.
Only the name, e-mail address, and fax number information can be retrieved from the LDAP server. Configure the other information by editing the destination registered to the one-touch button. Editing and Deleting Destinations in the Address Book (Remote UI)
In [Name], enter the name of the destination.
You can register a destination without entering a name. However, if you enter a name, you can search for the destination by its initial or name when you specify destinations from the Address Book.
* Destinations registered to one-touch buttons are also registered and displayed in the Address Book (One-Touch Address List), and you can select them when you specify destinations from the Address Book.
7
In [One-Touch Button Name], enter the name of the button.
You can register a button without entering a name. However, if you enter a name, it is displayed on the one-touch button.
8
Set the destination information according to the type of destination.
9
Click [OK].
The destination is registered to the one-touch button.
10
Log out from Remote UI.