
Making Booklets (Booklet Copying)

You can arrange the page layout so that 2-sided copies form a booklet when they are folded in half. You can also add a cover using different paper than that of the main document.
You can also configure finishing settings such as folding the pages of the booklet copy in half and stapling in the crease (saddle stitching).
You can also configure finishing settings such as folding the pages of the booklet copy in half and stapling in the crease (saddle stitching).
* The available functions vary depending on the options installed. Options with Finishing Functions
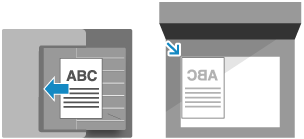
Placing originals when making booklet copies

Place originals of the same size. You cannot perform booklet copying for originals of different sizes.
Place vertical originals in portrait orientation.
IMPORTANT
Usable Paper
Booklet copying may not be available with some sizes and types of paper. If you use heavy paper for the cover, the machine may not copy onto the cover even when you configure the settings to do so, depending on the thickness of the paper. Usable Paper for Booklet Printing
There are restrictions to the types of paper and number of sheets that can be saddle stitched. For details on the restrictions to the types of paper and number of sheets that can be saddle stitched, see the specifications of the options you use. Options with Finishing Functions
1
On the copy screen, press [Options]  [Booklet]. Copy Screen
 [Booklet]. Copy Screen
The [Booklet] screen is displayed.
2
Select whether or not to arrange the pages in booklet layout.
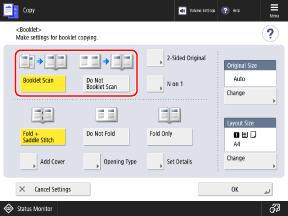
Normally, select [Booklet Scan]. If you are using an original with pages that are already arranged in booklet layout, select [Do Not Booklet Scan].
Performing Booklet Copying with 2-Sided Originals

Press [2-Sided Original], select how the original opens, and press [OK].
[Book Type]
Select this if the top and bottom orientation of the front and back sides of the original are the same.

[Calendar Type]
Select this if the top and bottom orientation of the front and back sides of the original are opposite.

Arranging Multiple Pages of the Original on One Page (N on 1)

When [N on 1] is displayed, you can arrange multiple pages from the original on a single page in the booklet.
Press [N on 1], select the number of pages to combine, and press [OK].
To change the page order (layout when combining originals), press [Set Details], select the page order, and press [OK].
You can add a page number to each page of the booklet (each combined page consisting of multiple original pages). Adding Page Numbers and Watermarks When Copying
* You cannot add a page number to each individual page from the original.
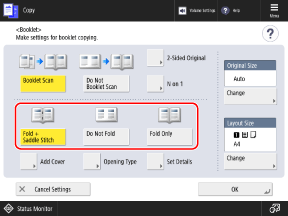
Select the finishing method for the pages of the booklet copy.
4
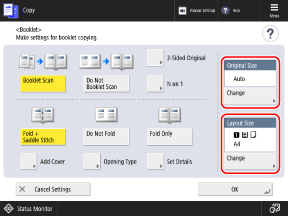
Configure the paper size and paper settings, as needed.
When Changing the Original Size
Press [Change] under [Original Size], select the size of the original, and press [OK].
When Changing the Paper to Use for Booklet Copying

Press [Change] under [Layout Size], select the paper to be used, and press [OK].
On the screen for selecting the paper, you can press [ ] to check the details of the selected paper.
 ] to check the details of the selected paper.
When the use of a paper source is restricted, you cannot select the paper loaded in that paper source. [Restrict Paper Source] (C7100 Series Only)
The copy ratio (enlarge or reduce setting) is set automatically according to the selected paper size.
To perform booklet copying for an original at 100% magnification, select the paper size of the original when spread open.
Example: When the size of the original is A4
If A4 size (A4R) paper is selected in [Layout Size], each page is reduced to A5 size when copied.
If A3 size paper is selected in [Layout Size], each page is copied at A4 size.
5
Configure the cover settings, as needed.

You can add a cover using different paper than that of the main document.
You can also copy the original onto the cover. Include the cover original in the normal original when you want to copy onto the cover.
You can also copy the original onto the cover. Include the cover original in the normal original when you want to copy onto the cover.
1
Press [Add Cover].
The [Add Cover] screen is displayed.
2
Select whether to copy onto the cover.
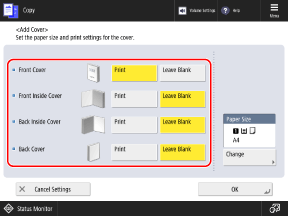
Select whether to copy onto each page that forms the cover.
3
Select the paper to be used as the cover.
Press [Change] under [Paper Size], select the paper to be used, and press [OK].
You can only select the same size of paper as that used for the main document.
On the screen for selecting the paper, you can press [ ] to check the details of the selected paper.
 ] to check the details of the selected paper.
When the use of a paper source is restricted, you cannot select the paper loaded in that paper source. [Restrict Paper Source] (C7100 Series Only)
4
Press [OK].
The [Booklet] screen is displayed again.
6
Press [Set Details] to perform correction or adjustment, as needed.
If Stapling (Saddle Stitch) Cannot Be Performed Due to Too Many Pages
Divide the booklet copy into volumes with the number of sheets that can be stapled.
Press [Divided Booklet], enter the number of sheets for each volume, and press [OK] [OK].
[OK].
Press [Divided Booklet], enter the number of sheets for each volume, and press [OK]
 [OK].
[OK].If Inner Pages Protrude After Being Folded in Half

When the stacked paper is folded in half, the inner pages protrude more as the number of pages increases. You can correct the paper displacement that occurs at this time.
Without correction

The red parts are displaced
With correction

The red parts are aligned
1
Press [Creep Correction].
2
Select [Auto] or [Manual].
If you select [Manual], enter the correction value (distance of displacement between the inside and outside edges of the folded paper).
3
Press [OK]  [OK].
[OK].
 [OK].
[OK].When [Trim] Is Displayed on the [Set Details] Screen
You can trim the protruding part to achieve a cleaner finish. You can also adjust the trim width and trim position.

When Adjusting the Saddle Stitch Fold Position and Staple Position

If you selected [Fold + Saddle Stitch] in Step 3, adjust the saddle stitch fold position and staple position so that they are at the center of the paper. Print a test page, check the current state of the fold position and the shift width on the test page, and then perform adjustment.

1
Press [Adjust Saddle Stitch Fold Position/Stitch Position]  [Next].
 [Next].
2
Select the paper source with the loaded usable paper, and press [Start Printing].
A test page is printed.
3
Select the current state of the fold position, set the shift width, and press [Next].
Check the current state of the fold position and the shift width on the test page, then select the current state and set the shift width.
4
Select the current state of the staple position and set the shift width.
Check the current state of the staple position and the shift width on the test page, then select the current state and set the shift width.
5
Press [OK].
6
Press [Start Printing] to print the test page again, and check the adjustment results.
To end the adjustment without printing the test page, press [Done].
7
Press [Done].
If further adjustment is needed, press [Re-Adjust] and repeat Steps 3 to 6.
8
Press [OK].
When Adjusting the Fold Position of the Paper

If you selected [Fold Only] in Step 3, adjust the fold position so that it is at the center of the paper. Print a test page, check the current state of the fold position and the shift width on the test page, and then perform adjustment.

1
Press [Adjust Fold Position]  [Next].
 [Next].
2
Select the paper source with the loaded usable paper, and press [Start Printing].
A test page is printed.
3
Select the current state of the fold position, set the shift width, and press [OK].
Check the current state of the fold position and the shift width on the test page, then select the current state and set the shift width.
4
Press [Start Printing] to print the test page again, and check the adjustment results.
To end the adjustment without printing the test page, press [Done].
5
Press [Done].
If further adjustment is needed, press [Re-Adjust] and repeat Steps 3 and 4.
6
Press [OK].
7
Press [OK]  [Close].
 [Close].
The copy screen is displayed again.
IMPORTANT
If Paper Runs Out While Copying with the Staple (Saddle Stitch) Setting
Load paper in the paper source without removing the copied paper before it is stapled. The machine will perform stapling when copying is completed.