Registering a Profile for Specific Colors
From a computer, print the "Color Chart for Assign RGB Values to Output Colors in Color Chart" with the machine, and refer to the chart to register specific colors to the profile.
Step 1: Printing the Chart from a Computer with the Machine
From a computer, print the "Color Chart for Assign RGB Values to Output Colors in Color Chart" with the machine using the printer driver.
This section describes the general procedure for this operation. Check the manual of the application you are using for a detailed description of the operation.
Required Preparations
Install the printer driver on the computer, and configure the settings according to your usage environment. Preparing to Print Data Using a Driver
Perform Auto Adjust Gradation (Full Adjust) on the machine. Calibrating More Accurately (Full Adjust)
1
On the computer, download the "Color Chart for Assign RGB Values to Output Colors in Color Chart" from the page for the machine at the online manual site.
2
Open the downloaded chart.
3
From the menu in the application used to open the chart, select the print command.
4
Select the printer driver of the machine, and click [Preferences] or [Properties].
The [Printing Preferences] screen of the printer driver is displayed.
5
On the [Basic Settings] tab, configure the settings as follows.
[Page Size]: Select [A4] or [Letter].
[1-sided/2-sided/Booklet Printing]: Select [1-sided Printing].
[Manual Scaling]: Clear the checkbox.
6
On the [Quality] tab, select the [Manual Color Settings] checkbox, and click [Color Settings].
The [Color Settings] screen is displayed.
7
On the [Matching] tab, configure the settings as follows.
[Matching Mode]: Select [Do Not Use].
[Application Color Matching Priority]: Clear the checkbox.
8
Click [OK].
The [Printing Preferences] screen is displayed again.
9
Click [OK], and click [Print] or [OK].
The machine starts printing the chart.
When printing is completed, proceed to Step 2. Step 2: Registering the Profile on the Machine
When printing is completed, proceed to Step 2. Step 2: Registering the Profile on the Machine
You can cancel printing on the printing screen or from the printer icon in the Windows notification area. Canceling Printing from a Computer
You can use [ Status Monitor] on the control panel to check the print job status and log. Viewing the Print Job Status and Log
 Status Monitor] on the control panel to check the print job status and log. Viewing the Print Job Status and Log
NOTE
If the machine is configured so that print data from the computer is not printed immediately, you need to operate the machine to perform printing. Printing Documents in Forced Hold State
Step 2: Registering the Profile on the Machine
Refer to the chart printed in Step 1, and register the colors you want to reproduce in the profile of the machine.
Use the control panel to register the profile. You cannot register the profile using Remote UI from a computer.
Administrator or DeviceAdmin privileges are required. The machine must be restarted to apply the registration.
Administrator or DeviceAdmin privileges are required. The machine must be restarted to apply the registration.
1
Log in to the machine as an administrator. Logging In to the Machine
2
On the control panel, press [ Settings/Registration] in the [Home] screen or other screen. [Home] Screen
 Settings/Registration] in the [Home] screen or other screen. [Home] Screen
The [Settings/Registration] screen is displayed.
3
Press [Adjustment/Maintenance]  [Adjust Image Quality]
  [Register Color Profile].
 [Adjust Image Quality]
  [Register Color Profile].
The [Register Color Profile] screen is displayed.
4
Press [Assign RGB Values to Output Colors in Color Chart].
5
Create a profile to register the colors you want to reproduce.
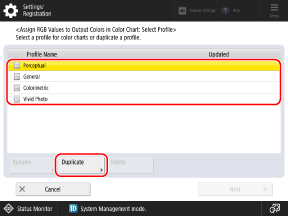
Select and duplicate one of the previously registered profiles in the machine, and create a profile to register the colors you want to reproduce.
1
Select a profile from the list, and press [Duplicate].

2
Enter the profile name, and press [OK].
6
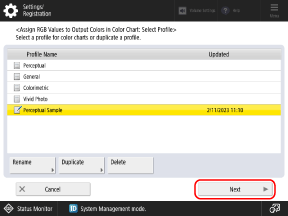
Select the created profile, and press [Next].

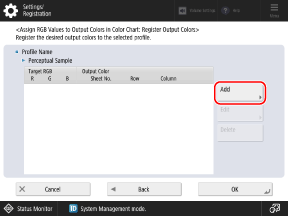
A list of colors registered in the profile is displayed.
Register the colors you want to reproduce in the profile.
Up to 168 colors can be registered in each profile.
1
Press [Add].

2
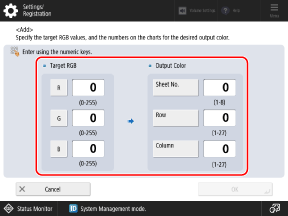
Enter the values for the colors you want to register.

[Target RGB]
Enter the RGB values for the colors you want to register.
* You cannot register an RGB value in which the R, G, and B values are the same.
Examples:
Examples:
R,G,B=255,255,255 (White)
R,G,B=0,0,0 (Black)
* You cannot register an additional color with an RGB value that has already been registered.
[Output Color ]
Refer to the chart printed in Step 1, and enter numbers in [Sheet No.], [Row], and [Column] for the colors you want to reproduce.
3
Press [OK].
The screen shown in Step 7-1 is displayed again, and the registered colors are added to the list.
8
Press [OK]  [OK].
[OK].
 [OK].
[OK].9
Press [ Settings/Registration]
  [Yes].
 Settings/Registration]
  [Yes].
The machine restarts, and the registrations are applied.