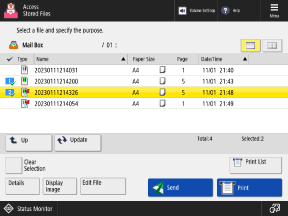
[Mail Box] File Selection Screen
On the control panel, press [Access Stored Files]  [Mail Box] in the [Home] screen, and select a Mail Box to display the file selection screen.
Use this screen to select the files to print or send.
Select a file and press the buttons to perform various operations.
 [Mail Box] in the [Home] screen, and select a Mail Box to display the file selection screen.
 Use this screen to select the files to print or send.
Select a file and press the buttons to perform various operations.

Selecting a File
When you select a file, it is given a checkmark and a number. When you print or merge multiple files at the same time, the files are printed or merged in numerical order.
To select all displayed files, press [Select All (Max 100 Files)] at the bottom left of the screen with the files unselected.
To select all displayed files, press [Select All (Max 100 Files)] at the bottom left of the screen with the files unselected.
* You can select up to 100 files at a time.
* Files with the [ ] icon have print settings saved.
 ] icon have print settings saved.
Checking the File Information and Details
Select a file and press [Details] at the bottom of the screen to check the file resolution, color mode (RGB or CMYK), and other details.
You can also change the file name from the [Details] screen.
You can also change the file name from the [Details] screen.
Select a file and press [Display Image] at the bottom of the screen to display a preview screen and check the file details.
You can also delete a page on the preview screen and print pages from the preview screen.
You can also delete a page on the preview screen and print pages from the preview screen.
Operating or Editing a File
Select a file and press [Edit File] at the bottom of the screen to move, copy, or merge files, and to edit files page by page. You can also scan a document and save the data to Mail Box. Operating and Editing Files in Mail Box
Printing a File
Select a file and press [Print] at the bottom of the screen to display the print settings screen.
Use the print settings screen to set the number of prints.
Use the print settings screen to set the number of prints.
Sending a File
Select a file and press [Send] at the bottom of the screen to display the TX settings screen.
Use the TX settings screen to specify destinations and configure the TX settings before sending.
Use the TX settings screen to specify destinations and configure the TX settings before sending.
NOTE
Checking Mail Box Information
The Mail Box icon [ ], box number, and name are displayed at the top left of the screen.
 ], box number, and name are displayed at the top left of the screen.
Press [Print List] at the bottom right of the screen to print a list of files saved in Mail Box.