Sending Files in Mail Box
You can convert files saved to Mail Box to a file format compatible with a computer and send the files by e-mail using the control panel of the machine or Remote UI.
* You cannot send CMYK color document files or files with a resolution of 1,200 dpi.
This section describes how to send files using the control panel.
When sending files using Remote UI from a computer, send from [Access Received/Stored Files] on the Portal page. Managing the Machine from a Computer (Remote UI)
When sending files using Remote UI from a computer, send from [Access Received/Stored Files] on the Portal page. Managing the Machine from a Computer (Remote UI)
Required Preparations
Make preparations according to the destination to which to send the file. Preparing to Send and Save Scanned Data
1
On the control panel, press [Access Stored Files] in the [Home] screen. [Home] Screen
The screen for selecting the storage space is displayed.
2
Press [Mail Box].
3
Select the Mail Box with the file you want to send.
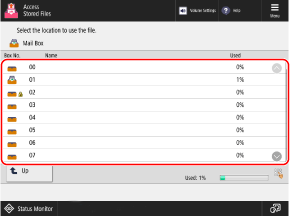
You can also directly specify the Mail Box by using the numeric keys to enter a box number.
If the PIN input screen is displayed, enter the PIN set for the Mail Box, and then press [OK].
Use the icon to check the status of the Mail Box.
[ ]: File is saved.
]: File is saved.[ ]: File is not saved.
[ ]: PIN is set. Mail Box Settings
]: PIN is set. Mail Box Settings4
Select the file to send, and press [Send].
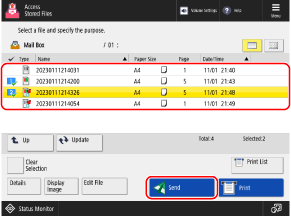
You can select and send up to 32 files in the same Mail Box at a time.
5
Specify a destination. Specifying Destinations
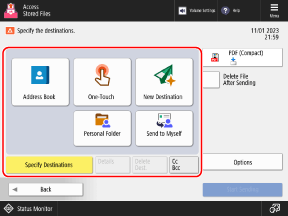
To specify a folder for a login user (Personal Folder) as a destination, press [Personal Folder].
To specify the e-mail address of a login user as a destination, press [Send to Myself].
When sending a file in Mail Box, you cannot specify a destination using the address book in a mobile device or the TX log of the machine.
When Specifying an E-Mail Address as a Cc or Bcc Destination
1
Press [Cc Bcc].
2
Press [Cc] or [Bcc].
3
Press [Specify Destinations], and specify the destination. Specifying Destinations
To change the type (To, Cc, or Bcc) of specified destination, press [To/Bcc|Cc] or [To/Cc|Bcc], specify the destination to change in Cc or Bcc, and press [OK].
4
Press [OK].
6
Configure the TX settings.
You can configure the file format, file name, and other send settings.
7
Press [Start Sending].
Sending starts.
To cancel sending, use the following procedure:
[  Status Monitor] Status Monitor] |
Use [ Status Monitor] to check the sending status and log. Checking the Send or Save Status and Log of Scanned Data
Status Monitor] to check the sending status and log. Checking the Send or Save Status and Log of Scanned Data