Operating and Editing Files in Mail Box
You can use the control panel of the machine or Remote UI to operate and edit the files saved to Mail Box as follows:
Change file names
Delete files
Move and copy files to another Mail Box
Move and copy files to a storage area of the hold function (only on models with the hold function)
Add files (save documents scanned with the machine)
Merge multiple files
Insert and delete pages
* When multiple files are merged or pages are inserted, the print settings saved to the files are deleted.
This section describes how to operate and edit files using the control panel.
When operating and editing files using Remote UI from a computer, operate and edit the files from [Access Received/Stored Files] on the Portal page. However, you cannot use Remote UI to operate and edit some items. Managing the Machine from a Computer (Remote UI)
When operating and editing files using Remote UI from a computer, operate and edit the files from [Access Received/Stored Files] on the Portal page. However, you cannot use Remote UI to operate and edit some items. Managing the Machine from a Computer (Remote UI)
1
On the control panel, press [Access Stored Files] in the [Home] screen. [Home] Screen
The screen for selecting the storage space is displayed.
2
Press [Mail Box].
3
Select the Mail Box with the file you want to operate or edit.
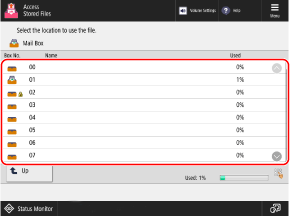
You can also directly specify the Mail Box by using the numeric keys to enter a box number.
If the PIN input screen is displayed, enter the PIN set for the Mail Box, and then press [OK].
Use the icon to check the status of the Mail Box.
[ ]: File is saved.
]: File is saved.[ ]: File is not saved.
[ ]: PIN is set. Mail Box Settings
]: PIN is set. Mail Box Settings[Used] at the bottom right of the screen indicates the total usage of all Mail Boxes.
4
Operate or edit the file.

When Changing the File Name
Select the file you want to rename, and press [Edit File]  [Change File Name].
Enter the file name, and press [OK] to change the file name.
Enter the file name, and press [OK] to change the file name.
When Deleting a File
Select the file you want to delete, and press [Edit File] [Delete] [Yes].
* You can select and delete up to 100 files in the same Mail Box at a time.
When Moving and Copying Files to Another Mail Box
1
Select the file to move or copy.
2
Press [Edit File] [Move/Duplicate].
3
Press [Mail Box].
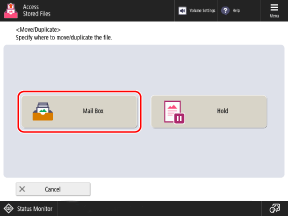
If the above screen is not displayed, proceed to Step 4.
4
Select the Mail Box to which you want to move or copy the file, and press [Move] or [Duplicate].
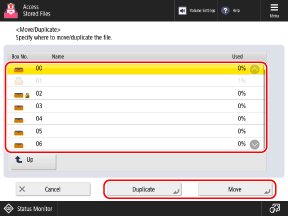
The file is moved or copied with the same name as the original file.
When Moving or Copying Files to a Storage Area of the Hold Function (Only on Models with the Hold Function)
* Files without saved print settings cannot be moved or copied to a storage area of the hold function.
* For details of the hold function, see the following:
1
Select the file to move or copy.
2
Press [Edit File] [Move/Duplicate] [Hold].
3
Select whether to copy the file, and press [Start].
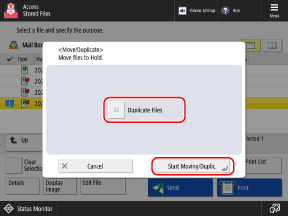
To move the file, press [Start] without selecting the [Duplicate Files] checkbox.
To copy the file, select the [Duplicate Files] checkbox, and press [Start].
When Adding Files (When Saving Documents Scanned with the Machine)
The procedure is the same as the scan operation and settings in [Scan and Store] except that the steps to display the scan screen are different. Saving Scanned Data
1
Place the original. Placing Originals
If the screen for selecting the thickness of the original is displayed, select the thickness of the placed original.
2
Press [Edit File] [Add Files (Scan and Store)].
The scan screen is displayed.
3
Configure the scan settings. Scan Settings
4
Press [ Start].
Start].Scanning of the original starts.
When Merging Multiple Files
You can merge multiple files saved to the same Mail Box into one file.
* Files with different resolution cannot be merged.
1
Select the files to merge.
The files are merged in the order they were selected (order of checkbox numbers).
2
Press [Edit File] [Merge Multiple Files].
3
Enter the merged file name, as needed.
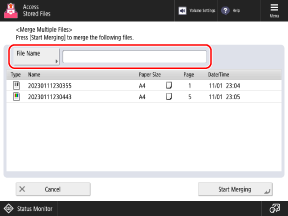
When entering the file name, press [File Name], enter the file name, and press [OK].
If a file name is not entered, the save date and time of the merged file becomes the file name.
4
Press [Start Merging].
The files are merged.
The print settings saved to the files are all deleted and merged.
The default settings are applied when printing merged files. [Change Default Settings]
The default settings are applied when printing merged files. [Change Default Settings]
When Inserting a File in Between Pages
You can insert a file saved to the same Mail Box in between pages.
* Files with different resolution cannot be inserted.
1
Select the file to which to insert another file.
2
Press [Edit File] [Insert Pages].
3
Specify the position to insert and the file to insert, and press [Next].
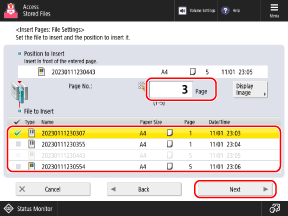
Specify the position to insert by using the numeric keys to enter the page number.
4
Enter the file name after insertion, as needed.
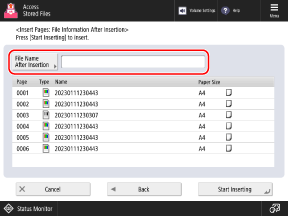
When entering the file name, press [File Name After Insertion], enter the file name, and press [OK].
If a file name is not entered, the save date and time of the inserted file becomes the file name.
5
Press [Start Inserting].
The file is inserted.
The print settings saved to the files are all deleted and inserted.
The default settings are applied when printing inserted files. [Change Default Settings]
The default settings are applied when printing inserted files. [Change Default Settings]
When Deleting a Page
1
Select the file with the page to delete.
2
Press [Edit File] [Delete Page].
3
Specify the page(s) to delete.
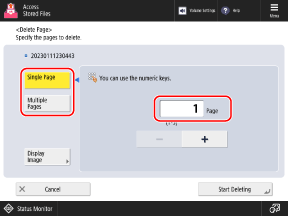
To delete just one page, press [Single Page], and specify the page number to delete.
To delete multiple consecutive pages at the same time, press [Multiple Pages]. Specify the pages to be deleted by specifying the first and last pages.
4
Press [Start Deleting] [Yes].
The pages are deleted.