Cannot Save Scanned Data to a Shared Folder
Check the saving method, shared folder of the store location, and status of the machine in the following order:
Step 1: Checking the Saving Method
To save scanned data to a shared folder, on the control panel in the [Home] screen, press [Scan and Send], specify the shared folder as the destination, and perform scanning.
* You cannot use [Scan and Store] on the [Home] screen to save scanned data to a shared folder. Check in the following order:
Prepare a shared folder that serves as the store location of the scanned data in advance.
You can also create a new shared folder. Creating a Shared Folder
Specify the prepared shared folder as the destination.
On the [Scan and Send] screen, press [New Destination]  [File], and specify the following information:
 [File], and specify the following information:
* If the shared folder of the store location is registered in the Address Book, press [Address Book] to select the shared folder.
[Protocol]
Select [Windows (SMB)].
[Host Name]
Enter the name or IP address of the computer with the shared folder, prefixed with "\\."
Examples:
\\192.168.100.50
\\[fe80:2e9e:fcff:fe4e:dbce]
\\192.168.100.50
\\[fe80:2e9e:fcff:fe4e:dbce]
* You can confirm the computer name and IP address on the computer.
[Folder Path]
Enter the path to the folder to which to save the file. Use "\" as a separator.
[User Name] and [Password]
Enter the user name and password to access the shared folder.
* When you are using the login user name of the computer with the shared folder, you can confirm the user name on that computer. Checking the Login User Name for the Computer
NOTE
By registering the shared folder information of the store location to the Address Book in advance, you can save the trouble of entering the information each time you send data. Registering Shared Folder Information to an Address Book
Step 2: Checking the Occurrence of the Problem
Does the Problem Occur with All Shared Folders?
If so, check the network connection status and settings of the machine. If the machine is not connected to a network, reconfigure the network settings.
Step 3: Checking the Status of the Computer with the Shared Folder
Did You Change the Password of the Computer with the Shared Folder?
If so, change the password used to access the shared folder using the information of the shared folder registered to the Address Book.
Did You Update Windows?
If so, the security may have been strengthened, preventing communication between the machine and computer.
If the shared folder on the computer does not have a password, set a password, and re-register the information for accessing the shared folder to the Address Book of the machine. Preparing to Send and Save Scanned Data
If the shared folder on the computer does not have a password, set a password, and re-register the information for accessing the shared folder to the Address Book of the machine. Preparing to Send and Save Scanned Data
Did You Install or Update the Security Software?
If so, the security may have been strengthened, preventing communication between the machine and computer.
For a workaround, contact the software manufacturer.
For a workaround, contact the software manufacturer.
Step 4: Checking the Status of the Machine
Did You Change the IP Address of the Machine or Another Machine?
If so, check whether the machine and the other machine have the same IP address. If they have the same IP address, change it to a different IP address.
Step 5: Checking the Shared Folder
Do You Have Permission to Access the Shared Folder?
If you do not have permission to access the shared folder, on the computer, change the permission to enable saving of scanned data.
When Using Windows

1
Right-click the shared folder of the store location, and click [Properties].
The properties screen of the shared folder is displayed.
2
On the [Security] tab, check that [Everyone] has the access permission of [Change].
3
If not, in the access permissions for [Everyone], select [Allow] for [Change].
When Using macOS

1
Click [ ]
]  [System Settings]
  [General]
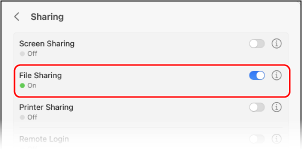
  [Sharing].
 [System Settings]
  [General]
  [Sharing].
The [Sharing] screen is displayed.
2
Set [File Sharing] to on, and click  .
.

3
In [Shared Folders], select the shared folder of the store location.
4
In [Users], select [Everyone]  [Read & Write].
 [Read & Write].
Checking the Attributes of the Shared Folder
On the computer, check that the attributes of the shared folder are not read only.
When Using Windows

1
Right-click the shared folder of the store location, and click [Properties].
The properties screen of the shared folder is displayed.
2
On the [General] tab, check that the [Read-only] checkbox in [Attributes] is not selected.
3
If the checkbox is selected, clear the [Read-only] checkbox.