Printing Received E-mail (E-Mail Print)
E-Mail Print allows you to print the message and attached JPEG or TIFF image files of an e-mail received from the POP3 mail server without using a computer. E-mails can be manually received as well as being automatically received at regular intervals. When the SMTP protocol is used, e-mails directly sent to the machine via no mail server are printed.

Outline of E-Mail Print
|
General
An e-mail message is printed with e-mail header information.
An HTML e-mail message is printed as a plain text.
If a line (without line feed) in an e-mail message contains more than 1,000 characters, excessive characters are placed on a new line and may not be correctly printed.
|
|
When the optional SD card is installed
Received data is temporarily stored in the SD card before being printed, reducing the communication time to perform the reception processing.
If the e-mail message size exceeds 25 MB or the e-mail size exceeds 1.5 GB, the e-mail message is not printed.
If the e-mail header data exceeds 20 KB, the excessive data is not printed.
If the SD card has no sufficient free space, E-Mail Print is not available.
|
|
When no SD card is installed
There is no limit on the size of received data because the machine prints data while receiving, but it takes a long time to receive a large size of data.
|
 |
|
When the toner cartridge is nearly empty, no e-mails can be received.
|
 |
|||||||||
Supported e-mail encoding formats
Supported e-mail character sets
|
|||||||||
Printable Formats of Attached Image Files
The E-Mail Print function supports the following types of image files.
|
JPEG file
|
TIFF file
|
 |
|
Some files are unavailable depending on the file structure.
You can print up to three attached files for each e-mail. (Excessive attached files are not printed.)
If the SD card is installed, the printable file size is 100 MB or less per file.
|
Configuring E-Mail Print Settings
This section describes how to specify the settings for receiving and printing e-mails on this machine. Use a computer to specify the settings for receiving e-mails and the operation panel of the machine to specify the settings for printing e-mails.
From a Computer
1
Start the Remote UI and log on in Management Mode. Starting the Remote UI
2
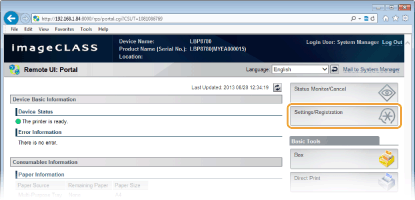
Click [Settings/Registration].
3
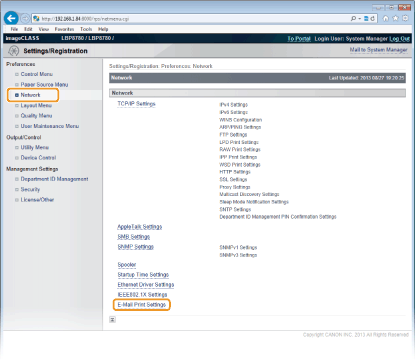
Click [Network]  [E-Mail Print Settings].
 [E-Mail Print Settings].
4
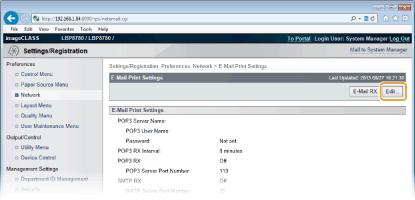
Click [Edit].
5
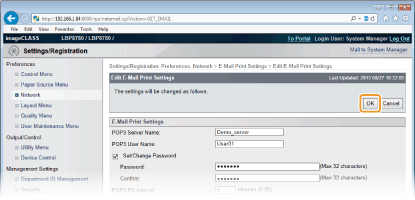
Specify the settings for E-Mail Print.
 When performing E-Mail Print from POP3 mail server
When the e-mail receiving starts, all e-mails stored in the mailbox of the mail server are printed. If you send e-mails that you want to print to the machine in advance, you can automatically print the e-mails at regular time intervals or print all stored e-mails in an arbitrary timing.


We recommend using the mail address exclusively for E-Mail Print because all e-mails received into the machine are deleted from the mail server.
Conditions of use for POP3 protocol
The POP3 mail server must support the UIDL command. For details, contact your network administrator or server administrator.
The POP3 mail server must support the UIDL command. For details, contact your network administrator or server administrator.
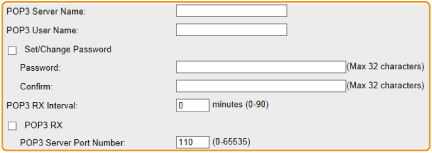
[POP3 Server Name]
Enter the mail server name or IP address for receiving e-mails.
[POP3 User Name]
Enter up to 32 alphanumeric characters for the user name used to connect to the mail server.
[Set/Change Password]
To set the password for connecting to the mail server, select the check box and enter up to 32 alphanumeric characters for the password in the [Password] text box. For confirmation, enter the same password in the [Confirm] text box.
Specify the interval for automatically connecting to the mail server in minutes. New e-mails in the mailbox of the mail server are automatically received and printed at the specified time intervals. You can also specify this setting by using <POP3 RX Interval> in the setting menu of the operation panel (POP3 RX Interval).

Preventing E-mails from Being Automatically Received
Set [POP3 RX Interval] to [0]. If you set [0], you must manually receive e-mails. Manually Receiving E-Mails
Set [POP3 RX Interval] to [0]. If you set [0], you must manually receive e-mails. Manually Receiving E-Mails
[POP3 RX]
Select the check box to enable E-Mail Print from the POP3 mail server. You can also specify this setting by using <POP3 RX> in the setting menu of the operation panel (POP3 RX).
[POP3 Server Port Number]
Specify the port number of the mail server that receives e-mails.
 When performing E-Mail Print by using SMTP protocol
If e-mails are sent to the machine via SMTP, the machine prints the e-mails immediately after receiving them. Enable this function when you want to forward fax documents from Canon multifunction printers to this machine and print them on the machine (To forward fax documents from Canon multifunction printers).


[SMTP RX]
Select the check box to enable E-Mail Print by using the SMTP protocol. You can also specify this setting by using <SMTP RX> in the setting menu of the operation panel (SMTP RX).
[SMTP Server Port Number]
Specify the port number of the SMTP server for receiving e-mails.
6
Click [OK].
7
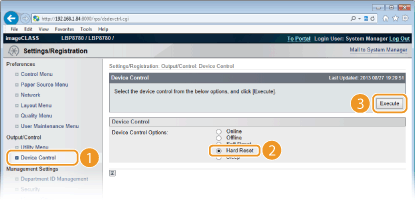
Perform a hard reset.
Click [Device Control], select [Hard Reset], and then click [Execute].
 |
The settings are enabled after the hard reset is performed.
|
From the Operation Panel
8
Specify other settings for E-Mail Print as necessary.
 |
Specify whether or not to print the e-mail message.
|
 |
You can limit the number of pages to print the e-mail message.
|
 |
You can specify the settings for printing attached image files.
|
|
 |
Specify whether or not to display an E-Mail Print error.
|
|
|
Manually Receiving E-Mails
If e-mail printing from the POP3 mail server is enabled, you can manually receive and print e-mails as well. When you want to connect to the mail server before automatically receiving e-mails or the machine is configured to prevent e-mails from being automatically received, follow the procedure below to manually receive the e-mails.
1
Press  (Utility).
 (Utility).
When the machine is offline, it does not operate even if  (Utility) is pressed. Set the machine to Online. [Online] key
 (Utility) is pressed. Set the machine to Online. [Online] key
2
Use  /
/  to select <E-Mail Print Utility>, and press
  .
.
 /
/  to select <E-Mail Print Utility>, and press
  .
.
3
Select <Received E-Mails>, and press  .
.
 .
.
4
Select <Yes>, and press  .
.
 .
.
 |
The machine is connected to the mail server. E-Mail Print is started for new e-mails in the mailbox of the mail server if any.
|
|
Enable SMTP RX on this machine, and then specify the IP address of the machine as the Internet Fax (I Fax) Address on the source multifunction printer. Forwarded fax documents are printed immediately when received.
Attached files can only be printed if they are in TIFF format. Only one TIFF file can be printed for each fax document.
When the toner cartridge is nearly empty, no fax documents can be received. The fax documents that could not be received on this machine are printed on the source multifunction printer.
When the optional SD card is installed on the machine, the maximum size of a printable TIFF file is limited to 100 MB.
|