Loading Paper into the Stack Bypass-C
If you are feeding paper manually, load the paper stock into the Stack Bypass-C.
Standard Size
You can select standard A or B series paper, or inch paper.
Custom Size
You can load nonstandard paper sizes (98.4 mm x 148 mm to 330.2 mm x 487.7 mm).
NOTE |
For information on paper that can be loaded when theLong Sheet Tray-B is attached, see"Available Paper Stock." |
Envelope
No. 10(COM10) (104.7 mm x 241.3 mm), Monarch (98.4 mm x 190.5 mm), DL (110 mm x 220 mm), ISO-C5 (162 mm x 229 mm), Nagagata 3 (120 mm x 235 mm), Yougatanaga 3 (120 mm x 235 mm), Kakugata 2 (240 mm x 332 mm), Custom Size (98.4 mm x 148 mm to 330.2 mm x 487.7 mm)
Tab Paper
For information on how to load tab paper, see "Loading Tab Paper."
IMPORTANT |
Note the following points when using the Stack Bypass-C: Paper Quantity: One to approximately 250 sheets (80 g/m2, stack approximately 27.5 mm high) Feed coated paper one sheet at a time. Paper which has been rolled or curled must be straightened out prior to use, to allow the paper to feed smoothly through the Stack Bypass-C. Some types of paper stock cannot be fed into the Stack Bypass-C. (See "Caution for Paper Curl.") For information on paper that can be loaded, see "Available Paper Stock." Make sure that you fan the sheets of paper well before placing them. Thin paper, recycled paper, pre-punched paper, heavy paper, labels, transparencies and clear film should be fanned particularly well before loading it. Do not load different size/type paper at the same time. Be sure to correctly set the paper type. When printing on special types of paper, such as heavy paper or transparencies, be sure to correctly set the paper type, especially if you are using heavy paper. If the type of paper is not set correctly, it could adversely affect the quality of the image. Moreover, the fixing unit may become dirty and require a service repair, or the paper could jam. |
NOTE |
The Stack Bypass-C is an optional product. For high-quality printouts, use paper recommended by Canon. |
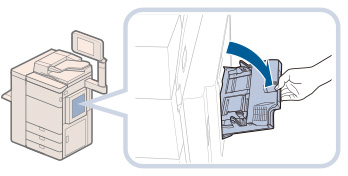
1.
Open the Stack Bypass-C.
NOTE |
If the paper is loaded in the Stack Bypass-C, a job may be reserved to use the Stack Bypass-C. |
If there is no reserved job, remove any paper remaining in the Stack Bypass-C → continue the procedure from step 2.
If there is a current or reserved job, you can reserve a copy/print job by changing paper for the Stack Bypass-C in [Change MP Tray Paper]. For more information, see the following:
Reserving a Print Job Using the Stack Bypass-C for Access Stored Files
2.
Adjust the slide guides to match the size of the paper.
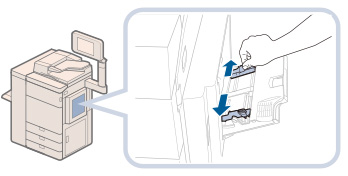
If you are feeding large size paper, pull out the auxiliary tray.
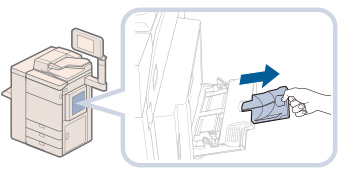
3.
Load the paper into the Stack Bypass-C.
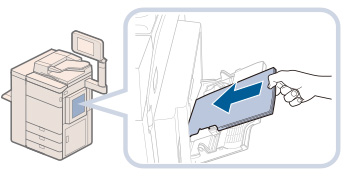
Make sure that the height of the paper stack does not exceed the loading limit mark ( ).
).
).For the procedures to load the envelopes into the Stack Bypass-C, see "Loading Envelopes into the Stack Bypass-C."
IMPORTANT |
When loading paper into the Stack Bypass-C, align the paper stack neatly between the slide guides. If the paper is not loaded correctly, a paper jam may occur. When loading paper into the Stack Bypass-C, align the paper stack evenly between the slide guides. The paper may not be fed if the slide guides are set to a position narrower than the paper, causing the paper to curl. |
NOTE |
If there are instructions on the paper package about which side of the paper to load, follow those instructions. When the paper is loaded into the Stack Bypass-C, the side facing up is the one printed on. If problems, such as poor print quality or paper jams occur, try turning the paper stack over and reload it. For more information on the print direction of preprinted paper (paper which has logos or patterns already printed on it), see "Relationship Between the Original Orientation and Paper Orientation." If the paper is curled when using the Stack Bypass-C, a paper jam may occur. Therefore, fix the curling as indicated in the diagram before loading the paper into the Stack Bypass-C. 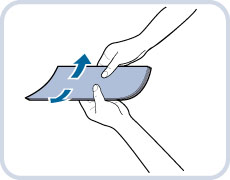 To copy or print on the backside of preprinted paper, fix the curling, and then load the preprinted paper face up into the Stack Bypass-C. To copy or print on the backside of preprinted paper with the same orientation of the preprinted side, set the paper as shown in the illustration below. 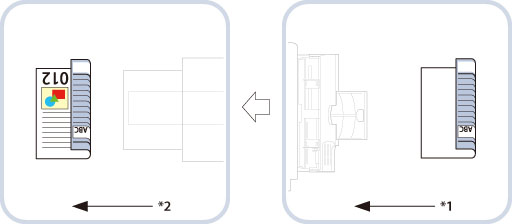 *1 Feeding Direction *2 Output Direction |
4.
Specify the paper size.
If the displayed paper size is the same as the one you set in the Stack Bypass-C, proceed to step 5.
If the displayed paper size is different from the loaded paper size, adjust the slide guides again. If the different paper size is still displayed, follow the procedure below to select the proper paper size.
IMPORTANT |
Set the paper size to the same size as the paper loaded in the Stack Bypass-C. |
NOTE |
If a screen prompting you to adjust the slide guides is displayed, adjust the width of the slide guides → specify the paper size → press [OK]. 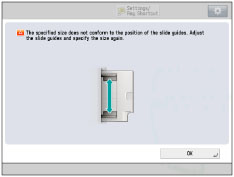 If a screen prompting you to adjust the slide guides or check [Multi-Purpose Tray Defaults] in Settings/Registration is displayed, adjust the width of the slide guides to match the paper size stored in [Multi-Purpose Tray Defaults], or set [Multi-Purpose Tray Defaults] to 'Off' in [Preferences] (Settings/Registration). (See "Registering Multi-Purpose Tray Defaults.") 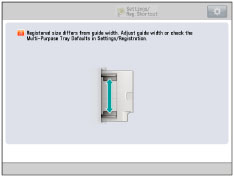 |
If you want to select a standard paper size:
Adjust the slide guides to match the paper size → press [Standard Size].
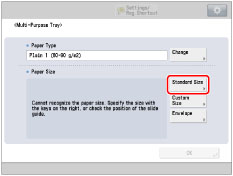
Select the desired paper size → press [OK].

NOTE |
To select an inch paper size, press [Inch Size]. |
If you want to select a nonstandard paper size (Custom Size):
Press [Custom Size].
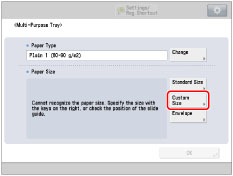
Press [X] and [Y] → enter each value → press [OK].
You can also select a size button ([S1] to [S5]) containing a stored paper size setting, instead of entering values.
NOTE |
If you make a mistake when entering values, press To select a registered paper size stored in a size button ([S1] to [S5]), you must store the irregular paper size in the size button beforehand. For instructions on storing irregular paper sizes, see "Registering/Editing/Deleting Custom Paper Sizes." |
5.
Select the desired paper type.
Press [Change] for <Paper Type>.
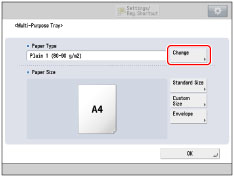
Select the desired paper type → press [OK].
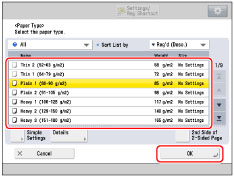
You can also select the paper type from [Simple Settings]. Press [Simple Settings] → select the paper type → press [OK].
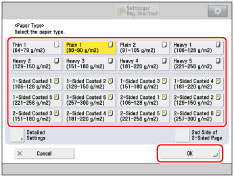
If you are printing on the backside of a previously printed sheet, press [2nd Side of 2-Sided Page].
NOTE |
Transparencies can be selected only if you select A4 or A4R as the paper size. For more information on paper types, see "Available Paper Stock." You can register paper types that are not listed in Detailed Settings for Selecting the Paper Type. For information on registering a custom paper type, see "Registering Custom Paper Types." |
6.
Press [OK].
If you make a mistake when specifying settings for paper loaded in the Stack Bypass-C, remove the paper from the tray, place the paper back in the tray, and then specify the settings again.
IMPORTANT |
Feed vellum paper one sheet at a time, and remove each sheet as it is delivered to the output tray. Loading several sheets together may cause paper jams. Depending on the type of heavy paper you want to load, if you load multiple sheets of heavy paper into the Stack Bypass-C, a paper jam may occur. In this case, load only one sheet of heavy paper at a time. If a paper jam still occurs, adjust the curl correction level in the range of +1 to +5. (See "Curl Correction for Each Paper Drawer.") If you are making two-sided prints, select the 2-Sided mode. The printed-paper may crease depending on the moisture absorption condition of the paper. To print on the backside of preprinted paper, load the paper into the Stack Bypass-C, and press [2nd Side of 2-Sided Page] on the paper selection screen that appears. When printing long sheet, remove the output immediately. If paper of other sizes is printed or another tray is selected as the output destination while the output long sheet is still left on the output tray, the output on the bottom may become depressed or stained. To avoid depression or stain, we recommend that you place a blank long sheet on the output tray before outputting. If the first output sheet cannot be output onto the output tray smoothly, we recommend that you place a blank sheet of the same or larger size than the output paper on the output tray in advance. |
NOTE |
When scanning the following originals, you cannot use the Automatic Paper Selection mode. Use the Manual Paper Selection mode when scanning these types of originals: Transparencies and other highly transparent objects Originals with an extremely dark background |