Items That Can Be Configured for Destinations
When you register destinations to the Address Book or one-touch buttons, or when you edit registered destinations, the items that can be configured vary depending on the type of destination.
E-Mail Destination Settings
When you register an e-mail destination to the Address Book or a one-touch button, configure the items described below.
In this section, the descriptions refer to the screens and item names displayed when you register destinations using the control panel.
When you register destinations using Remote UI from a computer, the settings that can be configured are the same, but the screen configuration and item names are different.
When you register destinations using Remote UI from a computer, the settings that can be configured are the same, but the screen configuration and item names are different.
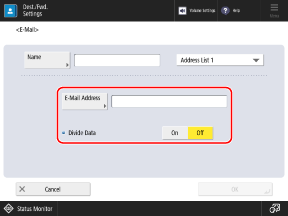
[E-Mail Address]
Enter the e-mail address.
* You can set frequently used domain names (the part after "@" in the e-mail address) as registered characters on the keyboard of the control panel, and call them up when you enter e-mail addresses. [Registered Characters for Keyboard]
* If you register a domain name to be automatically added when sending, you can register e-mail addresses without having to enter "@" and the domain name. [Auto Add Specified Domain to Dest. Without Domain]
[Divide Data]
If the size of the data being sent exceeds the upper limit, the transmission is divided and sent in multiple parts. In this case, specify whether to divide the data when sending.
If you select [On], the data is divided into smaller sizes that do not exceed the limit, and sent in multiple sections. The recipient's e-mail software needs to be able to combine the divided data.
If you select [Off], the number of pages sent at one time is reduced, and the pages are sent in multiple transmissions. However, if you send data that cannot be separated into pages, such as a JPEG file, a sending error occurs.
* You can change the upper limit of the data size. [Maximum Data Size for Sending]
I-Fax Destination Settings
When you register an I-Fax destination to the Address Book or a one-touch button, configure the items described below.
In this section, the descriptions refer to the screens and item names displayed when you register destinations using the control panel.
When you register destinations using Remote UI from a computer, the settings that can be configured are the same, but the screen configuration and item names are different.
When you register destinations using Remote UI from a computer, the settings that can be configured are the same, but the screen configuration and item names are different.
* The items that appear on the screen vary depending on the model and options.
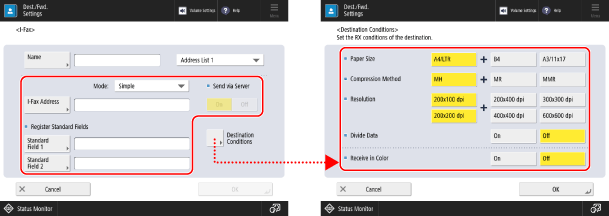
[Mode]
Select the Send Mode according to the type of I-Fax sending results that you want to check.
Checking Whether an I-Fax Is Delivered to an E-Mail Server
Select [Simple].
When you send an I-Fax using the Simple mode, the sending results are displayed as follows.
Sending succeeded/Communication not confirmed: [--]
Sending failed: [NG]
Checking Whether an I-Fax Is Delivered to the Destination Machine
Select [Full].
When you send an I-Fax using the Full mode, the sending results are displayed as follows.
Sending succeeded: [OK]
Sending failed: [NG]
Communication not confirmed: [--]
In addition, when you send an I-Fax using the Full mode, the sending results are determined by receiving the MDN (the sending result notification e-mail) from the destination machine.
Since the MDN is not received if you send an I-Fax using the Full mode to a machine that does not support the Full mode, [Awaiting result...] is displayed for the processing status until timeout occurs, even after sending is completed. [Full Mode TX Timeout]
Since the MDN is not received if you send an I-Fax using the Full mode to a machine that does not support the Full mode, [Awaiting result...] is displayed for the processing status until timeout occurs, even after sending is completed. [Full Mode TX Timeout]
* For the processing status and sending results, you can check the sending status and log in [ Status Monitor]. Checking the Send or Save Status and Log of Scanned Data
Status Monitor]. Checking the Send or Save Status and Log of Scanned Data[I-Fax Address]
Enter the e-mail address.
When the Destination Is a Machine on the Same Network
Enter the IP address in the following format:
<Destination machine name>@[<Destination IP address>] |
Example:
adv01@[192.168.11.100]
adv01@[192.168.11.100]
* You can set frequently used domain names (the part after "@" in the e-mail address) as registered characters on the keyboard of the control panel, and call them up when you enter e-mail addresses. [Registered Characters for Keyboard]
* If you register a domain name to be automatically added when sending, you can register e-mail addresses without having to enter "@" and the domain name. [Auto Add Specified Domain to Dest. Without Domain]
[Register Standard Fields]
Configure this setting when using a service such as an Internet fax service. For details, contact your Internet service provider.
[Send via Server]
Specify whether to send I-Faxes via the e-mail server when the destination is a machine on the same network.
By selecting [Off], you can send directly to the destination machine and reduce the burden on the e-mail server.
When this item is set to [Off] and you want to send to a destination that is not specified in IP address format, settings such as an MX (Mail eXchange) record need to be configured on the DNS server. For details, contact the network administrator.
If [Mode] is set to [Full], the MDN is sent and received via the e-mail server, even when you set this item to [Off].
* By default, you cannot change the setting of this item. [Use Send via Server]
[Destination Conditions]
Set the destination conditions according to the specifications of the destination machine. If you set conditions that the destination machine does not support, an error may occur.
[Paper Size]
Set a paper size that the destination machine supports.
If you set multiple paper sizes, the machine automatically selects the paper size closest to the original size of the scanned data when sending. If you set a paper size that is larger than the sizes that can be used by the destination machine, the image may be clipped or cut off.
If the original size of the scanned data is smaller than the set paper size, the image is sent at the same size as the original, with blank margins.
If the original size of the scanned data is larger than the set paper size, the image is sent at a reduced size.
[Compression Method]
Set a compression method that the destination machine supports.
MMR has the highest compression rate and shortest transmission time, followed by MR, and then MH.
MMR has the highest compression rate and shortest transmission time, followed by MR, and then MH.
[Resolution]
Set a resolution that the destination machine supports.
A higher value increases the resolution and image quality. However, a higher resolution increases the transmission time.
A higher value increases the resolution and image quality. However, a higher resolution increases the transmission time.
[Divide Data]
If the size of the data being sent by I-Fax exceeds the upper limit, select whether to divide the data when sending it.
If you select [On], the data is divided into smaller sizes that do not exceed the limit, and sent in multiple sections. The destination machine needs to be able to combine the divided data.
If you select [Off] and the data size exceeds the limit, a sending error occurs.
If you set [Send via Server] to [Off], the data is sent without being divided even if it exceeds the upper limit, regardless of this setting.
* You can change the upper limit of the data size. [Maximum Data Size for Sending]
[Receive in Color]
Set whether the destination machine can receive in color.
If you set this to [On], press [Next] and set a paper size and resolution that the destination machine supports when it receives in color.
If you set this to [On], press [Next] and set a paper size and resolution that the destination machine supports when it receives in color.
Shared Folder, File Server, and Advanced Space Destination Settings
When you register a shared folder, file server, or Advanced Space destination in the Address Book or a one-touch button, configure the items described below.
In this section, the descriptions refer to the screens and item names displayed when you register destinations using the control panel.
When you register destinations using Remote UI from a computer, the settings that can be configured are the same, but the screen configuration and item names are different.
When you register destinations using Remote UI from a computer, the settings that can be configured are the same, but the screen configuration and item names are different.
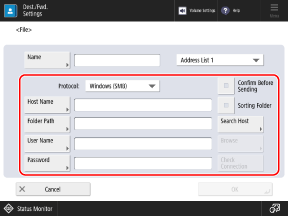
[Protocol]
Select the send protocol.
For a shared folder, select [Windows (SMB)].
For a file server, select the protocol according to the destination server.
For Advanced Space, select [Windows (SMB)] or [WebDAV] according to the method used to make it public.
[Host Name]
Enter the host name or IP address of the destination.
For a shared folder, enter the name or IP address of the computer with the shared folder.
When you enter an IPv6 address, enclose the IP address in brackets [ ].
When [Windows (SMB)] Is Selected for [Protocol]
Add "\\" before the IP address.
Examples:
\\192.168.100.50
\\[fe80:2e9e:fcff:fe4e:dbce]
\\192.168.100.50
\\[fe80:2e9e:fcff:fe4e:dbce]
* You can also use [Search Host] or [Browse] to specify the host name.
By default, you cannot use [Browse]. You can use it only if SMB v1.0 is enabled in the SMB version setting. [Specify SMB Client Version]
When [FTP] Is Selected for [Protocol]
Add "ftp://" before the IP address. If TLS is enabled, add "ftps://" instead of "ftp://" before the IP address.
Examples:
ftp://192.168.100.50
ftps://[fe80:2e9e:fcff:fe4e:dbce]
ftp://192.168.100.50
ftps://[fe80:2e9e:fcff:fe4e:dbce]
When [WebDAV] Is Selected for [Protocol]
Add "http://" before the IP address. If TLS is enabled, add "https://" instead of "http://" before the IP address.
Examples:
http://192.168.100.50
https://[fe80:2e9e:fcff:fe4e:dbce]
http://192.168.100.50
https://[fe80:2e9e:fcff:fe4e:dbce]
When the Destination Is the Advanced Space of the Machine
When you specify a loopback address instead of the host name or IP address of the machine, you can use the following functions.
You can send an e-mail notification when a file is stored. Sending the TX Result by E-mail
You can send and store files even when users are prohibited from storing files over the network. [Prohibit Writing from External]
Enter the loopback address as shown below.
Protocol | For host name | For IPv4 address | For IPv6 address |
SMB | \\localhost | \\127.0.0.1 | \\[::1] |
WebDAV | http://localhost | http://127.0.0.1 | http://[::1] |
WebDAV (When TLS is enabled) | https://localhost | https://127.0.0.1 | https://[::1] |
[Folder Path]
Enter the path to the folder in which to store the file.
When [Windows (SMB)] or [FTP] Is Selected for [Protocol]
If you select [Windows (SMB)], use "\" as a separator.
If you select [FTP], use "/" as a separator.
If you select [FTP], use "/" as a separator.
When [Windows (SMB)] is selected, [Check Connection] can only check up to the first level of the specified folder path.
If the folder does not exist at the entered path, a folder with the entered name is created when a file is stored for the first time.
* However, if the parent folder does not exist, or if you do not have write permission to the parent folder, a sending error occurs without a folder being created.
When [WebDAV] Is Selected for [Protocol]
Use "/" as a separator.
When the Destination Is the Advanced Space
The top-level folder name is "share" for the Shared Space, and "users" for the Personal Space.
Examples:
When a folder named "scandata" is in the Shared Space
\share\scandata
/share/scandata
\share\scandata
/share/scandata
When a folder named "scandata" is in the Personal Space
\users\scandata
/users/scandata
\users\scandata
/users/scandata
[User Name]
Enter the user name for logging in to this destination.
* You can use UPN when you log in to a computer belonging to a domain operated with Active Directory.
[Password]
Enter the password for logging in to this destination.
[Confirm Before Sending]
Select this checkbox to display a screen for confirming the user name and password before you send a file to this destination.
Since this setting allows you to enter the user name and password on the confirmation screen whenever you send a file, you can register a destination without setting the user name and password.
Since this setting allows you to enter the user name and password on the confirmation screen whenever you send a file, you can register a destination without setting the user name and password.
Deselect the checkbox if you register this destination in a group. If you register this destination in a group with the checkbox selected, you will not be able to specify the group as a destination and send data to it.
If you use this destination as a fax forwarding destination, the confirmation screen is not displayed when a fax is forwarded, even if the checkbox is selected.
[Sorting Folder]
When this checkbox is selected, each time you send a file, a new folder is created in the folder specified in [Folder Path], and the file is stored in that folder.
When you send a file, you can create a new folder and store the file in that folder at the same time.
When you send a file, you can create a new folder and store the file in that folder at the same time.
* This item is displayed only when [Windows (SMB)] or [FTP] is selected in [Protocol].
When the Checkbox Is Selected
On the send screen, press [ Start] to display the following screen.
Start] to display the following screen.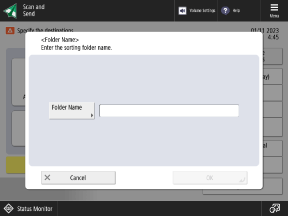
Press [Folder Name], enter the name of the folder you want to create, and press [OK]  [OK].
[OK].
If you specify multiple destinations, a sending error occurs.
If the entered folder already exists, the file is stored to that folder.
[Check Connection]
Check whether the machine can connect to the destination using the configured information.
* When you set [Protocol] to [WebDAV], the HEAD method of HTTP is used to check the connection. Even when the information is configured correctly, an error may appear due to the settings configured on the server.
When [WebDAV] Is Selected for [Protocol]
The HEAD method of HTTP is used to check the connection.
If access via the HEAD method is prohibited, an error occurs in the connection check even when the destination information is configured correctly. However, the connection is established properly during actual sending.
If access via the HEAD method is prohibited, an error occurs in the connection check even when the destination information is configured correctly. However, the connection is established properly during actual sending.
* Examples of when access via the HEAD method is prohibited
IIS 7: Access via the HEAD method cannot be performed unless the Source checkbox is selected in the access permissions for the WebDAV authoring rules of the target folder.
Apache: Access via the HEAD method cannot be performed unless HEAD is described using the Limit directive in httpd.conf.
Advanced Space: When used as a WebDAV server, access via the HEAD method is always prohibited.
NOTE
Changing the Authentication Method Used When Logging In to the Destination
Instead of setting the user name and password, you can configure the settings to use the authentication information for logging in to the machine, or the authentication information registered for each user. [Information Used for File TX/Browsing Authentication]
Fax Destination Settings
When you register a fax destination to the Address Book or a one-touch button, configure the items described below.
In this section, the descriptions refer to the screens and item names displayed when you register destinations using the control panel.
When you register destinations using Remote UI from a computer, the settings that can be configured are the same, but the screen configuration and item names are different.
When you register destinations using Remote UI from a computer, the settings that can be configured are the same, but the screen configuration and item names are different.
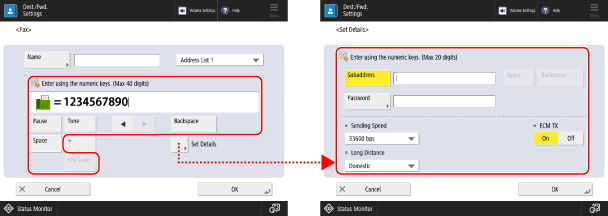
Fax number entry field
Enter the fax number using the numeric keys.
If an external line number is required, add it before the fax number.
When you enter an international destination, enter the international access number first, followed by the country code, and then the fax number.
Use the buttons described below according to the destination or the service that you use.
* You cannot enter "P" (pause) at the beginning of the fax number.
[Pause]
Insert the character "P."
If you are unable to connect properly when sending to an international destination, insert "P" between the numbers to add a pause. You can change the pause time. [Set Pause Time]
If you are unable to connect properly when sending to an international destination, insert "P" between the numbers to add a pause. You can change the pause time. [Set Pause Time]
[Tone]
Insert the character "T."
Even if you are using a pulse dial line, a tone dial signal will be used for the numbers following "T." Enter "T" in situations such as when you use a fax information service.
Even if you are using a pulse dial line, a tone dial signal will be used for the numbers following "T." Enter "T" in situations such as when you use a fax information service.
[PIN Code]
Press to enter a Personal Identification Number (PIN) code. [PIN Code Access] [North America]
* This item may not be displayed depending on the model or region.
[R] key
If the machine is connected to a Private Branch Exchange (PBX), press this button before entering the destination. If this button is not available, you need to register the R-key setting. [R-Key Setting] [Europe][Asia/Oceania][Americas] (230 V Machine Only)
* This item may not be displayed depending on the model or region.
[Set Details]
Set the fax sending details, as needed.
[Subaddress] and [Password]
Configure these settings to use a subaddress and enhance the confidentiality of communication.
* The machine supports the use of ITU-T (International Telecommunication Union-Telecommunication Standardization Sector) standard subaddresses. If the destination machine supports subaddress communication (confidential communication), you can enhance the confidentiality of sent documents by setting a subaddress and password for sending.
[Sending Speed]
Depending on the destination or the status of the line, a sending error may occur due to the communication speed. If sending errors occur frequently, set a slower communication speed for this item.
[Long Distance]
If a sending error occurs for an international destination, select [Long Distance (1)]. If the error does not improve, select [Long Distance (2)], followed by [Long Distance (3)].
[Select Line]
If you have multiple lines, select the line to use for sending.
[ECM TX]
If an error occurs when sending an image, the Error Correction Mode (ECM) function checks and corrects the image so as not to send a distorted image. Specify whether to use the ECM function.
When ECM transmission is enabled, the function checks for errors on the sending side and the receiving side during communication. Therefore, the ECM function also needs to be enabled on the destination machine.
With ECM transmission, communication may take more time than usual because the function checks for errors during communication. In addition, even when ECM transmission is enabled, errors may sometimes occur due to the status of the line.