Checking the Scanned Data and Organizing Pages (Preview)
You can display a preview screen to check the contents before sending or saving scanned data. You can also change the page order and delete pages on the preview screen.
* You cannot display or operate the preview screen when saving scanned data to Mail Box.
Displaying the Preview Screen
You can configure the settings to display a preview screen before sending or saving scanned data.
* For the basic scanning operations, see the following:
1
Press [Options]  [Preview] on the scan screen. Scan Screen
[W/Settings] is displayed at the bottom of the setting button.
2
Press [Close].
The scan screen is displayed again.
3
Press [ Start].
Start].Scanning of the original starts.
When scanning is completed, the preview screen is displayed.
When scanning is completed, the preview screen is displayed.
When [Press the [Start] key to scan the next original.] Is Displayed
When an original is placed on the platen glass and is scanned or scanning is performed using Job Build, the screen for scanning additional originals is displayed.
When scanning of all originals is completed, press [Preview and Send] to display the preview screen.
When scanning of all originals is completed, press [Preview and Send] to display the preview screen.
Operating the Preview Screen
If the settings are configured to display a preview screen, the preview screen is displayed after scanning of the original is completed.
* When an original is placed on the platen glass and is scanned or scanning is performed using Job Build, you can press [Preview and Send] after scanning of all originals is completed to display the preview screen.
You can use the preview screen to check the contents of the scanned data and organize the pages.
Press [Start Sending] or [Start Storing] to send or save the scanned data.
Press [Start Sending] or [Start Storing] to send or save the scanned data.
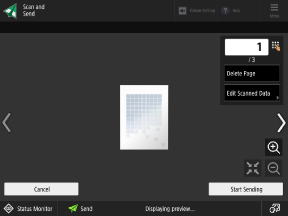
Changing the Page to Display
Press [ ] or [
 ] on the left or right side of the screen.
You can also directly specify the page to display by using the numeric keys to enter a page number.
] or [] on the left or right side of the screen. You can also directly specify the page to display by using the numeric keys to enter a page number.
Deleting a Page
Display the page you want to delete, and press [Delete Page] [Yes].
Moving a Page
Press [Edit Scanned Data] [Move Page Position], specify the page to move and the destination, and then press [OK].
Replacing a Page
Press [Edit Scanned Data] [Switch Page Position], specify the page to replace and the replacement page, and then press [OK].