Enter the IP address or host name of the server machine.
To specify the port number, enter "8443" (optional).
To search for the server machine automatically, leave this blank.
Starting and Stopping Synchronization (Client Machine)
This section describes how to start and stop synchronization on the client machine.
Starting Synchronization on a Client Machine
Enable the synchronization function and configure the settings for connecting to the server machine.
This section describes how to configure the settings using Remote UI from a computer.
On the control panel, select [ Settings/Registration] in the [Home] screen or other screen, and then select [Management Settings] to configure the settings. However, the control panel can only be used to enable or disable the synchronization function. [Synchronize Custom Settings (Client)]
This section describes how to configure the settings using Remote UI from a computer.
On the control panel, select [
Settings/Registration] in the [Home] screen or other screen, and then select [Management Settings] to configure the settings. However, the control panel can only be used to enable or disable the synchronization function. [Synchronize Custom Settings (Client)]Administrator privileges are required. The machine must be restarted to apply the settings.
Required Preparations
Enable the synchronization function on the server machine, and configure the data to be synchronized. Starting Synchronization on the Server Machine
1
Log in to Remote UI as an administrator. Starting Remote UI
2
On the Portal page of Remote UI, click [Synchronize Custom Settings]. Remote UI Portal Page
The [Synchronize Custom Settings] screen is displayed.
Click [Change Connection Destination].
The [Connection Settings] screen is displayed.
4
In [Service] under [Synchronize Custom Settings (Client)], select [Start].
Configure the settings for connecting to the server machine.
You can skip this step when all of the conditions below are met. Proceed to Step 6.
When the server machine is connected to the same router (including the server machine's client function)
When there is only one server machine on the same network
When [User Account ID for Authentication] in [Synchronize Custom Settings (Client)] is left blank
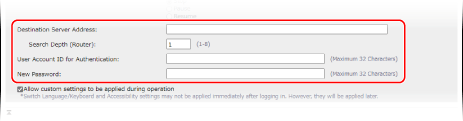
[Destination Server Address]
Example: When specifying the port number
192.168.18.138:8443
192.168.18.138:8443
* When you specify the port number for an IPv6 address, enclose the IP address in brackets [ ].
Example:
[fe80::65f0:82cb:b3d6:e6bc]:8443
Example:
[fe80::65f0:82cb:b3d6:e6bc]:8443
* When you use a sub line for the network settings of the server machine, enter the information below.
For the client machine: IP address of the sub line of the server machine
For the server machine's client function: IP address of the main line, or "localhost"
[Search Depth (Router)]
Enter the router hop count (number of routers the data passes through) for network discovery. When not passing through a router, specify "1."
[User Account ID for Authentication] and [New Password]
Enter the user name and password of the user with Administrator privileges for the server machine.
Select the [Allow custom settings to be applied during operation] checkbox, as needed.
Normally, the synchronized data is applied immediately after the user logs in, but the following settings may not be applied:
[Switch Language/Keyboard]
[Accessibility]
[Personal SSID and Network Key Settings]
To apply these settings during user operation, select this checkbox.
7
Click [Change]  [OK].
[OK].
8
Restart the machine. Restarting the Machine
The settings are applied and synchronization starts.
NOTE
Checking the Synchronization Communication Log
On the screen shown in Step 3, you can check the synchronization communication log and store it as a file on a computer.
If an error occurs, [Warning] or [Error] is displayed for [Level].
[Warning]: Unable to communicate temporarily with the server machine, etc.
[Error]: Registration data limit has been exceeded, failed to authenticate the server machine, etc.
When a Client Machine Cannot Connect to the Server Machine During Discovery
The client machine cannot connect to the server machine during discovery in the following cases. Enter the IPv4 address in [Destination Server Address] in Step 5.
When the network settings of the server machine use both IPv4 and IPv6 with priority given to IPv6, and IPv6 is disabled on the client machine
When the main line is used for the network settings of the server machine, and the sub line is used for the network settings of the client machine
If Data Is Not Synchronized Properly
If a message appears on the control panel, follow the instructions of the message to fix the problem. A Message Appears
If no message appears on the control panel even though a data mismatch occurs between the client machine and server machine, delete the user setting information, and log in. Deleting User Setting Information
Stopping Synchronization on a Client Machine
This section describes how to configure the settings using Remote UI from a computer.
On the control panel, select [ Settings/Registration] in the [Home] screen or other screen, and then select [Management Settings] to configure the settings. [Synchronize Custom Settings (Client)]
Administrator privileges are required.
On the control panel, select [
Settings/Registration] in the [Home] screen or other screen, and then select [Management Settings] to configure the settings. [Synchronize Custom Settings (Client)]Administrator privileges are required.
1
Log in to Remote UI as an administrator. Starting Remote UI
2
On the Portal page of Remote UI, click [Synchronize Custom Settings]. Remote UI Portal Page
The [Synchronize Custom Settings] screen is displayed.
3
Click [Change Connection Destination].
The [Connection Settings] screen is displayed.
4
In [Service] under [Synchronize Custom Settings (Client)], select [Stop].
5
Click [Change] [OK].
The settings are applied.
6
Log out from Remote UI.
NOTE
Client machines save only the information of users logged in during synchronization. If you stop synchronization, the client machine no longer receives information from the server machine, and users without saved information cannot log in.
If the user information on the server machine is required on a client machine where synchronization was stopped, export the personalized data from the server machine and import it to the client machine. Preparing to Update Personalized Data on the Client Machine
If the user information on the server machine is required on a client machine where synchronization was stopped, export the personalized data from the server machine and import it to the client machine. Preparing to Update Personalized Data on the Client Machine