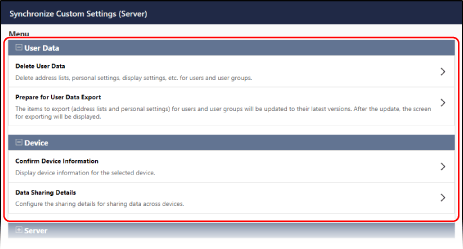
Preparing the Synchronization and Checking the Status (Server Machine)
After starting synchronization on the server machine, click [Synchronize Custom Settings (Server)] on the Portal page of Remote UI to prepare the synchronization and check the status of synchronizing with the client machine.
Deleting Personalized Data on the Server Machine
Select the information of a user or user group and delete it.
When the data to be synchronized exists on both the server machine and a client machine, the data on the client machine is deleted and overwritten with the data on the server machine.
To use the data on a client machine, delete the applicable data from the server machine before starting the synchronization.
Delete personalized data using Remote UI from a computer. You cannot use the control panel to delete personalized data.
Administrator privileges are required.
Administrator privileges are required.
1
Log in to Remote UI as an administrator. Starting Remote UI
2
On the Portal page of Remote UI, click [Synchronize Custom Settings (Server)]. Remote UI Portal Page
The [Synchronize Custom Settings (Server)] screen is displayed.
3
In [User Data], click [Delete User Data].
The [Delete User Data] screen is displayed.
4
Enter the user name or group ID to be deleted, and click [Search].
If you click [Search] with the search condition left blank, all registered users and user groups will be displayed.
5
Select the checkbox of the user and user group to be deleted.
6
Click [Delete]  [Yes].
The user and user group are deleted.
7
Log out from Remote UI.
Configuring the Data to Be Synchronized
For some of the personalized data items, you can configure whether to synchronize the settings across all client machines or use device-specific information.
* To change the settings during synchronization, stop synchronization on all client machines, change the settings, and then restart synchronization on the client machines. Starting and Stopping Synchronization (Client Machine)
Configure this setting using Remote UI from a computer. You cannot use the control panel to configure the setting.
Administrator privileges are required.
Administrator privileges are required.
1
Log in to Remote UI as an administrator. Starting Remote UI
2
On the Portal page of Remote UI, click [Synchronize Custom Settings (Server)]. Remote UI Portal Page
The [Synchronize Custom Settings (Server)] screen is displayed.
3
In [Device], click [Data Sharing Details].
The [Data Sharing Details] screen is displayed.
4
Specify whether to synchronize the data.
To synchronize the data, select [Shared across All Devices]. To use device-specific information without synchronizing, select [Device-Specific (Not Shared)].
If you change the setting from [Device-Specific (Not Shared)] to [Shared across All Devices] during synchronization, all Shared button settings and data specific to each client machine are initialized before synchronization.
If you change the setting from [Shared across All Devices] to [Device-Specific (Not Shared)], all data in [Default Settings] and [Previous Settings] is initialized for users registered in the server machine.
All items without settings in [Data Sharing Details] will be synchronized. Settings That Can Be Personalized
5
Click [OK] [Yes].
The settings are applied.
6
Log out from Remote UI.
Checking Information of a Client Machine
You can check the name, serial number, and other information of a synchronized client machine. You can also stop synchronization of a client machine from the server machine.
Perform these operations using Remote UI from a computer. You cannot use the control panel to perform these operations.
Administrator privileges are required.
Administrator privileges are required.
1
Log in to Remote UI as an administrator. Starting Remote UI
2
On the Portal page of Remote UI, click [Synchronize Custom Settings (Server)]. Remote UI Portal Page
The [Synchronize Custom Settings (Server)] screen is displayed.
3
In [Device], click [Confirm Device Information].
The [Confirm Device Information] screen is displayed.
4
Check the information of the client machine.
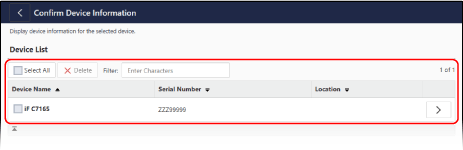
Start entering the name of the client machine in [Filter] to filter the client machines that appear in the list by partial matches.
To view the detailed information, click [ ] on the client machine.
] on the client machine.To stop synchronization of a client machine, select the checkbox of the client machine, and click [Delete] [Yes].
5
Log out from Remote UI.
Preparing to Update Personalized Data on the Client Machine
Client machines save only the information of users logged in during synchronization. If you stop synchronization, the client machine no longer receives information from the server machine, and users not saved cannot log in.
If the user information on the server machine is required on a client machine where synchronization was stopped, export personalized data from the server machine and import it to the client machine. To prepare for this operation, export personalized data managed on the server machine.
If the user information on the server machine is required on a client machine where synchronization was stopped, export personalized data from the server machine and import it to the client machine. To prepare for this operation, export personalized data managed on the server machine.
* On a server machine with the client function enabled, you can use this function only when [Destination Server Address] is set to "localhost:8443."
When you use this function, personalized data can be exported for only 15 minutes, even when synchronization is in progress.
* When using this function, do not allow users to log in until the export process is complete.
When you use this function, personalized data can be exported for only 15 minutes, even when synchronization is in progress.
* When using this function, do not allow users to log in until the export process is complete.
Export data using Remote UI from a computer. You cannot use the control panel to export data.
Administrator privileges are required.
Administrator privileges are required.
1
Log in to Remote UI as an administrator. Starting Remote UI
2
On the Portal page of Remote UI, click [Synchronize Custom Settings (Server)]. Remote UI Portal Page
The [Synchronize Custom Settings (Server)] screen is displayed.
3
In [User Data], click [Prepare for User Data Export].
The [Prepare for User Data Export] screen is displayed.
4
Enter the user name or group ID to export, and click [Search].
If you click [Search] with the search condition left blank, all registered users and user groups will be displayed.
5
Select the checkbox of the user and user group to export.
You can select up to 500 users and 50 user groups.
Users logged in from the control panel are also included.
Users logged in from the control panel are also included.
6
Click [Update and Export] [Yes].
7
Click [To [Export Address Lists] Page] or [To [Export] Page].
To export personal address lists or user group address lists as individual files, click [To [Export Address Lists] Page].
To batch export all of the personalized data together in one file, click [To [Export] Page].
The export screen is displayed.
8
Export the data within 15 minutes.
To export address lists individually, select [Personal Address List (All)] or [User Group Address List (All)] in [Address List] when you perform the export operation. Exporting Data Individually
To batch export the personalized data, select [Personal Setting Information] or [User Group Address List] in [Select Item to Export] when you perform the export operation. Exporting Data in Batch
9
Log out from Remote UI.
NOTE
Updating Personalized Data on a Client Machine That Has Been Synchronized
Import the exported file to the client machine that has been synchronized.