Installing the System Options
When the machine is connected to the network, the machine can communicate with the distribution server to install the system options.
If the machine cannot connect to the network or cannot communicate with the distribution server for some reason, you can install the system options offline.
If the machine cannot connect to the network or cannot communicate with the distribution server for some reason, you can install the system options offline.
IMPORTANT
If a printer function expansion kit is installed, you need to restart the machine using the power switch and initialize the printer settings.
NOTE
When you install a MEAP application, use a different installation procedure than that for the system options. Installing MEAP Applications
Installing by Communicating with the Distribution Server
This section describes how to install the system options using Remote UI from a computer.
On the control panel, select the [ Settings/Registration] in the [Home] screen or other screen, and then select [Management Settings] to install the system options. [Register/Update Software]
Administrator privileges are required. The machine must be restarted to apply the installed content.
On the control panel, select the [
 Settings/Registration] in the [Home] screen or other screen, and then select [Management Settings] to install the system options. [Register/Update Software]
Administrator privileges are required. The machine must be restarted to apply the installed content.
Required Preparations
Prepare the "license access number" shown on the license access number certificate.
1
Log in to Remote UI as an administrator. Starting Remote UI
2
On the Portal page of Remote UI, click [Settings/Registration]. Remote UI Portal Page
3
Perform a communication test.
Check whether the machine can communicate with the distribution server.
1
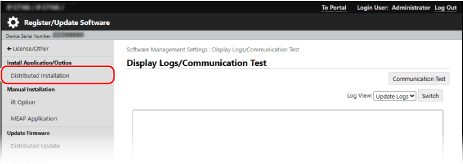
Click [License/Other]  [Register/Update Software]
  [Display Logs/Communication Test].
 [Register/Update Software]
  [Display Logs/Communication Test].
The [Display Logs/Communication Test] screen is displayed.
2
Click [Communication Test]  [Yes].
 [Yes].
The communication test result is displayed.
If an Error Message Appears
Take action following the instructions in the message.
* If the machine cannot connect to the network or cannot communicate with the distribution server for some reason, install the system options offline. Installing Offline
* If the machine cannot connect to the network or cannot communicate with the distribution server for some reason, install the system options offline. Installing Offline
3
Press [Back].
The [Display Logs/Communication Test] screen is displayed again.
4
Click [Distributed Installation].

The [Distributed Installation] screen is displayed.
5
For [License Access Number], enter the license access number.
6
Check the entered number, and click [Next].
7
Select the checkbox of the option you want to install.
8
Click [Start Installation].
When installation is complete, the installation result is displayed.
If the license agreement screen appears, check the content and then click [I Accept].
9
Click [Enabled after Restart] to restart the machine. Restarting the Machine
The machine restarts, and the installed content is applied.
Installing Offline
Obtain the "license key" on a computer connected to the network, and enter the license key on the control panel to install the system options.
Administrator privileges are required when you enter the license key and install the system options using the control panel. The machine must be restarted to apply the installed content.
Required Preparations
Prepare the "license access number" shown on the license access number certificate.
Prepare the serial number of the machine.
When you press [ ] on the [Home] screen or other screen of the control panel, the serial number is displayed at the bottom left of the screen.
 ] on the [Home] screen or other screen of the control panel, the serial number is displayed at the bottom left of the screen.
* You can also check the serial number on the Portal page of Remote UI. Remote UI Portal Page
1
Obtain a license key on a computer.
From a web browser on a computer, access the URL below, and enter the license access number and serial number following the instructions on the screen.
Have the obtained license key at hand.
2
Log in to the machine as an administrator. Logging In to the Machine
3
On the control panel, press [ Settings/Registration] in the [Home] screen or other screen. [Home] Screen
 Settings/Registration] in the [Home] screen or other screen. [Home] Screen
The [Settings/Registration] screen is displayed.
4
Press [Management Settings]  [License/Other]
  [Register License].
 [License/Other]
  [Register License].
The [Register License] screen is displayed.
5
Enter the obtained license key.
6
Press [Start]  [OK].
[OK].
 [OK].
[OK].7
Press [ Settings/Registration]
  [Yes].
 Settings/Registration]
  [Yes].
The machine restarts, and the installed content is applied.