Changing Settings for Fax Output Icons
You can change the settings for a fax output icon that you have added to the Output Bar in the Desktop Browser screen.
Editing the Settings
1.
Right-click  (fax output icon) whose settings you want to change, and select [Change].
Or, select the [Tools] menu > [Output Bar Settings] > [Settings] > (fax name) > [Change].
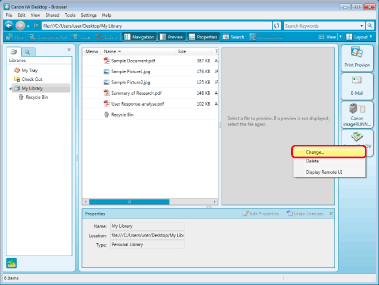
The [Fax Settings] dialog box is displayed.
2.
Change the fax settings.

The settings are as follows:
|
[Select Fax]
|
Select a fax machine to register in the Output Bar. You can only register fax machines that use the Canon fax driver in Desktop.
|
|
[Combine selected documents into one document with Document Binder to send fax]
|
Select this check box when you want to bind multiple selected documents into one in Document Binder and fax it. If this check box is deselected, the external application associated with the document starts after the sending execution operation to perform the fax sending.
|
|
[Check preview with Document Binder before sending fax]
|
When this is selected, Document Binder starts after the sending execution operation, and you can specify the pages to fax in Document Binder.
|
|
[Button Name]
|
Enter a name for the button to display in the Output Bar using up to 40 characters.
Select this option to use a specified image. Specify the path to the image using up to 259 characters.
|
|
[Button Image]
|
Select to specify the image to display in the button.
|
|
[Restore default]
|
Select to use the default image.
|
|
[Change image]
|
Select to specify an image to use. Click [Browse] and select the desired image in the displayed dialog box.
|
|
[Remote UI URL]
|
Enter the Remote UI URL of the fax machine.
|
3
Click [OK].
The fax sending operation and process will differ depending on the settings in the [Combine selected documents into one document with Document Binder to send fax] check box for the fax output icon settings.
If the check box is selected, specify the destination address in the fax sending settings dialog box in Desktop.
If the check box is not selected, the external application associated with the document starts, and the fax sending settings dialog box for the fax driver is displayed. In this case, the destination address is specified in the fax driver screen.
In addition, functions available during sending configuration will be different.
|
Operation
|
[Combine selected documents into one document with Document Binder to send fax]
|
|
|
When this is selected
|
When this is not selected
|
|
|
Use the fax sending settings dialog box in Desktop
|
Use the fax sending settings dialog box of the fax driver
|
|
|
Print multiple documents at once
|
Yes
|
No
|
|
Automatically acquire the destination address from the document
|
Yes
|
No
|
|
Enter the destination address
|
Yes
|
Yes
|
|
Enter the destination address from the address book of the fax driver
|
Yes
|
Yes
|
|
Enter the destination address from the address book of imageRUNNER ADVANCE
|
Yes
|
No
|
|
Preview, specify pages
|
Yes
|
No
|
|
Specify the external sending number when sending
|
Yes
|
Yes
|
|
Specify the time to send
|
No
|
Yes
|
|
Configure the cover sheet
|
Yes
|
Yes
|
|
Other functions specific to the fax driver
|
No
|
Yes
|
Configure the settings that fit your purpose by comparing the methods of specifying the destination address when performing the fax sending and other setting items.
For more details on the specific differences in each sending procedure, see the following.
|
Note
|
|
For details on how to fax a document from Desktop without using the Output Bar, see the following.
To enable previewing and page specifications, select the [Check preview with Document Binder before sending fax] check box when configuring the fax output icon settings.
|