Problems with Printing Results
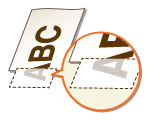
The printed image is displaced or skewed.
 Are the paper guides misaligned?
Match the paper guides with the paper loaded in the paper source.
White streaks appear/print density is uneven.

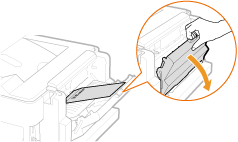
Have you cleaned the fixing unit?
Clean the fixing unit.
Is toner running low?
Check how much toner is left, and replace the toner cartridge as necessary.
Has the toner cartridge reached its life expectancy?
The inside of the toner cartridge may be degraded. Replace the toner cartridge.
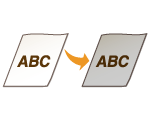
Images are not printed on the intended side of the paper.
Is the orientation of the loaded paper correct?
Check the orientation and side of the paper that is facing up. Load the paper again if it is incorrectly orientated.
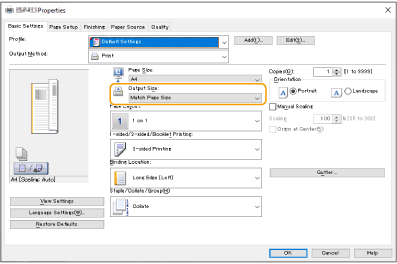
Images are not printed in the intended size.
Do the original size and size of the paper that is loaded match?
Replace the paper that is loaded with paper of the size you want to print on.
Match [Output Size] in the printer driver with the size of paper to print on.
The orientation does not match on both sides of the paper when using two-sided printing.
Are the settings for two-sided printing correct?
Follow the procedure below to check the print settings.
1 | Select the orientation of the original on the print settings screen of the application. |
2 | On the [Basic Settings] screen of the driver, set [Orientation] to the same orientation you set in step 1. 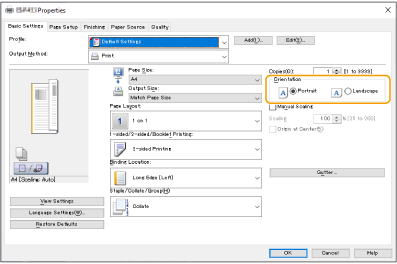 |
3 | While checking the print preview, set [Page Layout] 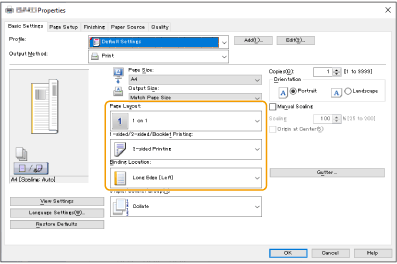 |
 |
[Page Order] is displayed when [Page Layout] is set to [2 on 1] or higher. |
Smudges appear on printouts.

Are you using appropriate paper?
Check usable paper, and replace with appropriate paper.
Change the <Streak Prevention> setting. <Mode 1> is the weakest, and <Mode 4> is the strongest. Try from <Mode 1>.
Setting in the Printer Driver
[Finishing] tab  [Advanced Settings] [Blurry Image Correction] Select the mode
Specifying Settings in the Settings Menu of the Control Panel

When the correction effect is strong, the print density will be lighter. Outlines may also become unclear and the roughness may stand out.
If the printer driver settings are changed, the correction effect will only apply when printing from that printer driver. If correction is required for all printing, change the settings on the control panel of the machine.
Changing the paper type and usage environment may improve this problem.
Toner smudges and splatters appear.

Are you using appropriate paper?
Check usable paper, and replace with appropriate paper.
Afterimages appear on the blank area.

Are you using appropriate paper?
Check usable paper, and replace with appropriate paper.
Has the toner cartridge reached its life expectancy?
The inside of the toner cartridge may be degraded. Replace the toner cartridge.
Printing is faint/streaked.
Is toner running low?
Check how much toner is left, and replace the toner cartridge as necessary.
Are you using appropriate paper?
Check usable paper, and replace with appropriate paper. Also set the correct paper size and type.
Some parts are left white.

Are you using paper that has absorbed moisture?
Replace with appropriate paper.
Are you using appropriate paper?
Check usable paper, and replace with appropriate paper.
Change the <Adjust Paper Separation> setting. Setting <Mode 1> or <Off> may improve this problem. Try from <Mode 1>.
Has the toner cartridge reached its life expectancy?
The inside of the toner cartridge may be degraded. Replace the toner cartridge.
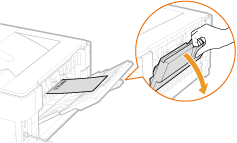
Black spots appear on printouts.

Have you cleaned the fixing unit?
Set <Reduce Toner Fixing Stain> to <On>.
If you select <On>, lines or edges may be smudged.
Clean the fixing unit.
Back of paper is smudged.

Is the loaded paper smaller than the size specified in the print data?
Check whether the size specified in the print data matches that of the loaded paper.
Have you cleaned the fixing unit?
Clean the fixing unit.
Toner of the printed images peels off.
Are you using appropriate paper?
Check usable paper, and replace with appropriate paper.
Paper creases.

Is paper loaded correctly?
Wrinkling may occur if the paper is not passing below the loading limit line or loading limit guide, or loaded at an angle.
Are you using paper that has absorbed moisture?
Replace with appropriate paper.
Are you using appropriate paper?
Check usable paper, and replace with appropriate paper.
Does wrinkling occur when printing on thin paper or plain paper in a high humidity environment?
Change the [Paper Wrinkle Correction] setting. Setting this item to [On] may improve this problem.
When set to [On], the print speed will be slower.
In some environments, wrinkling may occur when printing because the paper inside the paper drawer absorbs humidity. In this case, wrinkling may be reduced by decreasing the amount of paper when loading new paper.
Paper curls.

Are you using paper that has absorbed moisture?
Replace with appropriate paper.
If <Plain 2> was set as the paper type, change the setting to <Plain 1>.
Set <Curl Prevention Mode> to <On> in the paper source to use.
If you select <On>, the print speed will be slower. Toner may not be fixed sufficiently, resulting in faded printouts.
If you select <On>, do not use the sub-output tray.
Are you using appropriate paper?
Check usable paper, and replace with appropriate paper. Also set the correct paper size and type.
Load the paper again with the side to print on reversed.

This symptom may worsen in rare cases, depending on the paper you are using. In this case, return the paper to its original orientation.
Has paper been output to the output tray?
If printouts of envelopes curl, output them to the sub-output tray on the back side of the machine.
LBP458x | LBP456w | ||
 |  |
Paper is not fed/multiple sheets of paper are fed together.
Is paper loaded correctly?
Fan the paper stack thoroughly so that paper is not stuck together.
Check whether paper is loaded correctly.
Check whether the number of sheets of paper loaded is appropriate and whether the appropriate paper is used.
Check whether mixed sizes and types of paper are loaded together.
Does this occur when feeding from the multi-purpose tray?
Change the [Adjust Paper Conveyance in Multi-Purpose Tray] setting. Setting this item to [On] may improve this problem.
When set to [On], the print speed may be slower.
Paper jams occur with narrow width paper.
Are you printing on thin paper loaded in the multi-purpose tray?
If paper jams occur when printing on paper (with a width of 85.0 mm to 89.9 mm and weight of 90 g/m2 or lighter) loaded in the multi-purpose tray with <Free Size> set, change the paper source and paper size as follows.
Paper source:Change from the multi-purpose tray to a paper drawer.
Paper size:Change from <Free Size> to <Custom Size>.
Smudge marks appear on the bottom edge of printouts.
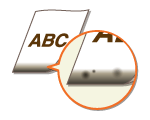
Are you printing data on the entire surface of the paper, without a margin?
This symptom may occur if a margin is set to none in the printer driver. A margin of 5 mm or narrower around the edge of paper or 10 mm or narrower around the edge of envelopes is not printable with the machine. Make sure to have margins around the document to print.
Setting in the Printer Driver
[Finishing] tab [Advanced Settings] [Expand Print Region and Print] [Off]
A portion of the page is not printed/print position is incorrect.
Are you printing data on the entire surface of the paper, without a margin?
This symptom may occur if a margin is set to none. A margin of 5 mm or narrower around the edge of paper or 10 mm or narrower around the edge of envelopes is not printable with the machine. Make sure to have margins around the document to print.
Setting in the Printer Driver
[Finishing] [Advanced Settings] [Expand Print Region and Print] [Off]
Is the correct print position specified?
Adjust the print position settings to have appropriate values.
Are you using custom size paper loaded in correct orientation?
Load the custom size paper in portrait orientation when you print without using the UFR II printer driver.
Load the custom size paper in landscape orientation if the following conditions are met when you are using the UFR II printer driver.
Paper size in paper source selection menu | <Free Size> |
Paper to load | Paper in which the long edge length is 215.9 mm or shorter |
Printouts are faded in stripes.

Are you using paper that has absorbed moisture?
Set <Transfer Adjustment Mode> to <On>.
Select <On> only for solving this problem. In general, if you select <On>, streaks may appear on printouts.
Replace with appropriate paper.
Are you using appropriate paper?
Check usable paper, and replace with appropriate paper.
Has the toner cartridge reached its life expectancy?
The inside of the toner cartridge may be degraded. Replace the toner cartridge.
Printouts are grayish.
Is the installation site of the machine exposed to direct sunlight?
Move the machine to a location sheltered from direct sunlight.
Are you using heavy paper?
Set <Correct Background Density> to any of <Mode 1> to <Mode 4> according to the paper type.
If printouts of plain paper are grayish, set to <Mode 4>.
If this mode is selected, lines may be thinner.
Printouts are faded as a whole.
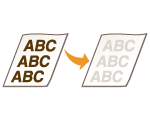
Has the toner cartridge reached its life expectancy?
Set <High Density Mode> to <On>.
If you select <On>, blank areas may be grayish.
If the problem persists, the inside of the toner cartridge may be degraded. Replace the toner cartridge.
After setting a new toner cartridge, set <High Density Mode> back to <Off>. If <On> remains selected, printouts may be grayish.
Printed barcode cannot be read.
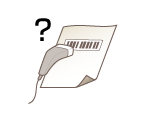
Are you using a small barcode or a barcode consisting of thick lines?
For paper sizes available in both portrait and landscape orientations, changing the orientation may solve the problem.
If the orientation cannot be changed, change the mode by using [Barcode Adjustment Mode].
Setting in the Printer Driver
[Finishing] tab [Advanced Settings] [Barcode Adjustment Mode] Select the mode
Specifying the setting for [Barcode Adjustment Mode] may cause lines to be thinner.
If you select [Mode 3], the print speed will be slower.