Creating Master Images
This section describes the procedure for creating an inspection job and creating master images.
1.
Open the main screen
Refer to the following for details on how to display the main screen.
2.
Start creating the inspection job by using any of the following methods
Click [New] from [File] in the menu bar.
Click [New] in the toolbar.
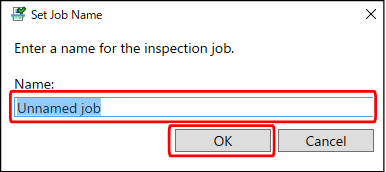
3.
Enter the name of the inspection job on the [Set Job Name] screen and click [OK]
NOTE |
The following characters cannot be used in file names. \ / : * ? " < > | |
The [Job Settings (Register Master Image)] screen is displayed.
4.
Set each of the fields on the [Job Settings (Register Master Image)] screen
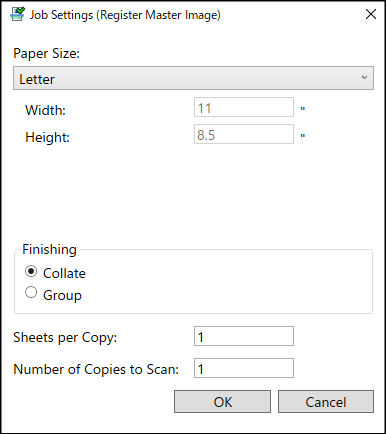
[Paper Size] | Set the paper size of the printed matter to be inspected. The size specified on the [Preferences] screen is displayed as the default value. |
[Finishing] | Select the output method of the printed matter to be inspected. [Collate]: Outputs the printed matter collated one copy at a time. [Group]: Outputs the printed matter grouped into sets of the same page number. |
[Sheets per Copy] | Set the number of sheets of paper per copy. This is not the number of pages. |
[Number of Copies to Scan]*1 | Set the number of copies to be scanned when creating a master image. |
*1 | As the number of scanned copies increases, the inspection accuracy increases. Initially, set to a small number of copies, then check the scanned images and increase the number of copies as needed. The recommended number of copies is as follows. |
Image type | Recommended number of copies |
Photographs containing halftone (if you want high inspection accuracy) | 5 copies |
Photographs containing halftone | 3 copies |
Monochrome text | 1 copy |
IMPORTANT |
If you are scanning two or more copies, configure the print job so that the same page on the second and subsequent copies have the same image. If the print job contains numbers, text, and variable data that differ between the copies, the master images will not be created correctly. |
Example of setting the number of sheets
In the Inspection Tool, set the size and number of sheets of paper that will be actually output. The correlation between the print job settings on the controller side and the settings on the Inspection Tool side is as follows. Take care configuring the settings when inspecting 2-sided printing and booklet printing.
Controller | Inspection Tool | |||
Paper Size | Number of pages per copy | Output method | Paper Size | Number of sheets per copy |
LTR | 10 | 1-sided | LTR | 10 |
11" x 17" | 52 | 2-sided | 11" x 17" | 26 |
11" x 17" | 120 | Booklet* | 11" x 17" | 30 |
* 120 pages of page size LTR data are printed onto 11" x 17" paper as a booklet.
5.
Click [OK]
The [Create Master Image] screen is displayed.
6.
Click [Start Scanning]
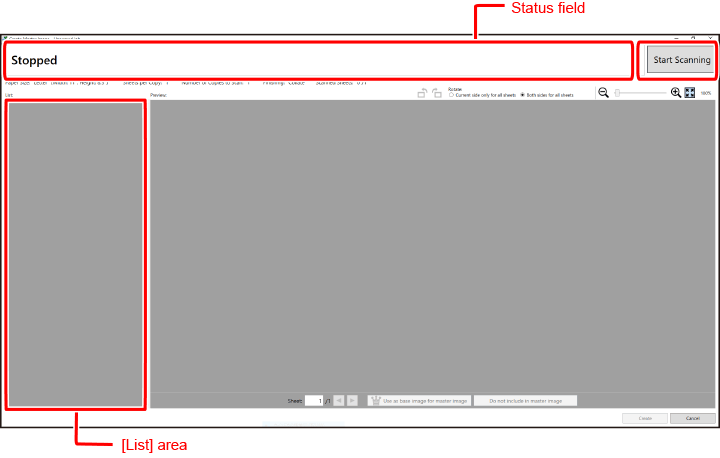
The status field changes to [Waiting to scan].
NOTE |
Scanning cannot be started while printing is underway. |
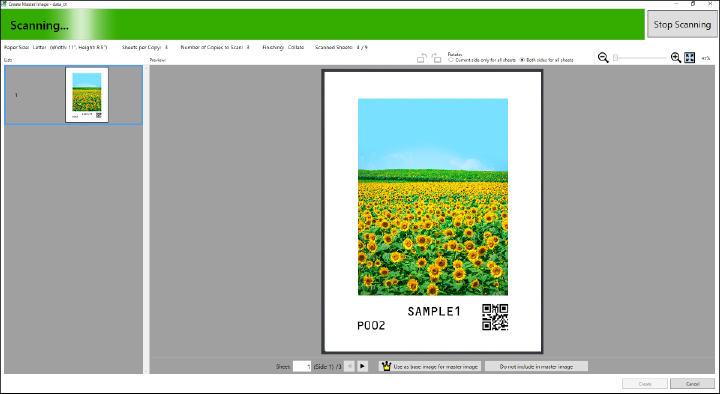
7.
After the status field changes to [Waiting to scan], execute the print job for the master images from the controller
When scanning begins, the status field changes to [Scanning].
The scanned images are displayed in the [List] area on the left side of the screen.
NOTE |
The Inspection Unit scans both sides of the output paper at the same time. |
8.
Check the status field display and proceed depending on each of the statuses and messages
If the status field changes to [Stopped]:
Scanning has been completed. Proceed to Step 9.
If the status field changes to [Waiting to scan]:
Printing stopped before scanning the number of copies of images as specified on the [Job Settings (Register Master Image)] screen for the master images has finished. (This state occurs if the number of printed copies is smaller.)
If there are no problems in the number of copies, click [Stop Scanning]. Proceed to Step 9. If the number of copies specified on the controller side is not reached, there may be a problem such as a paper jam. Check the display on the printer and controller.
If the status field changes to [Error] and a message is displayed:
Solve the problem by referring to the following.
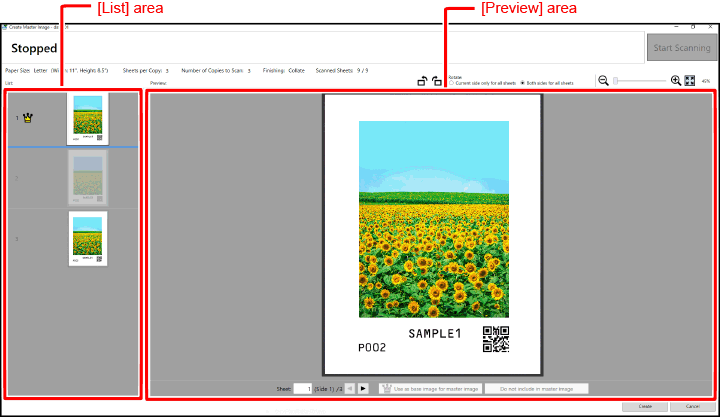
9.
Create master images
If only a single copy was scanned, proceed to Step 11.
The master images will be created by combining images from multiple copies.
NOTE |
You can change the rotation and display magnification of the pages displayed on the screen. Refer to the following for details. |
Select a single image you want to use as the base image from [List] area.
NOTE |
Immediately after the images are scanned, the first image is set as the base image for the master image. |
Click [Use as base image for master image] in the [Preview] area.
Images that are compared to the base image and judged as not suitable for the master image are automatically excluded from the master images. Images excluded from the master images are displayed grayed out.
If you want to exclude images which are not grayed out from being combined to a master image, select those images from [List] area and click [Do not include in master image].
NOTE |
All of the images which are not grayed out will be combined. |
If you want to include images which are grayed out, in being combined to a master image, select those images from [List] area and click [Include in master image].
10.
Set the master images for all of the other pages
Use  and
and  to display the images of the other pages and perform Step 9.
11.
Click [Create]
The process of combining the images of each page is executed. After the process is completed, the [Confirm Master Image] screen will be displayed.
NOTE |
The number of pages displayed on the screen at the same time can be changed. Refer to the following for details. |
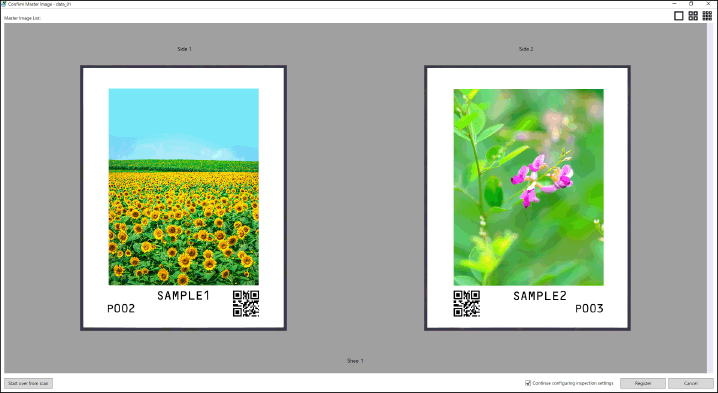
12.
Check the master images of all of the pages
To start scanning the master images from the beginning again, click [Start over from scan].
The [Create Master Image] screen is displayed again.
If there are no problems, click [Register].
This completes creating the master images.
If the [Continue configuring inspection settings] check box is selected, the [Inspection Settings] screen will be displayed. If the check box is not selected, the main screen is displayed again.
Next, configure the inspection settings.
IMPORTANT |
Click [Cancel] to discard the combined image data and return to the main screen. |