Registering Groups to the Address Book (Remote UI)
You can use Remote UI from a computer to group multiple destinations in the same address list and register them in the Address Book or one-touch buttons.
You can register up to 256 destinations per group.
You can register different types of destinations in the same group. In addition to registering destinations such as e-mail addresses, you can also register a Mail Box of the machine to the group.
For example, if you register an e-mail address destination and a Mail Box together in a group, you can specify that group as a destination for sending scanned data, so that the data sent by e-mail is automatically stored in the Mail Box for backup.
Registering Groups to the Address Book
Required Preparations
Before you register destinations to a group, all of the destinations need to be registered to the Address Book of the machine. Registering Destinations to the Address Book
When you register file store locations (shared folder, file server, or Advanced Space) to a group, disable the setting for displaying the confirmation screen. Shared Folder, File Server, and Advanced Space Destination Settings
* If you register a destination that is configured to display the confirmation screen to the group, you will not be able to specify the group as a destination and send data to it.
1
Log in to Remote UI. Starting Remote UI
The address lists to which groups can be registered vary depending on the logged in user. Address List Types
2
On the Portal page of Remote UI, click [Address Book]. Remote UI Portal Page
The [Address Lists] screen appears.
3
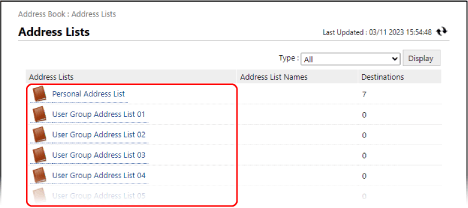
Click the address list in which the destinations to be grouped are registered.

The address list screen appears.
You can only group destinations that are registered in the clicked address list.
The created group will be registered in the address list clicked here.
If the PIN input screen appears, enter the PIN set for the Address Book, and press [OK].
4
Click [Register New Group].
The [Register New Destination: Group] screen appears.
5
In [Group Name], enter the name of the group.
You can register a group without entering a name. However, if you enter a name, you can search for the group by its initial or name when you specify destinations.
When Managing Destinations with Access Numbers
In [Access Number], enter the access number to display the group to be registered.
* If no access number is set for the group to be registered, leave [Access Number] blank.
6
Specify the destinations to be registered to the group.
1
In [Member List] under [Member Settings], click [Select Destination].
2
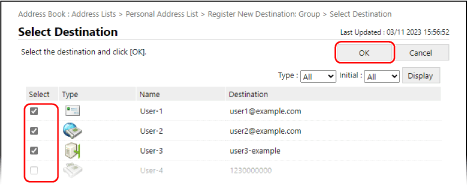
Select the checkboxes of the destinations to be registered to the group, and click [OK].

The destinations are added to [Member List] on the [Register New Destination: Group] screen.
You can filter the destinations displayed in the list by selecting the destination type in [Type] or the initial of the name in [Initial] at the top right of the screen, and then clicking [Display].
To display destinations that are configured with an access number, enter the number in [Access Number] at the top right of the screen, and then click [Display].
You can select checkboxes of multiple destinations at the same time.
When Registering a Mail Box to a Group
Under [Member Settings], select the [Store in Mail Box] checkbox and select the number of the Mail Box to be registered to the group.
You can register only one Mail Box per group.
You can register only one Mail Box per group.
* You cannot register a Mail Box to a group in a personal address list or user group address list.
7
Click [OK].
The group is registered to the Address Book.
8
Log out from Remote UI.
Registering Groups to One-Touch Buttons
Required Preparations
Before you register destinations to a group, all of the destinations need to be registered to the one-touch buttons of the machine. Registering Destinations to One-Touch Buttons
When you register file store locations (shared folder, file server, or Advanced Space) to a group, disable the setting for displaying the confirmation screen. Shared Folder, File Server, and Advanced Space Destination Settings
* If you register a destination that is configured to display the confirmation screen to the group, you will not be able to specify the group as a destination and send data to it.
1
Log in to Remote UI. Starting Remote UI
2
On the Portal page of Remote UI, click [Address Book]. Remote UI Portal Page
The [Address Lists] screen appears.
3
Click [Address List One-Touch].
The address list screen appears.
If the PIN input screen appears, enter the PIN set for the Address Book, and press [OK].
4
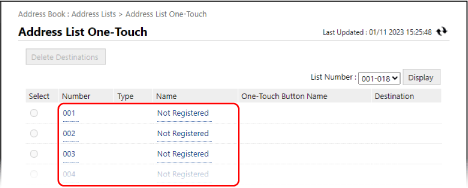
Click a name (or number) displayed as [Not Registered].

The [Register New Destination: E-Mail] screen appears.
Three-digit numbers (001 to 200) are assigned to one-touch buttons. At the top right of the screen, select the range of numbers in [List Number], and click [Display] to change the numbers displayed in the list.
5
In [Type], select [Group], and click [Set].
The [Register New Destination: Group] screen appears.
6
In [Group Name], enter the name of the group.
You can register a group without entering a name. However, if you enter a name, you can search for the group by its initial or name when you specify destinations from the Address Book.
* Groups registered to one-touch buttons are also registered and displayed in the Address Book (One-Touch Address List), and you can select them when you specify destinations from the Address Book.
7
In [One-Touch Button Name], enter the name of the button.
You can register a button without entering a name. However, if you enter a name, it is displayed on the one-touch button.
8
Specify the destinations to be registered to the group.
1
In [Member List] under [Member Settings], click [Select Destination].
2
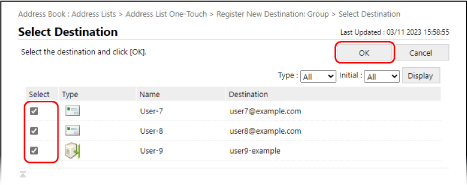
Select the checkboxes of the destinations to be registered to the group, and click [OK].

The destinations are added to [Member List] on the [Register New Destination: Group] screen.
You can filter the destinations displayed in the list by selecting the destination type in [Type] or the initial of the name in [Initial] at the top right of the screen, and then clicking [Display].
You can select checkboxes of multiple destinations at the same time.
When Registering a Mail Box to a Group
Under [Member Settings], select the [Store in Mail Box] checkbox and select the number of the Mail Box to be registered to the group.
You can register only one Mail Box per group.
You can register only one Mail Box per group.
9
Click [OK].
The group is registered to the one-touch button.
10
Log out from Remote UI.