Sending Faxes
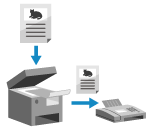
You can scan a document, photo, or other printed material (original) with the machine, convert it to a black and white image, and send it.
* You can also send a fax after checking the connection to the recipient, or you can send it manually.
1
Place the original. Placing Originals
If the screen for selecting the thickness of the original appears, select the thickness of the placed original.
2
On the control panel, press [Fax] in the [Home] screen. [Home] Screen
The fax screen is displayed.
3
Press [ Reset].
Reset].The fax may be sent to an incorrect destination if the destination setting for the previously sent fax remains. Reset the setting before performing the operation.
4
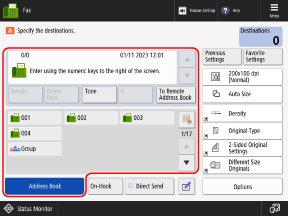
Specify the destination. Specifying Destinations
5
Configure the fax TX settings. Fax TX Settings
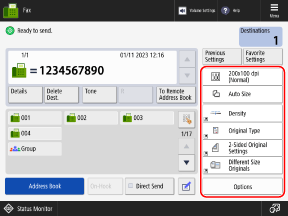
When "Favorite Settings" are registered, you can call them up by pressing [Favorite Settings]. Registering and Recalling Favorite Settings
When Recalling Previous Settings (Setting History)
You can press [Previous Settings] to call up the settings used to send faxes in the past. The sending destination is also applied together with the settings that are called up.
When you call up the setting history, the specified destination and TX settings are overwritten.
When you call up the setting history, the specified destination and TX settings are overwritten.
* You cannot use the setting history in the following cases:
When destinations are managed with access numbers Hiding Destinations (Access Number Management)
When using a push-button telephone service
On the [Previous Settings] screen, select the history you want to recall, and press [OK].
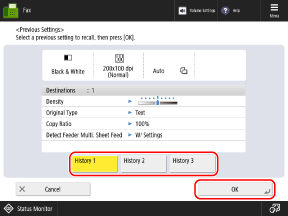
You can change the called up destination and TX settings, and send the fax.
Each login user can select from their own setting history.
Guest users or users who are not logged in can select from the setting history common to unauthorized users.
Guest users or users who are not logged in can select from the setting history common to unauthorized users.
When entry of new destinations is restricted, the setting history is cleared regardless of the type of restricted destination. Sending Only to Registered Destinations
6
Press [ Start].
Start].The machine starts scanning the original.
To cancel sending the fax, press [Cancel]  [Yes]. Canceling Fax Sending
When scanning is completed, the fax is sent. You can use [ Status Monitor] to check the sending status and log. Checking the Status and Log for Sent and Received Faxes
Status Monitor] to check the sending status and log. Checking the Status and Log for Sent and Received FaxesIf the [Confirm Destinations] Screen Appears
Check that the destination is correct, and then press [Yes].
When [Press the [Start] key to scan the next original.] Is Displayed
When an original is placed on the platen glass and scanned, or when scanning is performed using Job Build, the screen for scanning additional originals is displayed.
1
To continue scanning originals, place the next original, and press [ Start].
Start].The next original is scanned, and the same screen is displayed.
Repeat this process until scanning of all originals is completed.
Repeat this process until scanning of all originals is completed.
When you place originals in the feeder to scan, remove the scanned original (original ejected to the original output tray) before placing the next original.
When Changing the Scan Settings for Each Original
On the screen with the displayed message, press [Change Settings]. You can change the following settings:
[Scan Size]
[2-Sided Original]
[Density]
[Original Type]
For example, when scanning a 2-sided original after scanning a 1-sided original, press [Change Settings], and set [2-Sided Original].
2
Press [Start Sending].
The fax is sent.
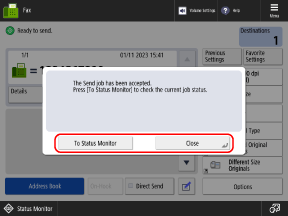
When [To Status Monitor] Is Displayed
To check the sending status and log, press [To Status Monitor]. Checking the Status and Log for Sent and Received Faxes
Press [Close] to return to the fax screen.
Press [Close] to return to the fax screen.
NOTE
When Multiple Originals Are Fed during Scanning and Operations Are Canceled (Detect Multiple Sheet Feed)
A message appears on the screen. Remove the jammed original while following the instructions in the message. Paper and Staple Jams
When the jammed original is removed, the screen for resuming operations is displayed.
If multi sheet feeding was detected incorrectly, press [Do Not Detect Multi. Sheet Feed] to resume scanning.
When the jammed original is removed, the screen for resuming operations is displayed.
If multi sheet feeding was detected incorrectly, press [Do Not Detect Multi. Sheet Feed] to resume scanning.
To prevent detection of multi sheet feeding, configure either of the following settings:
On the fax screen, press [Options] [Detect Feeder Multi Sheet Fd.] each time you scan, to cancel detection of multi sheet feeding.
Change the default settings to prevent detection of multi sheet feeding. [Set Detection of Feeder Multi. Sheet Feed as Default]
* Depending on the model, the optional document feeder double feeding detection kit may be required in order to use the multiple sheet feed detection function. 

Previewing Content Before Sending
You can display a preview screen to check the content before sending a fax. You can also change the page order and delete pages on the preview screen. Checking the Content of Scanned Originals and Organizing Pages (Preview)
Improving the Quality of the Sent Image
If the sent images are too dark or the light colors in the background of the originals cannot be removed, you may be able to improve the quality by configuring the following settings before sending:
Set the resolution to [200x400 dpi] or [400x400 dpi]. Setting the Resolution
Set the original type to [Text]. Selecting the Original Type
Set the background density to [Auto]. Adjusting the Density
* In the [Settings/Registration] menu, if [Fax/I-Fax Send Jobs] in [Speed/Image Quality Priority for B&W Scan] is set to [Speed Priority], change the setting to [Quality Priority]. [Speed/Image Quality Priority for B&W Scan]
([Quality Priority] is set by default.)
([Quality Priority] is set by default.)
If Fax Cannot Be Sent Because Recipient's Line Is Busy or Other Reason
The number is redialed automatically after a certain period of time.
* If necessary, you can change the number of redials, the interval between redials, and the page to be sent when redialing is performed due to a sending error. You can also disable automatic redialing. [Auto Redial]