Restricting Destinations That Can Be Specified
By restricting the destinations to which you can send scanned data and faxes, you can prevent sending data by mistake and data leaks.
IMPORTANT
You cannot restrict destinations for faxes sent by computer.
Even when the use of new destinations or destinations from the send function log is prohibited, users can send faxes from a computer (PC faxing) to a destination of their choice. To more strictly limit the available destinations, you must also prohibit the sending of faxes from a computer. Prohibiting Fax Sending from a Computer
When you use ACCESS MANAGEMENT SYSTEM, you cannot configure some functions to restrict send destinations.
For details, see the manual of ACCESS MANAGEMENT SYSTEM at the online manual site.
Prohibiting the Use of Destinations in the TX Log
You can prevent users from specifying destinations in the TX log for scanning and faxing.
This section describes how to configure the settings using Remote UI from a computer.
On the control panel, select [ Settings/Registration] in the [Home] screen or other screen, and then select [Function Settings] to configure the settings. [Restrict Resending from Log]
Administrator privileges are required.
On the control panel, select [
Settings/Registration] in the [Home] screen or other screen, and then select [Function Settings] to configure the settings. [Restrict Resending from Log]Administrator privileges are required.
1
Log in to Remote UI as an administrator. Starting Remote UI
2
On the Portal page of Remote UI, click [Settings/Registration]. Remote UI Portal Page
3
Click [Send]  [Common Settings].
The [Common Settings] screen is displayed.
4
Select the [Restrict Resending from Log] checkbox.
5
Click [OK].
The settings are applied.
6
Log out from Remote UI.
Sending Only to Registered Destinations
You can configure the settings so that the destinations that can be specified as sending destinations are limited to the following:
Destinations registered in the Address Book or one-touch buttons Registering Destinations (Address Book)
Destinations registered to [Favorite Settings] Registering Favorite Settings
E-mail addresses of login users registered in the user information Registering User Information
Destinations that can be searched on an LDAP server Registering LDAP Servers
When this function is enabled, users cannot enter a destination using the numeric keys. In addition, the TX log recorded before enabling this function is deleted, leaving only the aforementioned available destinations in the TX log.
This section describes how to configure the settings using Remote UI from a computer.
On the control panel, select [ Settings/Registration] in the [Home] screen or other screen, and then select [Function Settings] to configure the settings. [Limit New Destination]
Administrator or DeviceAdmin privileges are required.
On the control panel, select [
Settings/Registration] in the [Home] screen or other screen, and then select [Function Settings] to configure the settings. [Limit New Destination]Administrator or DeviceAdmin privileges are required.
1
Log in to Remote UI as an administrator. Starting Remote UI
2
On the Portal page of Remote UI, click [Settings/Registration]. Remote UI Portal Page
3
Click [Send] [Limit New Destination].
The [Limit New Destination] screen is displayed.
4
In [Limit New Destination], select the checkboxes of the functions for which to limit the destinations.
5
Click [OK].
The settings are applied.
6
Log out from Remote UI.
Restricting Sending Destinations to a Specific Domain
You can restrict e-mail and I-Fax destinations to addresses in a specific domain. In addition, you can allow sending to a specific domain while restricting sending to subdomains.
This section describes how to configure the settings using Remote UI from a computer.
On the control panel, select [ Settings/Registration] in the [Home] screen or other screen, and then select [Function Settings] to configure the settings. [Restrict TX Destination Domain]
Administrator or DeviceAdmin privileges are required.
On the control panel, select [
Settings/Registration] in the [Home] screen or other screen, and then select [Function Settings] to configure the settings. [Restrict TX Destination Domain]Administrator or DeviceAdmin privileges are required.
1
Log in to Remote UI as an administrator. Starting Remote UI
2
On the Portal page of Remote UI, click [Settings/Registration]. Remote UI Portal Page
3
Click [Send] [Limit New Destination].
The [Limit New Destination] screen is displayed.
4
Select the [Restrict Sending to Domains] checkbox.
5
In the [Permitted Domains] list, add the domains to be permitted as sending destinations.
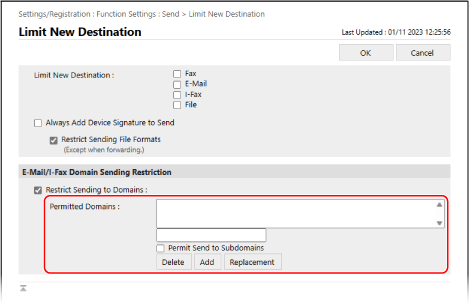
To add a domain to the list, enter the domain in the input field above [Add], and then click [Add].
To allow sending to a subdomain of the domain that you entered, select the [Permit Send to Subdomains] checkbox, and then click [Add].
You can add up to three domains.
6
Click [OK].
The settings are applied.
7
Log out from Remote UI.
NOTE
Editing an Added Domain
Select the domain you want to edit in the [Permitted Domains] list, edit the domain displayed in the input field above [Replacement], and then click [Replacement].
Restricting the Sending Destination to the E-mail Address or Personal Folder of the Login User
You can restrict the destination when sending e-mail and the store location when sending files, to the following destinations and storage locations:
The login user's e-mail address registered in the user information Registering User Information
The login user's own dedicated folder (Personal Folder) Configuring a Personal Folder
This section describes how to configure the settings using Remote UI from a computer.
On the control panel, select [ Settings/Registration] in the [Home] screen or other screen, and then select [Function Settings] to configure the settings. [Common Settings]
Administrator or DeviceAdmin privileges are required.
On the control panel, select [
Settings/Registration] in the [Home] screen or other screen, and then select [Function Settings] to configure the settings. [Common Settings]Administrator or DeviceAdmin privileges are required.
1
Log in to Remote UI as an administrator. Starting Remote UI
2
On the Portal page of Remote UI, click [Settings/Registration]. Remote UI Portal Page
3
Click [Send] [Limit Send Destination].
The [Limit Send Destination] screen is displayed.
4
In [TX Destination], select the checkboxes of the items for which to limit the sending destination.
To restrict the e-mail sending destination so that login users can only send to their own e-mail address, select the [Only Send E-Mail to Myself] checkbox.
To restrict the store location when sending files, so that login users can only send to their Personal Folder, select the [Only Send File to Personal Folder] checkbox.
5
Click [OK].
The settings are applied.
6
Log out from Remote UI.