Backing Up and Restoring Data
You can back up the data saved in the storage space, such as the Mail Box and the Memory RX Inbox, to an external storage or an SMB server (a shared folder). If by any chance the data on the machine is corrupted, you can restore the data using the backup data.
There are two ways to back up the data. You can back up the data manually, or you can back it up automatically at a specified time.
There are two ways to back up the data. You can back up the data manually, or you can back it up automatically at a specified time.
Connecting an External Storage
Connect only one external storage device. If multiple external storages are connected to the machine, the data cannot be backed up or restored.
It is recommended to connect the external storage to the USB port on the right side, in the back of the machine. Rear Side
For the details about the external storage that can be used, see the specifications of the management functions. External Storage for Backup and Recovery
IMPORTANT
Do not turn OFF the machine until the data backup or restoration is complete. Otherwise, the machine may fail.
* It may take some time until the process is completed.
Back up important data regularly. If any problem occurs to the storage, the data may be lost. We will not be liable for any damage resulting from loss of your data.
* You can also export the Address Book and settings to back them up. Importing and Exporting the Address Book and Settings
After the display language setting is switched, restart the machine, and then perform the data backup or restoration. If you perform the data backup or restoration without restarting the machine, it may not be processed properly.
NOTE
You can also restore the backed up data after the firmware version is upgraded.
Configuring the Backup Data Store Location
Configure the settings for the external storage or the SMB server (such as the shared folder) to be used as the backup data store location in advance.
Configure the backup data store location using Remote UI from a computer. You cannot use the control panel to configure the settings.
Administrator privileges are required.
Administrator privileges are required.
Required Preparations
To save the data in an external storage, connect the external storage to the machine.
To save the data in a shared folder, create a shared folder, as needed. Creating a Shared Folder
1
Log in to Remote UI as an administrator. Starting Remote UI
2
On the Portal page of Remote UI, click [Settings/Registration]. Remote UI Portal Page
3
Click [Data Management]  [Backup Location Settings].
The [Backup Location Settings] screen is displayed.
4
Set the backup data store location.
When Storing the Data in an External Storage
1
Select [USB Storage Device] in [Backup Location].
2
In [USB Storage Device Settings], enter the path to the folder in which to store the backup data.
When Storing the Data on an SMB Server
1
Select [SMB Server] in [Backup Location].
2
In [SMB Server Settings], configure the settings of the SMB server on which to store the backup data.
[Host IP Address]
Enter the host name or IP address of the SMB server on which to store the backup data. You can also specify the path to a folder.
Input example:
\\smb-server\share
\\smb-server\share
[User Name]
Enter the user name for logging in to the SMB server.
[Password] and [Confirm]
In both [Password] and [Confirm], enter the password for logging in to the SMB server.
[Folder Path]
When the backup data is to be stored in a subfolder in the path specified in [Host IP Address], enter the remaining portion of the path.
* For the folder in which to store the backup data, the user limit needs to be set to "2" or more, or to "unlimited." You will not be able to restore the backup data correctly if it is stored in a folder with the user limit set to "1."
5
Configure the encryption settings, as needed.
To encrypt the backup data, select the [Encrypt Backup Data] checkbox, and enter the same password in both [Password] and [Confirm].
* The password is required to restore the backup data.
6
Click [OK].
The settings are applied.
7
Log out from Remote UI.
To continue to perform backup or configure the settings back up automatically, continue to operate without logging out.
Backing Up the Data Manually
Perform manual backup using Remote UI from a computer. You cannot use the control panel to perform manual backup.
Administrator privileges are required.
Administrator privileges are required.
Required Preparations
Set the backup data store location. Configuring the Backup Data Store Location
IMPORTANT
Do not perform backup while operating the machine.
1
Log in to Remote UI as an administrator. Starting Remote UI
2
On the Portal page of Remote UI, click [Settings/Registration]. Remote UI Portal Page
3
Click [Data Management] [Back Up].
The [Back Up] screen is displayed.
4
Check the free space in the store location.
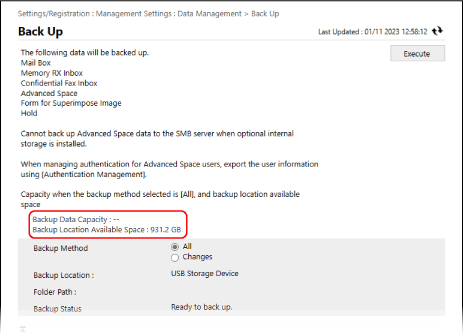
If the amount of [Backup Location Available Space] is not enough for the requirement of [Backup Data Capacity], reconfigure the store location of the baclup data. Configuring the Backup Data Store Location
5
Select the backup method.
To back up all data, select [All].
To back up only the updated data after the last backup, select [Changes].
* For the Advanced Space data, the updated data after the whole backup will be backed up. If you perform differential backup several times in a row, the difference from the whole backup, instead of the last differential backup, will be backed up.
6
Click [Start] [OK].
The data backup starts.
If [A server error has occurred.] Appears
Check that the store location of the backup data is configured correctly. Configuring the Backup Data Store Location
Check that the SMB server is operating properly.
7
Log out from Remote UI.
IMPORTANT
Do not modify or delete the backed up data. If modified or deleted, the data may not be restored properly.
NOTE
You Can Back up the Data to the Same Folder Only up to a Certain Number of Times.
When you can no longer back up the data, change the folder in which to save the data. Configuring the Backup Data Store Location
Checking the Backup Results
You can check the backup results using the following procedure.
Administrator privileges are required.
Administrator privileges are required.
Log in to Remote UI as an administrator click [Settings/Registration] [Data Management] [Back Up/Restore Log]
Backing Up the Data Automatically at a Specified Time
Specify the day of the week and the time to execute the backup process, and configure the settings to back up the data regularly.
Configure automatic backup using Remote UI from a computer. You cannot use the control panel to configure the setting.
Administrator privileges are required.
Administrator privileges are required.
Required Preparations
Configure the backup data store location. Configuring the Backup Data Store Location
1
Log in to Remote UI as an administrator. Starting Remote UI
2
On the Portal page of Remote UI, click [Settings/Registration]. Remote UI Portal Page
3
Click [Data Management] [Auto Backup Settings].
The [Auto Backup Settings] screen is displayed.
4
Select the backup method.
To back up all data, select the [Back Up All] checkbox.
To back up only the updated data after the last backup, select the [Back Up Changes] checkbox.
* For the Advanced Space data, the updated data after the whole backup will be backed up. If you perform differential backup several times in a row, the difference from the whole backup, instead of the last differential backup, will be backed up.
5
Set the frequency and time to execute the backup process.
To back up the data every day, select [Everyday] and enter the time to execute the backup process.
To back up the data on the specified day(s) of the week, select [Specify Days] and enter the time on the day(s) of the week to execute the backup process.
* Leave the days on which backup is not executed blank.
6
Click [OK].
The settings for backing up the data automatically is applied. The backup process will be executed at the specified time.
7
Log out from Remote UI.
IMPORTANT
Backup may not be executed while the machine is being operated.
Do not modify or delete the backed up data. If modified or deleted, the data may not be restored properly.
NOTE
Checking the Backup Results
You can check the backup results using the following procedure.
Administrator privileges are required.
Administrator privileges are required.
Log in to Remote UI as an administrator click [Settings/Registration] [Data Management] [Back Up/Restore Log]
Restoring Data
You can restore the backup data to the machine.
Restore the data using Remote UI from a computer. You cannot use the control panel to restore the data.
Administrator privileges are required. The machine must be restarted to apply the restoration.
Administrator privileges are required. The machine must be restarted to apply the restoration.
IMPORTANT
Checking the Available Memory of the Storage Area
To restore the backup data, the storage on the machine must have free space equal to or larger than the size of the backup data.
Restoring the Backup Data of Another Machine
If data from the Personal Space in the Advanced Space is included, the Personal Space data will not be restored unless the same user information as the backup source is registered. In this case, export the user information from the backup source, import it to the machine, and then perform restoration. Importing User Information Manually
1
Log in to Remote UI as an administrator. Starting Remote UI
2
On the Portal page of Remote UI, click [Settings/Registration]. Remote UI Portal Page
3
Click [Data Management] [Restore].
The [Restore] screen is displayed.
4
Click [Display Backup Data].
5
Select the backup data to be restored.
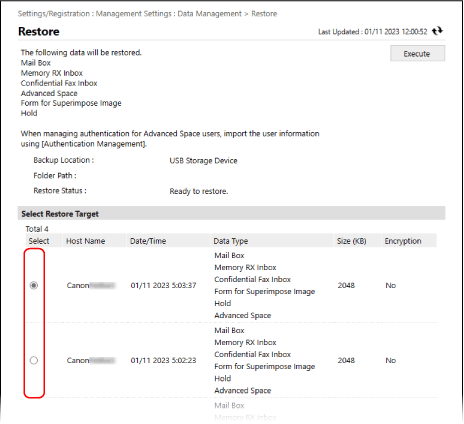
6
Click [Start] [OK].
To restore the encrypted backup data, enter the password that was set.
7
Click [Restart Main Unit].
The machine restarts, and restoration is performed after all the data stored on the machine has been deleted.
* After the data is restored, the documents may be printed automatically.
* After the data is restored, the documents may be printed automatically.
IMPORTANT
Depending on the machine settings, the backup data may not be restored completely.
If you back up the data saved on an optional storage and restore the data to the standard storage, part of the data may not be restored.
NOTE
Checking the Restoration Results
You can check the restoration results using the following procedure.
Administrator privileges are required.
Administrator privileges are required.
Log in to Remote UI as an administrator click [Settings/Registration] [Data Management] [Back Up/Restore Log]