Using IPSec
Use IP Security Protocol (IPSec) to prevent eavesdropping and tampering of IP packets sent and received over an IP network. This performs encryption at the IP protocol level to ensure security without relying on an application or network configuration.
IPSec Applicable Conditions and Supported Modes
Packets to Which IPSec Is Not Applied
Packets specifying a loopback, multicast, or broadcast address
IKE packets sent from UDP port 500
ICMPv6 Neighbor Solicitation and Neighbor Advertisement packets
Operation Mode of Key Exchange Protocol (IKE Modes)
The IKE modes supported by the machine are the main mode that is used to encrypt packets and aggressive mode without encryption.
IPSec Communication Mode
The communication mode supported by the machine is only the transport mode, which encrypts only the part excluding the IP header. Tunnel mode, which encrypts the entire IP packet, is not supported.
Conforming to FIPS 140
During IPSec communication, regardless of the [Format Encryption Method to FIPS 140] setting, an encryption module that has obtained FIPS 140 authentication is always used. [Format Encryption Method to FIPS 140]
To ensure that IPSec communication conforms to FIPS 140, you need to set the key length of both the DH and RSA keys for IPSec communication to 2048 bits or longer in the network environment to which the machine belongs.
* You can specify the key length only for the DH key on the machine. There is no setting for the RSA key on the machine, so take this into consideration when building the environment.
Using IPSec Together with IP Address Filtering
When packets are sent, the IP address filter settings are applied first. Setting Up a Firewall
When packets are received, the IPSec settings are applied first.
IPSec Policy Configuration
To perform IPSec communication on the machine, you must create an IPSec policy that includes the applicable range and algorithms for authentication and encryption. The policy is mainly made up of the following items:
Selector
Specify to which IP packets to apply IPSec communication. In addition to specifying the IP address of the machine and communicating devices, you can also specify their port numbers.
Operation Mode of Key Exchange Protocol (IKE Mode)
The key exchange protocol supports Internet Key Exchange version 1 (IKEv1). For the authentication method, select the Pre-Shared Key Method or Digital Signature Method.
Pre-Shared Key Method
This authentication method uses a common keyword called a shared key for communication between the machine and other devices.
This authentication method uses a common keyword called a shared key for communication between the machine and other devices.
Digital Signature Method
The machine and other devices authenticate each other by mutually verifying their digital signatures.
The machine and other devices authenticate each other by mutually verifying their digital signatures.
* You need to configure the settings to enable the use of SNTP.
ESP/AH
Configure the settings for the ESP or AH protocols to be used for IPSec communication. Use Perfect Forward Secrecy (PFS) for even greater security.
Configuring IPSec
Enable the use of IPSec, and then create and register an IPSec policy. If multiple policies have been created, specify the order in which they are applied. You can create up to 10 policies.
This section describes how to configure the settings using Remote UI from a computer.
On the control panel, select [ Settings/Registration] in the [Home] screen or other screen, and then select [Preferences] to configure the settings. [IPSec Settings]
Administrator or NetworkAdmin privileges are required.
On the control panel, select [
Settings/Registration] in the [Home] screen or other screen, and then select [Preferences] to configure the settings. [IPSec Settings]Administrator or NetworkAdmin privileges are required.
Required Preparations
Connect the machine directly to a computer on the same virtual private network (VPN) as the machine. Confirm the operation conditions, and finish the settings on the computer in advance. IPSec
Prepare the following according to the IKE authentication method:
When using the Pre-Shared Key Method, enable TLS for Remote UI communication. Using TLS
When using the Digital Signature Method, prepare the key and certificate to use, and configure the settings to enable the use of SNTP.
When using PFS, check that PFS is enabled on the communicating device.
1
Log in to Remote UI as an administrator. Starting Remote UI
2
On the Portal page of Remote UI, click [Settings/Registration]. Remote UI Portal Page
3
Click [Network Settings].
The network settings screen is displayed.
4
Click [IPSec Settings].
The [IPSec Settings] screen is displayed.
5
Select the [Use IPSec] checkbox.
To receive only packets that meet the policy, select [Reject] in [Receive Non-Policy Packets].
6
Click [OK].
The network settings screen is displayed again.
7
Click [IPSec Policy List].
The [IPSec Policy List] screen is displayed.
8
Click [Register New IPSec Policy].
The [Register Policy] screen is displayed.
9
Specify the policy name, and select [On] in [Policy On/Off].
For the policy name, enter a name to identify the policy using alphanumeric characters.
10
Restrict the AES key length, as needed.
To restrict the AES key length to 256 bits, such as when you want to meet CC authentication standards, select the [Only Allow 256-bit for AES Key Length] checkbox.
* Canon multifunction machines support two key lengths for the AES encryption method: 128-bit and 256-bit.
11
Set the selector.
1
Click [Selector Settings].
The [Selector] screen is displayed.
2
Set the selector.
[Local Address Settings] and [Remote Address Settings]
Set the IP address to which to apply IPSec communication. Specify the IP address of the machine in [Local Address Settings] and the IP address of the communicating device in [Remote Address Settings].
[All IP Addresses]
Select this to apply IPSec to all IP packets.
[IPv4 Address] or [All IPv4 Addresses]
Select this to apply IPSec communication to IP packets sent and received using an IPv4 address.
[IPv6 Address] or [All IPv6 Addresses]
Select this to apply IPSec communication to IP packets sent and received using an IPv6 address.
[IPv4 Manual Settings]
Select this to specify an IPv4 address to which to apply IPSec communication. Use any of the following methods to specify the IPv4 address to which to apply the settings.
When specifying a single IPv4 address
Select [Single Address], and enter the IPv4 address in [First Address].
Select [Single Address], and enter the IPv4 address in [First Address].
When specifying a range of IPv4 addresses
Select [Range Address], and enter the IPv4 addresses in [First Address] and [Last Address].
Select [Range Address], and enter the IPv4 addresses in [First Address] and [Last Address].
When specifying a range of IPv4 addresses using a subnet mask
Select [Subnet Settings], enter the IPv4 address in [First Address], and enter the subnet mask in [Subnet Settings].
Select [Subnet Settings], enter the IPv4 address in [First Address], and enter the subnet mask in [Subnet Settings].
[IPv6 Manual Settings]
Select this to specify an IPv6 address to which to apply IPSec communication. Use any of the following methods to specify the IPv6 address to which to apply the settings.
When specifying a single IPv6 address
Select [Single Address], and enter the IPv6 address in [First Address].
Select [Single Address], and enter the IPv6 address in [First Address].
When specifying a range of IPv6 addresses
Select [Range Address], and enter the IPv6 addresses in [First Address] and [Last Address].
Select [Range Address], and enter the IPv6 addresses in [First Address] and [Last Address].
When specifying a range of IPv6 addresses using a prefix
Select [Prefix Address], enter the IPv6 address in [First Address], and enter the prefix length in [Prefix Length].
Select [Prefix Address], enter the IPv6 address in [First Address], and enter the prefix length in [Prefix Length].
[Port Settings]
Set the ports to which to apply IPSec communication.
[Specify by Port Number]
Select this to use port numbers when specifying the ports to which IPSec communication applies. Specify the port number of the machine in [Local Port], and specify the port number of the communicating device in [Remote Port].
To apply IPSec communication to all port numbers, select [All Ports].
To apply IPSec communication to a specific port number, press [Single Port], and enter the port number.
[Specify by Service Name]
Select this to use service names when specifying the ports to which IPSec communication applies. Select the checkboxes of the services to which to apply IPSec communication.
3
Click [OK].
The [Register Policy] screen is displayed.
12
Configure the IKE settings.
1
Click [IKE Settings].
The [IKE] screen is displayed.
2
Configure the IKE settings.
[IKE Mode]
Select the operation mode of the key exchange protocol. When [Main] is selected, security is enhanced because the IKE session itself is encrypted, but communication is slower than [Aggressive], which does not perform encryption.
[Validity]
Enter the valid period of IKE SA (ISAKMP SA) to use as the control communication path in minutes.
[Authentication Method]
Select the authentication method of the machine.
If you select [Pre-Shared Key Method], click [Shared Key Settings]  enter the string to use as the shared key using alphanumeric characters click [OK].
If you select [Digital Signature Method], click [Key and Certificate] [Use] of the key and certificate to use.
[Authentication/Encryption Algorithm]
Configure the authentication and encryption algorithm for IKE phase 1.
To automatically set an algorithm that can be used by both this machine and the communicating device, select [Auto].
To specify a particular algorithm, select [Manual Settings], and configure the [Authentication], [Encryption], and [DH Group] settings.
[Authentication]: Select the hash algorithm.
[Encryption]: Select the encryption algorithm.
[DH Group]: Select the Diffie-Hellman group used to determine the key strength.
When [IKE Mode] Is Set to [Main] and [Authentication Method] Is Set to [Pre-Shared Key Method] If you specify more than one address in [Remote Address Settings] in the selector settings, the following restrictions apply when you create multiple policies: For policies with more than one address specified, all shared keys need to be set to the same string. Policies with more than one address specified cannot be set to a higher priority than policies with a single address specified. |
3
Click [OK].
The [Register Policy] screen is displayed again.
13
Configure the IPSec network settings.
1
Click [IPSec Network Settings].
The [IPSec Network] screen is displayed.
2
Configure the IPSec network settings.
[Validity]
Specify the valid period of IPSec SA to use as the data communication path by time, size, or both.
If you select the [Time] checkbox, enter the valid period in minutes.
If you select the [Size] checkbox, enter the valid period in megabytes.
If you select both, the item whose specified value is reached first is applied.
[PFS]
Select this checkbox to configure PFS for the session key.
[Authentication/Encryption Algorithm]
Set the authentication and encryption algorithm for IKE phase 2.
To automatically set the ESP authentication and encryption algorithm, select [Auto].
To specify a particular authentication method, select [Manual Settings], and select one of the following authentication methods.
[ESP]:
Authentication and encryption are both performed.
Select the algorithm in [ESP Authentication] and [ESP Encryption]. If you do not want to set the algorithm, select [NULL].
Authentication and encryption are both performed.
Select the algorithm in [ESP Authentication] and [ESP Encryption]. If you do not want to set the algorithm, select [NULL].
[ESP (AES-GCM)]:
Authentication and encryption are both performed.
AES-GCM is used as the algorithm.
Authentication and encryption are both performed.
AES-GCM is used as the algorithm.
[AH (SHA1)]:
Authentication is performed, but data is not encrypted.
SHA1 is used as the algorithm.
Authentication is performed, but data is not encrypted.
SHA1 is used as the algorithm.
[Connection Mode]
The machine only supports the transport mode.
3
Click [OK].
The [Register Policy] screen is displayed again.
14
Click [OK].
The created policy is added to the [IPSec Policy List] screen.
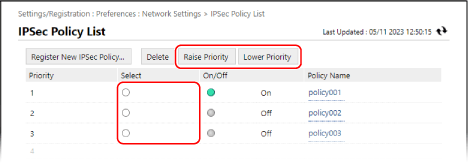
When Multiple Policies Are Registered
Select a policy, and click [Raise Priority] or [Lower Priority] to change the order of the priority. Higher level policies have priority when applied to IPSec communication.
15
Click [Apply Setting Changes] [OK].
The settings are applied.
16
Log out from Remote UI.
NOTE
Editing Registered Policies
To edit the registered information, click the policy name you want to edit on the [IPSec Policy List] screen.