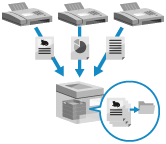
Memory Lock temporarily stores received faxes in the memory of the machine (Memory RX Inbox) without printing them immediately. You can forward faxes stored in the Memory RX Inbox to a specified destination.
You can also configure the settings so that Memory Lock is active only on specified days of the week or at specified time periods, such as on weekends or at night.
Preventing Immediate Printing of Received Faxes
Instead of immediately printing received faxes, you can temporarily store them in the memory of the machine (Memory RX Inbox) or in a storage location specified in advance (Confidential Fax Inbox).
You can use the control panel or Remote UI to check the content of faxes stored in each box before printing them. In addition to preventing printed faxes from being left unattended or stolen, you can save paper by deleting any unnecessary faxes without printing them.
You can also set a PIN for each box to restrict the users that can check or print the received faxes.
Memory Lock
Received Confidential Faxes
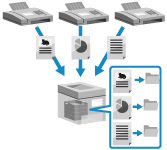
Received documents that match conditions set in advance, such as a destination fax number, are stored in a storage location (Confidential Fax Inbox) specified in advance. The machine has multiple Confidential Fax Inboxes.
For example, you can specify a condition to store all faxes from a particular company to a specific inbox to easily confirm the required documents.
For example, you can specify a condition to store all faxes from a particular company to a specific inbox to easily confirm the required documents.
Setting Memory Lock
To use Memory Lock, configure the settings to allow the use of Memory Lock, and then configure the settings to store received faxes in the memory of the machine (Memory RX Inbox).
This section describes how to configure the settings using Remote UI from a computer.
On the control panel, select the [Home] screen, and then configure the settings in the following order:
On the control panel, select the [Home] screen, and then configure the settings in the following order:
Setting to allow use of Memory Lock: Click [Menu]  [Function Settings] [Set Fax/I-Fax Inbox]
Memory RX Inbox: Click [Fax/I-Fax Inbox] [Memory RX Inbox] [Memory RX Inbox]
Administrator or DeviceAdmin privileges are required.
1
Log in to Remote UI as an administrator. Starting Remote UI
2
On the Portal page of Remote UI, click [Settings/Registration]. Remote UI Portal Page
Configure the settings to allow the use of Memory Lock.
1
Click [Receive/Forward] [Memory Lock Settings].
The [Memory Lock Settings] screen is displayed.
If the [Enter PIN] screen appears, enter the Memory RX Inbox PIN, and then click [OK].
2
Select the [Use Fax Memory Lock] or [Use I-Fax Memory Lock] checkbox.
3
Specify the days of the week and the time periods for using Memory Lock, as needed.
When Specifying the Same Time Period for Every Day
Select [Everyday] in [Specify Memory Lock Start Time] and [Specify Memory Lock End Time], and enter the start and end times in the corresponding input fields for [Everyday].
When Specifying a Different Time Period for Each Day
Select [Specify Days] in [Specify Memory Lock Start Time] and [Specify Memory Lock End Time], and enter the start and end times in the corresponding input fields for each day in [Specify Days].
4
Click [OK].
The settings are applied.
4
Click [To Portal].
The Portal page is displayed.
Configure the Memory RX Inbox settings.
1
Click [Access Received/Stored Files] [Memory RX Inbox] [Memory RX Inbox].
The Memory RX Inbox screen is displayed.
If the [Enter PIN] screen appears, enter the Memory RX Inbox PIN, and then click [OK].
2
Click [Memory Lock Settings].
The [Memory Lock Settings] screen is displayed.
3
Set [Fax Memory Lock] and/or [I-Fax Memory Lock] to [On].
4
Click [OK].
The settings are applied.
5
Set a PIN, as needed.
Click [Settings] to set the PIN of Memory RX Inbox. Select the [Set PIN] checkbox, enter the same number in [PIN] and [Confirm], and click [OK].
6
Log out from Remote UI.
IMPORTANT
When Memory Lock is disabled in the following cases, all faxes and I-Faxes stored in the memory are printed automatically:
When the Memory Lock end time specified in Step 3-3 has been reached.
When [Fax Memory Lock] or [I-Fax Memory Lock] is changed to [Off] in Step 5-3
NOTE
For how to use received faxes stored in Memory Lock, see the following:
Configuring Settings for Receiving Confidential Faxes
To receive confidential faxes, configure the settings to automatically forward received faxes to the Confidential Fax Inbox. You can also configure the Confidential Fax Inbox settings, as needed.
Configuring Settings for Automatically Forwarding to the Confidential Fax Inbox
Register the forwarding conditions (conditions for automatically forwarding to the Confidential Fax Inbox), and specify the Confidential Fax Inbox as the forwarding destination for faxes that meet those conditions.
Setting Confidential Fax Inbox
You can set a name and PIN for each Confidential Fax Inbox, as needed. You can also configure the settings to send an e-mail notice when a fax is stored.
NOTE
For how to use received confidential faxes, see the following: