[Mail Box] TX Settings Screen
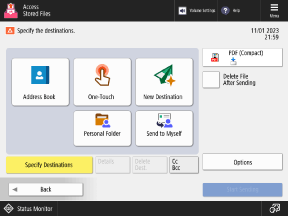
On the file selection screen of Mail Box, select a file and press [Send] to display the TX settings screen.
Use this screen to specify the destination and configure the file format and other settings when sending.
After specifying the destination and configuring the settings when sending, press [Start Sending] to send.
Use this screen to specify the destination and configure the file format and other settings when sending.
After specifying the destination and configuring the settings when sending, press [Start Sending] to send.

* Depending on the setting, the reference for the description here is the description when scanning. Replace "scan" with "send" when referring to it. The description may also include settings that cannot be configured for printing.
Specifying a Destination
Press [Address Book], [One-Touch], or [New Destination], and specify the destination from the Address Book or enter it directly. Specifying Destinations
To specify a folder for a login user (Personal Folder) as a destination, press [Personal Folder].
To specify the e-mail address of a login user as a destination, press [Send to Myself].
When specifying an e-mail address as a Cc or Bcc destination, press [Cc Bcc].
Configuring the Settings for When Sending
File Format
Press the file format setting button at the top right of the screen to set the file format for when sending. Configuring the File Format and Division Settings

* When sending a Mail Box file, you cannot select OOXML as the file format.
[Options]
You can configure other TX settings such as the file name and delayed send settings. [Options] Screen
Sending a File
Press [Start Sending] at the bottom right of the screen to send.
If you select [Delete File After Sending] before you press [Start Sending], the sent file is automatically deleted from the machine.
If you select [Delete File After Sending] before you press [Start Sending], the sent file is automatically deleted from the machine.
NOTE
Registering Frequently Used Settings from [ Menu]
Menu]
 Menu]
Menu]You can register the current settings as default settings. Changing the Default Settings
* The settings used when sending a Mail Box file cannot be registered as "Favorite Settings" or registered as a button to the [Home] screen.
[Options] Screen
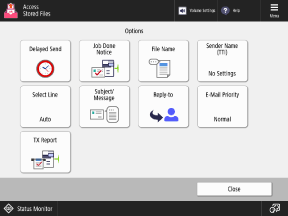
On the TX settings screen, press [Options] to display the [Options] screen.
Press the buttons on this screen to configure the detailed TX settings. After configuring the TX settings, press [Close] to return to the TX settings screen.
Press the buttons on this screen to configure the detailed TX settings. After configuring the TX settings, press [Close] to return to the TX settings screen.

[Delayed Send]
Configure the settings to send a file automatically at a specified time instead of sending it immediately. Delayed Send Settings
[Job Done Notice]
Configure the settings to send a TX result by e-mail when sending is complete. Sending the TX Result by E-mail
[File Name]
Set the file name for when sending. Setting the File Name
[Sender Name (TTI)]
Select the name to be printed as the sender name at the destination when sending by fax. Selecting the Sender Name
[Select Line] (Only when multiple fax lines are available)
Select the line to be used when sending by fax. Selecting the Line to Use for Sending
[Subject/Message]
Set the subject and message of the e-mail when sending by e-mail or I-Fax. Setting the Subject and Message
[Reply-to]
Set the e-mail address (Reply-To) that will be notified to the recipient as the e-mail reply-to destination when sending by e-mail or I-Fax. Setting the Reply-to Destination
[E-Mail Priority]
Set the priority level of the e-mail for when sending by e-mail or I-Fax.
[TX Report]
Configure the settings to print a TX report when sending is complete.
* By default, this report is printed automatically when an error occurs. In addition, depending on the machine settings, you may not be able to configure a TX report from the TX settings screen. [TX Report]