Preparations for Using Advanced Space
To use Advanced Space as a public storage space in the machine, you must configure the settings to open Advanced Space on the network as an SMB or WebDAV server.
SMB
Protocol for sharing files among multiple devices in an intranet.
WebDAV
Protocol that is expanded from HTTP used to send and receive data on the web and enables management of files and folders on a web server.
Because WebDAV also supports TLS encryption, you can construct a file sharing system that is very secure even on the web by using user authentication.
Because WebDAV also supports TLS encryption, you can construct a file sharing system that is very secure even on the web by using user authentication.
You can also configure the settings to perform user authentication when using WebDAV and allow creating a Personal Space, which can be used as a storage space for individual users.
This section describes how to use the control panel to collectively configure the settings required to open Advanced Space.
You can also configure the settings individually using Remote UI from a computer. Managing the Machine from a Computer (Remote UI)
Administrator or NetworkAdmin privileges are required. The machine must be restarted to apply the settings.
You can also configure the settings individually using Remote UI from a computer. Managing the Machine from a Computer (Remote UI)
Administrator or NetworkAdmin privileges are required. The machine must be restarted to apply the settings.
Required Preparations
When opening Advanced Space as a WebDAV server and using TLS to encrypt communication while connected to Advanced Space, specify the key and certificate to use for TLS encrypted communication. Using TLS
1
Log in to the machine as an administrator. Logging In to the Machine
2
On the control panel, press [ Settings/Registration] in the [Home] screen or other screen. [Home] Screen
 Settings/Registration] in the [Home] screen or other screen. [Home] Screen
The [Settings/Registration] screen is displayed.
3
Press [Function Settings]  [Store/Access Files]
  [Advanced Space Settings]
  [Unified Advanced Space Settings].
 [Store/Access Files]
  [Advanced Space Settings]
  [Unified Advanced Space Settings].
The [Unified Advanced Space Settings] screen is displayed.
4
Press [Next].
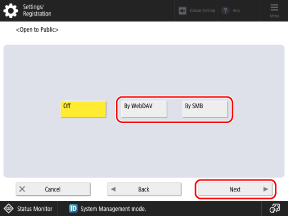
The [Open to Public] screen is displayed.
Select the method to make Advanced Space open to the public, and press [Next].

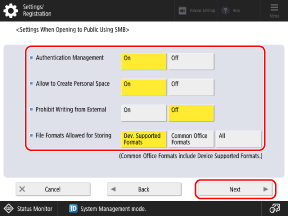
Configure the settings to make Advanced Space open to the public, and press [Next].

[Authentication Management]
To manage authentication of users using Advanced Space, set this to [On]. User authentication of the machine is also applied to Advanced Space. Authenticating Users and Managing Groups
Because Advanced Space is designed to be open to the public on a network, it is recommended to set this to [On] to require user authentication.
If this is set to [Off], anyone on the network can use Advanced Space, so be careful.
Because Advanced Space is designed to be open to the public on a network, it is recommended to set this to [On] to require user authentication.
If this is set to [Off], anyone on the network can use Advanced Space, so be careful.
[Allow to Create Personal Space]
To allow users to create their own Personal Space in Advanced Space, set this to [On].
* This is available only if you set [Authentication Management] to [On].
[Prohibit Writing from External]
To prohibit a user from saving, creating, or deleting files or folders while accessing Advanced Space externally, such as from a computer or other machine, set this to [On].
* Even when this is set to [On], an administrator with Administrator privileges can save, create, and delete files and folders while accessing Advanced Space externally (Shared Space only).
[File Formats Allowed for Storing]
Select the file formats that can be used to save data in Advanced Space.
[Device Supported Formats]: pdf, jpg, jpe, jpeg, tif, tiff, xps, pptx, oxps
[Common Office Formats]: doc, xls, csv, ppt, txt, and other common Office file formats in addition to the formats listed in [Device Supported Formats]
[All]: All file formats
Configure the encryption and authentication settings according to the selected method to make Advanced Space open to the public.
When Opening Advanced Space as an SMB Server

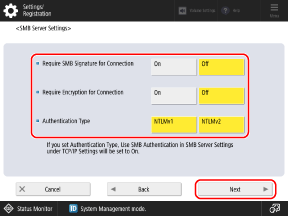
Configure the encryption and authentication settings, and press [Next].

* If you set [Authentication Management] to [Off] in Step 6, this step is not required. Proceed to Step 8.
[Require SMB Signature for Connection]
To request an SMB packet signature when connected to Advanced Space, set this to [On].
[Require Encryption for Connection]
To request connection with SMB v3.0 encryption communications when connected to Advanced Space, set this to [On].
* When this is set to [On], it is not possible to connect to Advanced Space from a client operating system that does not support SMB v3.0 encryption communication.
[Authentication Type]
Select the version of the authentication protocol according to the operating system to be used. You can also select both [NTLMv1] and [NTLMv2].
When Opening Advanced Space as a WebDAV Server
Select whether to use TLS to encrypt communication when connected to Advanced Space, and press [Next].
Press [OK].
9
Press [ Settings/Registration]
  [Yes].
 Settings/Registration]
  [Yes].
The machine restarts, and the settings are applied.
NOTE
Configuring Useful Functions for Advanced Space
You can have the machine send notification by e-mail that a file has been saved in Advanced Space in the machine and add a "hot folder" to enable printing simply by copying the file, as needed.
Creating a Personal Space
To use a Personal Space, each user must create their own Personal Space. Creating a Personal Space in Advanced Space
When Opening Advanced Space as an SMB Server
Depending on the network environment, you may have to set the computer name and workgroup name of the machine. Setting the Computer Name and Workgroup Name
Specify the SMB version to be used on the machine (SMB server), as needed. [Specify SMB Server Version]
* The SMB version should be the same on the server and client. If the versions are different, SMB cannot be used.
Individually Changing the Advanced Space Settings
You can use the [Settings/Registration] menu to change individual settings in the batch settings configured in the procedure above.
*1When you select [By SMB] in Step 5, [Use SMB Server] in [SMB Server Settings] is linked and enabled.
*2When you set [Authentication Type] in Step 7, [Use SMB Authentication] in [SMB Server Settings] is linked and enabled.
*3When you select [By WebDAV] in Step 5, [Use WebDAV Server] is linked and enabled.