Checking the Send or Save Status and Log of Scanned Data
You can check the send or save status and log of data scanned with the machine.
Processes handled by the machine, including sending and saving scanned data are managed as jobs. By checking the status and log of jobs, you can determine whether a job was sent or saved correctly and the cause of errors that occurred.
Depending on the machine settings, you can also resend a job that had a sending error.
* You cannot check the save status and log when saving to Mail Box on the machine. Check that the scanned data is saved to Mail Box. Using the Temporary Storage Space of the Machine (Mail Box)
* If the log is set not to be displayed, you can only check the send and save status. [Display Job Log]
* If the log is set not to be displayed, you can only check the send and save status. [Display Job Log]
NOTE
You can restrict other users from performing operations on the jobs of the login users. [Restrict Access to Other User Jobs]
Checking the Sending and Saving Status
This section describes how to check the status using the control panel.
You can also use Remote UI from a computer to check the status. Checking the Usage and Logs Using Remote UI
You can also use Remote UI from a computer to check the status. Checking the Usage and Logs Using Remote UI
1
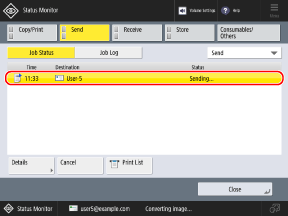
On the control panel, press [ Status Monitor] in the [Home] screen or other screen. [Home] Screen
 Status Monitor] in the [Home] screen or other screen. [Home] Screen
The [Status Monitor] screen is displayed.
2
Press [Send] or [Store], and then press [Job Status].
3
Check the job being processed or waiting to be processed.

When sending statuses are displayed, you can press [Print List] to print the sending status list.
4
Select a job with the details that you want to check, and press [Details].
The job details are displayed.
Check the number of pages and file name.
When Resending a Job That Had a Sending Error

* By default, a job that had a sending error is set to be deleted automatically and cannot be resent. [Delete Failed TX Jobs]
Press [Resend].
If multiple destinations of the same type are set, press [Broadcast List], select a destination, and press [Resend].
To resend to a different destination, press [Change Destination], change the destination, and press [Resend].
NOTE
Changing the Destination of a Job with Delayed Send Set
While the machine is waiting to send (until the specified time), you can press [Change Destination] in Step 5 to change the destination.
However, the destination cannot be changed in the following cases:
However, the destination cannot be changed in the following cases:
When multiple destinations are specified
When the destinations that can be specified during sending are restricted to registered destinations only Sending Only to Registered Destinations
Checking the Log
This section describes how to check the log using the control panel.
You can also use Remote UI from a computer to check the log. Checking the Usage and Logs Using Remote UI
You can also use Remote UI from a computer to check the log. Checking the Usage and Logs Using Remote UI
1
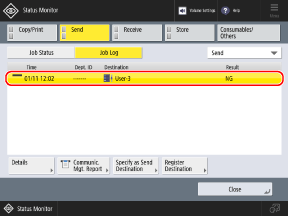
On the control panel, press [ Status Monitor] in the [Home] screen or other screen. [Home] Screen
 Status Monitor] in the [Home] screen or other screen. [Home] Screen
The [Status Monitor] screen is displayed.
2
Press [Send] or [Store], and then press [Job Log].
Check the jobs that were sent or saved.

When the TX log is displayed, press [Communication Management Report] to print the TX log list.
When the store log is displayed, press [Print List] to print the store log list.
4
Select a job to view its details, and press [Details].
The job details are displayed.
5
Check the number of pages and file name.
If [NG] is displayed for [Result]
Sending or saving was canceled, or an error occurred.
If a three-digit number starting with "#" is displayed in [Error Code], you can check the cause and solution using the error code. An Error Code Is Displayed (#xxx)
If a three-digit number starting with "#" is displayed in [Error Code], you can check the cause and solution using the error code. An Error Code Is Displayed (#xxx)
NOTE
Number of Pages in Jobs Set to Skip Blank Originals
[Original Pages] displayed in the job details shows the number of pages including blank pages.
You can check the number of pages after skipping blank pages in [Send Pages] or [Stored Pages] displayed in the job details.
Specifying and Registering Destinations from the TX Log
You can select a job in Step 3 and press [Specify as Send Destination] or [Register Destinations] to specify the same destination as the TX log or register a destination to the Address Book.